🧢 Beautiful ✨ Detailed πŸ’ Adorable

Kitty Scarf and Cat Hat Pattern

Kitty Scarf and Cat Hat Pattern
4.7β˜… Rating
2-4 Hours Time Needed
3.9K Made This
βœ‚οΈ

Beginner Friendly Level

Perfect for those just starting their crochet journey, with clear instructions and simple techniques

⏱️

Bite-Sized Project

Finishes in 2-4 hoursβ€”perfect for an afternoon of creative relaxation.

🧣

Snug Essential

Everyday comfort with practical charm, designed for both functionality and style through changing seasons.

About This Kitty Scarf and Cat Hat Pattern

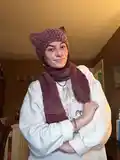
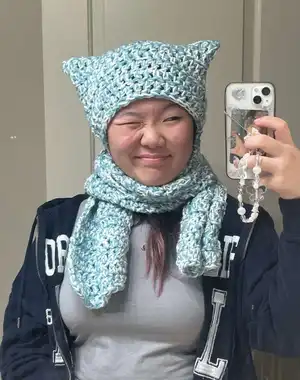
This pattern creates a cozy scarf with an off-center cat ear hat worked directly from the scarf edge. It uses simple double crochet rows and straightforward seaming to form the hat ears. The design is adjustable for width and length so you can personalize fit and style. Perfect for making wearable, playful accessories for yourself or as thoughtful handmade gifts.

Kitty Scarf and Cat Hat Pattern crochet pattern - detailed view of completed project

Includes clear step-by-step instructions, photos, and measurement guidelines for consistency. Uses basic crochet techniques and minimal finishing for quick results.

Why You'll Love This Kitty Scarf and Cat Hat Pattern

I absolutely love this pattern because it turns simple crochet stitches into a playful, wearable set that always gets compliments. I enjoy how easily you can personalize the width and length to make every set unique. The off-center hat placement is a clever trick I use to balance the scarf when worn, and I find that small detail makes a big difference. Making this pattern feels cozy and satisfying, and I love gifting finished sets to friends who appreciate handmade accessories.

Kitty Scarf and Cat Hat Pattern step 1 - construction progress Kitty Scarf and Cat Hat Pattern step 2 - assembly progress Kitty Scarf and Cat Hat Pattern step 3 - details and accessories Kitty Scarf and Cat Hat Pattern step 4 - final assembly and finishing

Switch Things Up

I love how easily you can customize this pattern by changing yarn colors; try ombre or two contrasting strands for a bold look.

If you want a chunkier result, use a bulkier yarn and a larger hook to create a squishy, warm set that works well for cold weather.

To make a mini version for a keychain or doll, use fingering or sport weight yarn and a smaller hook, reducing foundation chains proportionally.

I often add embroidered whiskers or a tiny felt nose to the hat to turn it into a character-style kitty with personality.

Try crocheting the hat panel in a textured stitch like hdc or a shell stitch to give the ears more structure and visual interest.

For a slouchier hat, increase the hat panel width slightly before folding so the ear points are more relaxed.

Make matching mittens or fingerless gloves by using the same yarn and stitch pattern to create a coordinated set.

Swap one of the two strands for a novelty yarn (like eyelash or metallic) for a subtle sparkle without changing the stitch fabric drastically.

I sometimes add a lining with soft fleece or finer crochet fabric inside the hat for extra warmth and a neater inside finish.

Play with different placement of the off-center hat β€” moving it left or right slightly changes how the scarf hangs when worn, so test before final sewing.

Common Mistakes & How to Fix Them

βœ— Skipping the measuring step for your initial chain leads to an uneven scarf width; measure the chain to match the recommended 22cm / 20 stitches or adjust to your preference. βœ— Not making the two turning chains at the start of each row can create a lopsided edge; always chain two and turn so your rows line up neatly. βœ— Failing to mark the middle and second stitch marker on the scarf will make hat placement inaccurate; place the middle marker first and then the second marker about 11cm away for correct off-center placement. βœ— Working with inconsistent tension will change the final size and drape of the scarf; maintain even tension and check measurements as you go to ensure consistent results.

Kitty Scarf and Cat Hat Pattern

Make a cozy kitty scarf with an off-center cat ear hat using simple double crochet rows. This pattern is versatile, beginner-friendly, and perfect for gifting or everyday wear. You can customize width, length, and yarn to create a unique set that suits your style. Follow the clear step-by-step instructions and photos to finish a warm, playful accessory.

Beginner Friendly 2-4 Hours

Materials Needed for Kitty Scarf and Cat Hat Pattern

β€” Main Fabric

  • 01
    Two strands held together of worsted weight yarn (#4) - approx 300g total
  • 02
    Suggested yarns used by designer: Drops Cotton Merino and Drops Brushed Alpaca Silk (about 3 skeins each held together)
  • 03
    Use any worsted weight yarn you like; adjust hook size accordingly
  • 04
    No special colors required; use matching or contrasting strands to change texture and look

β€” Tools Required

  • 01
    Crochet hook (use any hook that fits your yarn weight; designer used a 7mm hook)
  • 02
    Tapestry needle for weaving in ends
  • 03
    Measuring tape
  • 04
    Stitch markers (at least two)
  • 05
    Scissors

Progress Tracker

0% Complete

β€” Scarf :

Row 1 :

Chain your desired scarf width. I did approx. 22cm / 20 stitches.

Row 2 :

Do two more chains (these are your turning chains). Do one dc into the third stitch from hook. Do one dc into each chain.

Info :

At the start of each row do two chains and turn your work. It does not matter, whether you count the turning chain as a stitch, this is up to your personal preference. I do not count my turning chains as stitches.

Row 3 - Row 65 :

Do rows with dc until you reach your desired scarf length. Fasten off. I did 130cm / 65 rows.

β€” Cat Hat :

Info :

Mark the middle of the scarf with a stitch marker.

Step 1 :

Attach a second stitch marker approx. 11cm away. It does not matter, whether to the left or right.

Step 2 :

Attach yarn at the second stitch marker. Start working dc into the side of the scarf, away from the first stitch marker. I do 2 stitches per row.

Step 3 :

Do dc until you reach approx. 28cm. I did 28 stitches.

Step 4 :

Do rows with dc until your hat part is approx. 36cm long. I did 18 rows.

Step 5 :

Fold the hat part in half. Sl st together along sides (dotted lines). Fasten off. Turn hat inside out.

Info :

The cat hat is worked off center. That way, the scarf will be (approximately) the same length on both sides when wearing it.

Assembly Instructions

  • Mark the center of the scarf with a stitch marker, then place a second stitch marker approximately 11cm away to mark hat attachment placement.
  • Attach yarn at the second stitch marker and work double crochet into the side of the scarf, working away from the middle marker to build the hat panel.
  • When the hat panel reaches approx 36cm in height, fold it in half and slip stitch along the two side edges to close the hat (follow the dotted-line seam placement in photos).
  • Fasten off and turn the hat inside out so the seam sits on the inside and the cat ear points form naturally at the top corners.
  • Check placement so the hat is off-center on the scarf; this ensures the scarf hangs approximately the same on both sides when worn.

Important Notes

  • πŸ’‘Use two strands held together for a similar bulky look as the sample and to achieve the same gauge and drape.
  • πŸ’‘Measure your chain after the foundation row to ensure the scarf width matches the recommended 22cm or adjust stitches to fit your preference.
  • πŸ’‘Place and check stitch markers for middle and second placement before attaching the hat to ensure off-center alignment is correct.
  • πŸ’‘Keep consistent tension when working double crochet rows to maintain even fabric and accurate length measurements.

This cozy kitty scarf and cat hat set is a fun and fast make that adds personality to any winter outfit. Make one for yourself or create a matching set for a friend β€” the off-center hat placement is a delightful finishing touch. Enjoy experimenting with yarns and colors to make every set unique. πŸ§ΆπŸ’™

You ask,

we answer.

FAQs

What size will the finished piece be?

The finished scarf in the sample measures approx 130cm long and 22cm wide (20 foundation stitches); the hat panel measures approx 28cm wide by 36cm tall before folding.

Can I use different yarn weights for this pattern?

Yes, but changing yarn weight will affect final size; if you use thicker yarn, the set will be chunkier and larger β€” adjust hook accordingly and check measurements as you go.

Do I need prior crochet experience for this pattern?

This pattern is beginner-friendly and mainly uses double crochet and chains, so basic crochet knowledge is helpful but the instructions are clear for newer crocheters.

How long does this project typically take to complete?

Most crocheters finish this set in about 2-4 hours depending on yarn weight, hook size, and how long you make the scarf.