🧢 Beautiful ✨ Detailed πŸ’ Adorable

Sailor Girl Amigurumi Pattern

Sailor Girl Amigurumi Pattern
4.1β˜… Rating
8-10 Hours Time Needed
4.1K Made This
βœ‚οΈ

Intermediate Level

Ideal for those with basic crochet experience, featuring slightly more advanced stitches and techniques to expand your skills.

⏱️

All-Day Adventure

Requires 8-10 hours, ideal for a full day of immersive crocheting.

🧸

Cute Companion

An adorable friend to cherish, handcrafted with love to bring comfort and joy for years to come.

About This Sailor Girl Amigurumi Pattern

This pattern creates an adorable Sailor Girl amigurumi complete with a hat, skirt, bag and curly hair. It includes full round-by-round instructions for head, body, arms, legs, skirt, hat and bag with photo references. The design uses color changes and textured stitches to build charming sailor details.

Sailor Girl Amigurumi Pattern crochet pattern - detailed view of completed project

Perfect for makers who enjoy a little shaping and assembly, the pattern shows where to place safety eyes and how to attach hair and accessories. Follow the clear rounds and assembly tips to achieve a neat finished doll.

Why You'll Love This Sailor Girl Amigurumi Pattern

I absolutely love this pattern because it balances adorable details with clear step-by-step rounds that make shaping enjoyable. I love the curly hair technique β€” it gives the doll a lively personality and is very satisfying to make. I also enjoy the sailor outfit details, like the striped hat and layered skirt, which let me play with color and texture. I designed the pattern to be forgiving during assembly so you can position features until they look just right.

Sailor Girl Amigurumi Pattern step 1 - construction progress Sailor Girl Amigurumi Pattern step 2 - assembly progress Sailor Girl Amigurumi Pattern step 3 - details and accessories Sailor Girl Amigurumi Pattern step 4 - final assembly and finishing

Switch Things Up

I love how easy it is to customize this Sailor Girl by swapping colors; try pastel shades for a soft vintage look or bright primaries for a playful version.

You can make the doll bigger or smaller simply by changing yarn weight and hook sizeβ€”use thicker yarn and a larger hook for a chunky, cuddly toy or finer yarn and a smaller hook for a mini keychain version.

I often add embroidered freckles, blush or small facial expressions to give personality β€” experiment with eyebrow angles and mouth shapes for different moods.

Try different hair styles: replace the curly strands with braids, a bun, or short bob by changing how you attach and style the hair pieces.

Mix and match accessories; make several hats, bags or shoes in contrasting colors to create outfits and seasonal looks for your doll.

For safety and durability, I sometimes sew buttons or felt accents instead of small beads if the doll is intended for children.

I also like to change the skirt length or add a ruffle row to create a different silhouette β€” adding more rounds or using taller stitches gives more flare.

If you want posable limbs, consider adding thin wire inside the arms and legs before stuffing to allow gentle posing.

To create a themed set, change the bag and hat colors and add tiny appliques like anchors, stars, or initials for a personalized touch.

Finally, swap the eye style: use embroidered eyes for a soft look or different sized safety eyes to alter the doll's expression and scale.

Common Mistakes & How to Fix Them

βœ— Skipping stitch markers during rounds with increases can cause miscounts and uneven shaping; place a marker at the start of each round and after major increases to stay accurate. βœ— Failing to stuff gradually will leave lumps or a misshapen body; stuff small amounts evenly as you go and shape with your fingers to keep smooth curves. βœ— Changing tension between pieces makes seams and joins look different; maintain consistent tension across all parts or adjust hook size to match. βœ— Attaching safety eyes too late or in the wrong round causes misplacement; attach safety eyes to the head between rounds 18-19 with 8 sc between them as instructed. βœ— Overfilling the sleeves or limbs can distort hems and joins; fill sleeves a little as directed and stop when the intended shape is achieved. βœ— Not leaving long tails for sewing makes assembly harder; leave the long thread where instructed (for example after head rounds) to make sewing easier and neater.

Sailor Girl Amigurumi Pattern

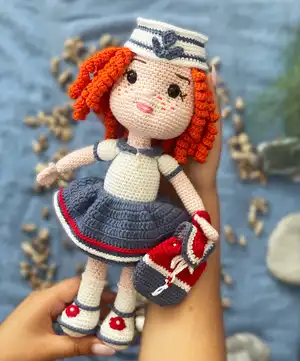
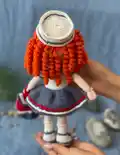
Make a charming Sailor Girl amigurumi with step-by-step rounds, clear photos, and helpful assembly notes. This pattern guides you through the head, body, hair, clothes and accessories so you can create a beautiful handmade doll. You will enjoy the detailed stitch counts and practical tips that help you finish a polished, gift-ready toy.

Intermediate 8-10 Hours

Materials Needed for Sailor Girl Amigurumi Pattern

β€” Main Fabric

  • 01
    Yarn - Main: Light Pink (skin) - small amount
  • 02
    Yarn - A Color: White (used for blouse, socks, hat) - small amount
  • 03
    Yarn - B Color: Sailor Blue (skirt, shoe details, hat stripes) - small amount
  • 04
    Yarn - C Color: Orange (hair) - small amount
  • 05
    Yarn - D Color: Red (bag and skirt detail) - small amount

β€” Tools Required

  • 01
    Crochet hook size 2.5 mm (or a size that fits your yarn)
  • 02
    Scissors
  • 03
    Polyester stuffing
  • 04
    Tapestry needle for sewing parts
  • 05
    Stitch markers
  • 06
    Pins for assembly
  • 07
    Safety eyes (2 pieces)
  • 08
    Awl or stuffing tool

Progress Tracker

0% Complete

Info :

Materials: Yarn. 2.5 mm hook size or a size that fits your yarn. Scissors, stuffing, tapestry needle, stitch marker and pins. Main Color: Light Pink A: White B: Sailor Blue C: Orange D: Red. FINISHED SIZE Around 20 cm in circumference, about 10 cm in length.

β€” Head :

Round 1 :

6 sc in a magic ring

Round 2 :

6 sc inc(12 sc)

Round 3 :

1 sc into sc next inc(18 sc)

Round 4 :

2 sc into sc next inc(24 sc)

Round 5 :

3 sc into sc next inc(30 sc)

Round 6 :

4 sc into sc next inc(36 sc)

Round 7 :

5 scinto sc next inc(42 sc)

Round 8 :

6 sc into sc next inc(48 sc)

Round 9 :

7 sc into sc next inc(54 sc)

Round 10-20 :

(11 ring)sc into sc(54 sc)

Round 21 :

18 sc into sc(6 sc inc)6 sc into sc(6 sc inc)18 sc into sc(66 sc)

Info :

A Color

Round 22-27 :

(6 ring)sc into sc(66 sc)

Round 28 :

(6 times)9 sc into sc next dec(60 sc)

Round 29 :

(6 times)8 sc into sc next dec(54 sc)

Round 30 :

(6 times)7 sc into sc next dec(48 sc)

Info :

Attach the safety eyes to rnd 18-19. There should be 8 sc between them.

Round 31 :

(6 times)6 sc into sc next dec(42 sc)

Round 32 :

(6 times)5 sc into sc next dec(36 sc)

Round 33 :

(6 times)4 sc into sc next dec(30 sc)

Round 34 :

(6 times)3 sc into sc next dec(24 sc)

Round 35 :

(6 times)2 sc into sc next dec(18 sc)

Round 36-39 :

(4 ring)sc into sc(18 sc)fo. Leave a long thread for sewing.
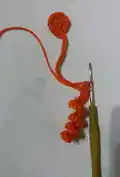
β€” HAIRS :

Info :

C Color

Round 1 :

8 sc in a magic ring

Round 2 :

8 sc inc(18 sc)

Round 3 :

45 ch.turn 35 ch into 2 sc(70 sc)10 sc into sc 11 strand.

Round 4 :

Top Layer -50 ch 40 ch into 2 sc(80 sc)10 ch into sc 11 strand.(22 strand)

β€” LEGS and BODY :

Info :

A Color

Round 1 :

6 ch

Round 2 :

6 ch inc (12 sc)

Round 3 :

3 sc into sc (6 sc inc)3 sc into sc(18 sc)

Round 4 :

6 sc into sc(6 sc inc)6 sc into sc (24 sc)

Round 5 :

8 sc into sc(8 sc inc)8 sc into sc(32 sc)

Round 6 :

Only in flo sc into sc(32 sc)

Round 7-8 :

(2 ring)sc into sc(32 sc)

Round 9 :

8 sc into sc(8 sc dec)8 sc into sc(24 sc)

Round 10 :

8 sc into sc(6 sc dec)8 sc into sc(18 sc)

Round 11-12 :

(2 ring)sc into sc(18 sc)

Round 13 :

Only in flo sc into sc(18 sc)

Round 14 :

(2 times)8 sc into sc next dec(16 sc)

Round 15-20 :

(6 ring)sc into sc(16 sc)

Info :

Main Color

Round 21 :

Only in flo sc into sc(16 sc)

Info :

Stuff the legs tightly. Keep filling as you go.

Round 22-34 :

(13 ring)sc into sc(16 sc)

Round 35 :

(2 times)8 sc into sc next inc(18 sc)

Round 36 :

(2 times)9 sc into sc next inc(20 sc)

Round 37 :

sc into sc(20 sc)

Round 38 :

Join the legs. 20 sc into sc 4 ch 20 sc into sc

Round 39 :

20 sc into sc 4 ch into sc 20 sc into sc ch's unworked rnd sc(48 sc)

Round 40-49 :

(10 ring)sc into sc(48 sc)

Round 50 :

(6 times)6 sc into sc next dec(42 sc)

Info :

A Color

Round 51 :

Only in flo sc into sc (42 sc)

Round 52-58 :

(7 ring)sc into sc(42 sc)

Round 59 :

(6 times)5 sc into sc next dec(36 sc)

Round 60 :

sc into sc(36 sc)

Round 61 :

(6 times)4 sc into sc next dec(30 sc)

Round 62 :

(6 times)3 sc into sc next dec(24 sc)

Round 63 :

Only in flo sc into sc(24 sc)

Info :

Main Color

Round 64 :

sc into sc (24 sc)

Round 65 :

(6 times)2 sc into sc next dec(18 sc)

Round 66 :

(6 times)1 sc into sc next dec(12 sc)

Round 67-68 :

(2 ring)sc into sc(12 sc)fo.

β€” SKIRT :

Info :

B Color

Round 1 :

(rnd-51 in blo sc into sc (42 sc)

Round 2 :

1 sc into 2 cr(84 cr)

Round 3-4 :

(2 times)cr into cr(84 cr)

Round 5 :

(15 times)5 cr into cr next inc(99 cr)

Round 6 :

Only in flo cr into cr(99 cr)

Round 7 :

Only in flo cr into cr(99 cr)

Round 8 :

Only in flo cr into hdc(99 hdc)

Round 9 :

Only in blo hdc into sc(99 sc)fo.

Info :

SKIRT DETAIL - D Color

Round 6 :

in blo sc into sc(99 sc)

Info :

A Color

Round 7 :

in blo sc into sc(99 sc)fo.

β€” ARMS :

Info :

Main Color - Make 2

Round 1 :

6 sc in a magic ring

Round 2 :

6 sc inc(12 sc)

Round 3-7 :

(5 ring)sc into sc(12 sc)

Round 8 :

6 sc into sc (3 ch)6 sc into sc(12 sc)

Round 9 :

6 sc into sc(3 ch out)6 sc into sc(12 sc)

Round 10 :

6 sc dec(6 sc)

Round 11 :

6 sc into sc

Round 12 :

6 sc inc (12 sc)

Round 13-25 :

(13 ring)sc into sc(12 sc)

Round 26 :

A color - only in flo sc into(12 sc)

Info :

Fill the sleeves a little

Round 27 :

(6 times)1 sc into sc next inc(18 sc)

Round 28-31 :

(4 ring)sc into sc(18 sc)

Round 32 :

(6 times)1 sc into sc next dec(12 sc)

Round 33 :

Straighten it.

Info :

Dip the awl into both layers. 6 sc fo.

β€” HAT :

Info :

A Color

Round 1 :

6 sc in a magic ring

Round 2 :

6 sc inc(12 sc)

Round 3 :

(6 times)1 sc into sc next inc(18 sc)

Round 4 :

(6 times)2 sc into sc next inc(24 sc)

Round 5 :

(6 times)3 sc into sc next inc(30 sc)

Round 6 :

(6 times)4 sc into sc next inc(36 sc)

Round 7 :

(6 times)5 sc into sc next inc(42 sc)

Round 8 :

(6 times)6 sc into sc next inc(48 sc)

Round 9 :

(6 times)7 sc into sc next inc(54 sc)

Round 10 :

Only in flo sc into sc(54 sc)

Round 11-12 :

(2 ring)sc into sc(54 sc)

Round 13 :

B color - sc into sc(54 sc)

Round 14 :

A Color - sc into sc(54 sc)

Round 15 :

sc into sc(54 sc)fo.

Round 10 (Detail) :

only in blo B color -sc into sc(54 sc)

Round 2 (Detail) :

A color - (2 ring)sc into sc(54 sc)fo.

β€” BAG :

Info :

B Color

Round 1 :

10 ch.

Round 2 :

10 ch into 20 sc

Round 3 :

10 sc into sc next inc(22 sc)

Round 4 :

(2 times)11 sc into sc next inc(24 sc)

Round 5 :

only in flo sc into sc(24 sc)

Round 6 :

(12 times)1 sc into sc next inc(36 sc)

Round 7-11 :

(5 ring)sc into sc(36 sc)

Round 12-13 :

(2 ring)A color-sc into sc(36 sc)

Round 14-18 :

D color (5 ring)sc into sc(36 sc)

Round 19 :

sc into hdc(36 hdc)fo.

Info :

Cover of the Bag - D Color

Round 1 :

12 ch.

Round 2 :

12 ch into 24 sc

Round 3 :

1 sc into sc next inc(36 sc)

Round 4 :

sc into sc(36 sc)

Round 5 :

A color - sc into sc (36 sc)

Round 6 :

2 sc into sc next inc(48 sc)

Round 7 :

B color - sc into sc(48 sc)fo.

β€” DETAILS :

Info :

Shoes Detail - Rnd 6 - B color - Only in blo sc into sc(32 sc) Rnd 13 - only in blo sc into sc(16 sc)

Info :

Socks Detail - Rnd 21 - A color - only in blo sc into sc(16 sc)

Assembly Instructions

  • Attach the safety eyes to the head between rounds 18-19, leaving 8 single crochet stitches between them, then secure the safety backs firmly.
  • Leave a long thread at the top of the head (after round 36-39 fo) for sewing; use this tail to attach the head to the body securely with a whipstitch.
  • Stuff the legs tightly and keep filling as you go; join the legs as instructed in round 38-39, then continue the body rounds and sew the opening closed.
  • Position the arms on either side of the body and fill the sleeves a little before sewing; pin them in place and sew through the body rounds for a firm attachment.
  • Sew the skirt to the body opening following the blo/flo placement in the skirt rounds so the stripes sit evenly around the waist.
  • Attach the hat and hair after finishing the head; sew hair strands/curls into the head in rows, referring to the photos for placement and density.

Important Notes

  • πŸ’‘Use stitch markers to keep track of your rounds, especially when working in blo or flo and during shaping sections.
  • πŸ’‘Stuff firmly but not too tightly for the best shape and structureβ€”overstuffing can distort seams and details.
  • πŸ’‘Pin all parts (arms, skirt, hat, hair) in place before sewing to ensure correct positioning and symmetry.
  • πŸ’‘Weave in ends as you go to avoid a tedious finishing session at the end and to keep the inside of the doll neat.

This Sailor Girl amigurumi pattern mixes sweet details and playful textures to create a lovely handmade doll. Perfect for gifting or keeping as a charming decor piece. Follow the rounds and photos to bring this sailor to lifeβ€”happy crocheting! 🧢✨

You ask,

we answer.

FAQs

What size will the finished piece be?

The finished amigurumi measures approximately 20 cm in circumference and about 10 cm in length when using the recommended yarn and 2.5 mm hook.

Can I use different yarn weights for this pattern?

Yes, you can use different yarn weights but the final size will change; choose an appropriate hook for your yarn and make a gauge test to adjust proportions.

Do I need prior crochet experience for this pattern?

This pattern is rated intermediate, so familiarity with basic stitches (sc, inc, dec, blo/flo) and working in rounds is recommended for best results.

How long does this project typically take to complete?

Most crocheters complete this project in 8-10 hours, though time may vary based on experience level and how much time you spend on assembly and finishing.

Where should I place the safety eyes?

Attach the safety eyes between rounds 18-19 on the head, leaving eight single crochet stitches between them for correct placement.