🧢 Beautiful ✨ Detailed πŸ’ Adorable

Koala Amigurumi Pattern

Koala Amigurumi Pattern
4.2β˜… Rating
2-3 Hours Time Needed
1.2K Made This
βœ‚οΈ

Beginner Friendly Level

Perfect for those just starting their crochet journey, with clear instructions and simple techniques

⏱️

Bite-Sized Project

Finishes in 2-4 hoursβ€”perfect for an afternoon of creative relaxation.

🧸

Cute Companion

An adorable friend to cherish, handcrafted with love to bring comfort and joy for years to come.

About This Koala Amigurumi Pattern

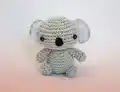
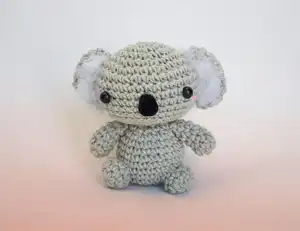
This pattern teaches you how to crochet a tiny koala amigurumi, approximately 7 cm tall using the recommended yarn and hook. You will crochet a head, body, hands, legs and ears, then assemble them with clear photo guidance. The design features fluffy white ear details created with acrylic yarn for a realistic look.

Koala Amigurumi Pattern crochet pattern - detailed view of completed project

Simple single crochet rounds and basic increases/decreases are used throughout. Finished koala makes a charming gift or a sweet addition to your amigurumi collection.

Why You'll Love This Koala Amigurumi Pattern

I absolutely love this pattern because it captures the sweet personality of a koala in a very small, quick project. I enjoy how simple single crochet shaping creates a rounded, huggable form with minimal effort. The fluffy ear finishing technique adds delightful texture and character that really brings the toy to life. I love that this pattern is approachable for newer crocheters yet yields a polished, professional-looking result.

Koala Amigurumi Pattern step 1 - construction progress Koala Amigurumi Pattern step 2 - assembly progress Koala Amigurumi Pattern step 3 - details and accessories Koala Amigurumi Pattern step 4 - final assembly and finishing

Switch Things Up

I love how easily this koala can be customized by changing yarn colors; try pastel grays, beige, or even a soft mint for a playful twist.

I often make a larger version by switching to worsted weight yarn and a 4 mm hook to create a cuddlier, bigger toy.

I sometimes replace safety eyes with embroidered eyes for a fully baby-safe toy appropriate for little ones.

I like to add tiny crocheted accessories like a scarf, hat, or flower to change the character and make seasonal versions.

I recommend experimenting with the shaggy ear technique: use thinner or thicker acrylic yarn to vary the fluffiness and overall look.

I sometimes embroider a small smile instead of using felt for a different expression and easier washing.

I add wire inside the arms when I want a poseable version that can hold tiny props like a miniature leaf.

I also try different nose shapes from felt or crocheted rounds to alter the koala's face subtly and give it personality.

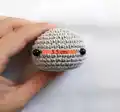
I encourage trying contrast cheeks by using different pink shades or blush techniques with yarn to create unique expressions.

I enjoy making a whole family set by varying sizes and colors so they nest together for display or gifting.

Common Mistakes & How to Fix Them
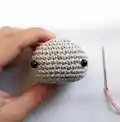
βœ— Forgetting to insert safety eyes before stuffing the head can make placement difficult later; insert the safety eyes between rnd 8 and rnd 9 as instructed and secure them before filling. βœ— Overstuffing the head or body will distort the shaping and roundness; stuff gradually and evenly, adding small amounts of fiberfill until you achieve firm but supple shape. βœ— Not leaving a long tail when fastening off the body or limbs makes sewing pieces together harder; leave a long tail on the body and limbs to sew pieces securely with a yarn needle. βœ— Skipping stitch counting during increases and decreases leads to incorrect stitch totals and misshapen parts; count stitches after each round and check the totals shown in each round. βœ— Using an inappropriate hook size for the yarn will change finished size and create gaps; use a 2.5 mm hook or a hook that gives a tight fabric for amigurumi and check your gauge. βœ— Attaching ears or limbs without pinning first can result in asymmetry and uneven placement; pin parts in place, check positioning from multiple angles, then sew securely.

Koala Amigurumi Pattern

Create an adorable pocket-sized koala with this easy-to-follow crochet pattern. You will make a cute little amigurumi using simple single crochet shaping, assemble the parts, and add fluffy ears for extra charm. Perfect for gifting or keeping as a sweet handmade companion. Follow the step-by-step rounds and photo-guided finishing tips for best results.

Beginner Friendly 2-3 Hours

Materials Needed for Koala Amigurumi Pattern

β€” Main Fabric

  • 01
    Gray cotton yarn (main body color) - amount as needed for a 7 cm koala
  • 02
    Pink cotton yarn - small amount for cheek detail
  • 03
    White acrylic yarn - small amount for shaggy inner ear detailing
  • 04
    Black felt fabric - small scrap for nose
  • 05
    Fiberfill (polyester stuffing) - small amount for head and body

β€” Tools Required

  • 01
    Crochet hook size 2.5 mm (3/0 - 4/0)
  • 02
    5 mm safety eyes (2 pieces)
  • 03
    Scissors
  • 04
    Fabric glue
  • 05
    Sewing needle and yarn needle for assembly
  • 06
    Pins for positioning parts
  • 07
    Pet brush or dog brush for teasing acrylic yarn into shaggy ear
  • 08
    Small embroidery or tapestry needle for sewing felt nose

Progress Tracker

0% Complete

β€” Head :

Round 1 :

6sc in magic ring (6)

Round 2 :

(inc) repeat 6 times (12)

Round 3 :

(sc in next st , inc) repeat 6 times (18)

Round 4 :

(sc in next 2 sts , inc) repeat 6 times (24)

Round 5 :

(sc in next 3 sts , inc) repeat 6 times (30)

Round 6 :

(sc in next 5 sts , inc) repeat 5 times (35)

Round 7-11 :

sc in each st around (35)

Round 12 :

(sc in next 3 sts , dec) repeat 7 times (28)

Round 13 :

(sc in next 2 sts, dec) repeat 7 times (21)

Round 14 :

(sc in next st , dec) repeat 7 times (14) , fasten off and stuff.

Info :

Insert safety eyes between rnd 8 and rnd 9

β€” Body :

Round 1 :

6sc in magic ring (6)

Round 2 :

(inc) repeat 6 times (12)

Round 3 :

(sc in next st , inc) repeat 6 times (18)

Round 4 :

(sc in next 5 sts , inc) repeat 3 times (21)

Round 5-10 :

sc in each st around (21)

Round 11 :

(sc in next 2 st, dec) repeat 5 times, sc in next st (16)

Round 12 :

(sc in next st , dec) repeat 5 times, sc in next st (11), fasten off and leaving tail for sewing then stuff.

β€” Hand (make 2) :

Round 1 :

6sc in magic ring (6)

Round 2-6 :

sc in each st around (6) fasten off, leave tail and stuff carefully

β€” Leg (make 2) :

Round 1 :

8sc in magic ring (8)

Round 2-3 :

sc in each st around (8) fasten off, leave tail and stuff carefully

β€” Ear (make 2) :

Round 1 :

6sc in magic ring (6)

Round 2 :

(inc) repeat 6 times (12)

Round 3 :

(sc in next st , inc) repeat 6 times (18)

Round 4 :

(sc in next 2 sts , dec) repeat 4 times, sc in next 2 st (14)

Round 5 :

sc in each st (14) Fasten off, leave tail . (No need stuffing)

β€” Assembly :

Info :

With pink cotton yarn, make small line under the eyes

Info :

Cut felt fabric into a shape like the example (nose shape) and attach with glue or sew in place

Info :

Set the head and body with pins then sew them together

Info :

Pin the hands and sew again

Info :

Sew the legs to the bottom of the body, spacing them evenly for stability

Info :

Set the ears and sew them

Info :

Prepare white acrylic yarn for shaggy ears

Info :

Starting from the lower end of the ear, follow the arrow direction to loop white yarn through the ear edge

Info :

We will make a knot every 4 ply yarn

Info :

Repeat up until the top of ears (6-7 knot)

Info :

Use scissors to trim any excess length of shaggy yarn if it looks too long

Info :

I use dog brush to untangle acrylic yarn

Info :

Brush the white yarn slowly to create a fluffy effect

Info :

Finish by trimming and shaping the shaggy ear fibers and securing any loose ends

Assembly Instructions

  • Attach the head to the body by aligning the body opening to the base of the head and sew securely through the rounds using the long tail left from the body; use pins to hold pieces in place while sewing.
  • Position and secure the safety eyes between rounds 8 and 9 of the head before stuffing, then add the pink cheek stitches beneath the eyes as shown.
  • Pin the hands on either side of the body where you prefer the arms to sit, then sew them in place with small whipstitches and weave in ends.
  • Sew the legs to the bottom of the body, spacing them evenly to ensure the koala can sit; use pins to check symmetry before stitching.
  • Sew the ears onto each side of the head, then use white acrylic yarn looped and knotted along the ear edge to create the shaggy inner ear, repeating knots about 6-7 times up to the top.
  • Brush the white acrylic yarn gently with a pet brush to separate fibers and create a fluffy ear finish; trim and tidy the shag to the desired shape.

Important Notes

  • πŸ’‘Insert safety eyes before stuffing the head and secure them firmly to avoid movement or slipping later.
  • πŸ’‘Stuff the head and body gradually and evenly to maintain good shape and avoid lumps; do not overstuff which can distort shaping.
  • πŸ’‘Pin all parts in place before sewing to ensure correct alignment and symmetry, then remove pins as you stitch each piece securely.

Thank you for choosing this Koala Amigurumi Pattern β€” I hope it brings you joy as you stitch and assemble this tiny friend. Take your time with the fluffy ears and finishing touches for the best personality-packed result. Share your finished koala with friends or keep it as a special handmade memento. 🧢🐨

You ask,

we answer.

FAQs

What size will the finished piece be?

The size of the finished doll is approximately 7 cm (2.8") when using the recommended yarn and a 2.5 mm crochet hook.

Can I use different yarn weights for this pattern?

Yes, you can use different yarn weights, but this will affect the final size; use an appropriate hook for your chosen yarn and expect the finished koala to be larger or smaller.

Do I need special tools to create the shaggy ears?

A pet brush or dog brush is recommended to untangle and fluff the acrylic yarn used for the shaggy ear effect; scissors and a needle are also useful for trimming and securing knots.

Do I need prior crochet experience for this pattern?

This pattern is beginner friendly and uses basic single crochet increases and decreases, but basic knowledge of magic ring, increases, and decreases will help you follow the rounds easily.

How long does this project typically take to complete?

Most crocheters complete this project in 2-3 hours, though time may vary based on experience level, finishing detail, and how much time you spend on the shaggy ear styling.