🧢 Beautiful ✨ Detailed πŸ’ Adorable

Lady Bunny Amigurumi Pattern

Lady Bunny Amigurumi Pattern
4.1β˜… Rating
5-7 Hours Time Needed
3.4K Made This
βœ‚οΈ

Intermediate Level

Ideal for those with basic crochet experience, featuring slightly more advanced stitches and techniques to expand your skills.

⏱️

Weekend Treat

Takes 5-7 hours, making it an enjoyable project to finish over a couple of days.

🧸

Cute Companion

An adorable friend to cherish, handcrafted with love to bring comfort and joy for years to come.

About This Lady Bunny Amigurumi Pattern

This pattern makes a delicate Lady Bunny amigurumi complete with a removable dress, tiny shoes, flowers and a basket of carrots. The design features small decorative details like coronets, dress flowers and embroidered facial features. You will work in rounds using standard amigurumi shaping and surface embroidery for the face.

Lady Bunny Amigurumi Pattern crochet pattern - detailed view of completed project

Clear round-by-round instructions are included for every part: head, ears, arms, legs, dress, basket and carrots. The pattern includes materials, abbreviations and assembly tips to help you finish a polished toy.

Why You'll Love This Lady Bunny Amigurumi Pattern

I absolutely love this pattern because it combines classic amigurumi shaping with dainty decorative details that make each bunny feel unique. I enjoy the small finishing touches like the coronet flowers and the tiny basket of carrots because they bring so much personality to the piece. The shaping is satisfying and predictable, so I can relax while stitching and still achieve a neat result every time. I find the dress and accessories provide a lot of room for creativity, which always keeps me inspired to make more variations.

Lady Bunny Amigurumi Pattern step 1 - construction progress Lady Bunny Amigurumi Pattern step 2 - assembly progress Lady Bunny Amigurumi Pattern step 3 - details and accessories Lady Bunny Amigurumi Pattern step 4 - final assembly and finishing

Switch Things Up

I love making variations of this bunny by changing colors and trims; try pastel shades for a softer look or bold colors for a playful twist.

I often change yarn weight and hook size to create different scalesβ€”use a thicker yarn with a larger hook for a plush, cuddly version or finer yarn for a tiny, collectible bunny.

I add small accessories like scarves, tiny hats, or embroidered initials to personalize each bunny and make them perfect gifts.

Try different flower combinations for the coronet: make three identical flowers or mix colors for a wildflower effect.

Swap the embroidered face for safety eyes for a different expression, but secure them tightly if the toy is for a child.

I sometimes add wire inside the limbs for posability; use thin craft wire and wrap it before inserting to keep it secure.

Experiment with the dress: lengthen or shorten the skirt rounds to change the silhouette or add a scalloped edge for a delicate finish.

Replace pearl beads with tiny buttons or embroidered dots to vary the dress embellishments and make each bunny unique.

Use variegated or ombre yarn for the dress to create an effortless gradient without changing colors mid-project.

For seasonal versions, switch the basket contents (pumpkins for autumn, tiny eggs for spring) and adjust colors to match the holiday theme.

Common Mistakes & How to Fix Them

βœ— Skipping stitch markers during leg join and torso shaping can make the join uneven; mark your first stitch and the join point to keep symmetry while you join the legs. βœ— Not stuffing as you go causes lumps and distortion later in the shaping; stuff gradually and firmly while working through the shaping rounds to maintain a smooth silhouette. βœ— Ignoring front loop/back loop instructions will change the skirt and cuff textures; work only in flo or blo exactly where indicated to match the pattern's texture. βœ— Forgetting to leave long thread ends for sewing makes assembly harder; always leave long tails at the end of parts to make sewing and finishing much easier.

Lady Bunny Amigurumi Pattern

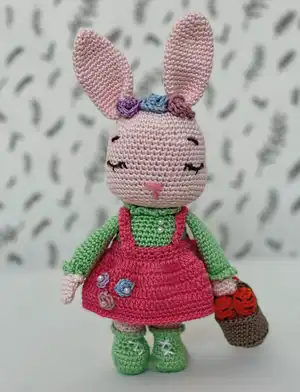
Bring a sweet handmade friend to life with this charming Lady Bunny amigurumi pattern. You will crochet a detailed bunny with dress, flowers, basket and tiny carrots using simple shaping and finishing techniques. The pattern includes step-by-step rounds, materials, abbreviations and assembly tips so you can follow along with confidence. Perfect as a special gift or a decorative keepsake for your home.

Intermediate 5-7 Hours

Materials Needed for Lady Bunny Amigurumi Pattern

β€” Main Fabric

  • 01
    Yarn suitable for 2.5 mm hook (fine/light weight recommended) in multiple colors
  • 02
    Main Color: Soft Pink (A) - head, ears, hands, feet
  • 03
    Soft Green (B) - body, sleeves, shoes and green sections between legs
  • 04
    Dark Pink (C) - dress (B color in pattern notes)
  • 05
    Smoked color (C) - decorative coronet/rose color options
  • 06
    Orange color (D) - carrots (small quantities)
  • 07
    Additional small amounts of contrasting colors for flowers and details

β€” Tools Required

  • 01
    Crochet hook size 2.5 mm (or size that fits your yarn)
  • 02
    Scissors
  • 03
    Polyester stuffing
  • 04
    Tapestry/yarn needle for sewing
  • 05
    Stitch markers
  • 06
    Pins for assembly
  • 07
    Small pearl beads or decorative buttons for dress (optional)
  • 08
    Embroidery thread for facial details
  • 09
    Sewing needle for attaching beads and flowers

Progress Tracker

0% Complete

β€” Materials :

Infos :

Yarn - 2.5 mm hook size or a size that fits your yarn - Scissors, stuffing, tapestry needle, stitch marker and pins. Main Color: Soft Pink A: Soft Green B: Dark Pink C: Smoked color D: Orange color (green color between the legs). FINISHED SIZE Around 20 cm in circumference, about 10 cm in length.
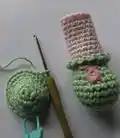
β€” Legs and Torso :

Round 1 :

8 sc in a magic ring

Round 2 :

8 sc inc(16 sc)

Round 3 :

5 sc into sc(5 sc inc)6 sc into sc(21 sc)

Round 4-6 :

(3 ring)sc into sc(21 sc)

Round 7 :

6 sc into sc(5 sc dec)6 sc into sc(16 sc)

Round 8 :

6 sc into sc(2 sc dec)6 sc into sc(14 sc)

Round 9-11 :

(3 ring)sc into sc(14 sc) Ana color

Round 12 :

Only in flo sc into sc(14 sc)

Round 13-21 :

(9 ring)sc into sc(14 sc)

Round 22 :

Put the legs together, make 2 ch together. sc into sc(30 sc)

Info :

Tightly stuff the legs. Keep filling as you go.

Round 23 :

14 sc into sc(2 ch into 4 sc )14 sc into sc(32 sc)

Round 24-26 :

(3 ring)sc into sc(32 sc)

Info :

A COLOR

Round 27 :

(4 times)6 sc into sc next inc(36 sc)

Round 28-35 :

(8 ring)sc into sc (36 sc)

Round 36 :

(6 times)5 sc into sc next dec(30 sc)

Round 37 :

Sc into sc (30 sc)

Round 38 :

(6 times)5 sc into sc next dec(24 sc)

Round 39 :

Sc into sc(24 sc)

Round 40 :

Only in flo sc into sc(24 sc)

Round 41 :

Only in blo sc into 3 ch fo

β€” Ears :

Item Name (P1) :

EARS (Make 2) Main color

Round 1 :

6 sc in a magic ring

Round 2 :

(3 times)1 sc into sc next inc(9 sc)

Round 3 :

(3 times)2 sc into sc next inc(12 sc)

Round 4 :

(2 times)5 sc into sc next inc(14 sc)

Round 5 :

(2 times)6 sc into sc next inc(16 sc)

Round 6 :

(2 times)7 sc into sc next inc(18 sc)

Round 7 :

(2 times)8 sc into sc next inc(20 sc)

Round 8-17 :

(10 ring)sc into sc(20 sc)

Round 18 :

(4 times)4 sc into sc next dec(16 sc)

Round 19 :

Sc into sc(16 sc)fo.

Info :

Leave a long thread end for sewing.

β€” Arms :

Item Name (P1) :

ARMS (Make 2) Main Color

Round 1 :

5 ch.ch into sc(10 sc)

Round 2-5 :

(4 ring)sc into sc(10 sc)

Round 6 :

5 sc into sc 2 ch. 2 ch into sc 5 sc into sc

Round 7 :

2 ch out next 10 sc into sc

Round 8 :

(4 times)2 sc into sc next dec (6 sc)

Round 9 :

(4times)2 sc into sc next inc(10 sc)

Round 10 :

(4 times)3 sc into sc next inc(14 sc)

Info :

A COLOR

Round 11 :

Only in flo sc into sc(14 sc)

Round 12-22 :

(11 ring)sc into sc(14 sc)fo.

Info :

Straighten. Dip the crochet in both layers. (7 sc) fo.

Info :

Leave a long thread end for sewing.

β€” Head :

Info :

HEAD Main Color

Round 1 :

6 sc in a magic ring

Round 2 :

6 sc inc(12 sc)

Round 3 :

1 sc into sc next inc(18 sc)

Round 4 :

2 sc into sc next inc(24 sc)

Round 5 :

3 sc into sc next inc(30 sc)

Round 6 :

4 sc into sc next inc(36 sc)

Round 7 :

5 sc into sc next inc(42 sc)

Round 8 :

6 sc into sc next inc(48 sc)

Round 9-14 :

(6 ring)sc into sc(48 sc)

Round 15 :

11 sc into sc(3 sc inc)20 sc into sc(3 sc inc)11 sc into sc(54 sc)

Round 16 :

Sc into sc(54 sc)

Round 17 :

13 sc into sc(3 sc inc)22 sc into sc(3 sc inc)13 sc into sc(60 sc)

Round 18-21 :

(4 ring)sc into sc(60 sc)

Round 22 :

8 sc into sc next dec(54 sc)

Round 23 :

7 sc into sc next dec(48 sc)

Round 24 :

6 sc into sc next dec(42 sc)

Round 25 :

5 sc into sc next dec (36 sc)

Round 26 :

4 sc into sc next dec(30 sc)

Info :

Fill the head tightly.

Round 27 :

3 sc into sc next dec(24 sc)

Round 28 :

2 sc into sc next dec(18 sc)

Round 29 :

Sc into sc (18 sc)fo.

Info :

Leave a long thread end for sewing.

β€” Rabbit\'s Dress :

Info :

B COLOR

Round 1 :

40 ch.

Round 2 :

40 ch into sc(40 sc)

Round 3-4 :

(2 ring)sc into sc (40 sc)

Round 5 :

Sc into 2 ch(80 cr)

Round 6-8 :

(3 ring)cr into cr (80 cr)

Round 9-10 :

(2 ring)cr into sc(80 sc)

Round 11 :

Only in blo sc into sc(80 sc)fo.

Item Name (P1) :

CLOTHES HANGERS (Make 2) 30 ch.ch into sc (30 sc) fo.

Info :

Leave a long thread end for sewing.

β€” Basket & Carrots :

Round 1 :

8 sc in a magic ring

Round 2 :

8 sc inc(16 sc)

Round 3 :

1 sc into sc next inc(24 sc)

Round 4 :

2 sc into sc next inc(32 sc)

Round 5 :

Only in flo sc into sc(32 sc)

Round 6-11 :

(6 ring)sc into sc(32 sc)

Round 12 :

Basket hanger - 20 ch.

Round 13 :

20 ch into 20 sc fo.

Info :

CARROT D COLOR

Round 1 :

8 sc in a magic ring

Round 2-8 :

(7 ring)sc into sc(8 sc)

Round 9 :

1 sc dec(7 sc)

Round 10 :

1 sc dec(6 sc)

Round 11 :

1 sc dec(5 sc)

Round 12 :

1 sc dec (4 sc)

Round 13 :

1 sc dec(3 sc)fo.

β€” Making of the Parts :

Info :

Make all parts as instructed: sew ears to the top of the head, embroider the face, attach arms and legs, sew dress and add flowers and pearls as decoration.

β€” Flowers :

Item Name (P1) :

DRESS FLOWER (MAKE 3) 8 sc in a magic ring fo. Leave a long thread end for sewing.

Item Name (P2) :

CORONET(MAKE 3) 10 ch. 1 ch into 3 cr 1 ch into 1 sc(15 cr 5 sc) Fo. Leave a long thread end for sewing.

Assembly Instructions

  • Sew the ears to the top center of the head, positioning them symmetrically and using a long tail to secure them firmly from the inside.
  • Embroider the eyes, eyelashes and nose onto the head before final assembly, using reference photos for placement and securing threads inside the head.
  • Sew arms to the sides of the torso between the designated rounds, angling slightly forward so they rest naturally along the dress.
  • Attach the legs to the bottom of the torso where indicated, sewing through multiple stitches for a secure join and ensuring the bunny stands balanced.

Important Notes

  • πŸ’‘Use stitch markers to mark the beginning of each round and the leg-joining point to ensure symmetry.
  • πŸ’‘Stuff parts firmly but gradually to maintain smooth shapes and avoid overstuffing which can distort the crochet fabric.
  • πŸ’‘Leave long thread ends when finishing parts so you have enough length to sew pieces together securely.

This Lady Bunny pattern brings a delicate handmade friend to your craft table with charming accessories and pretty details. Whether you make her for a child or as a decoration, she is sure to bring smiles and warm memories. Enjoy every stitch and personalize her dress and flowers to make each bunny uniquely yours. 🧢🌸

You ask,

we answer.

FAQs

What size will the finished piece be?

The finished amigurumi measures around 20 cm in circumference and about 10 cm in length using the recommended yarn and 2.5 mm hook.

Can I use different yarn weights for this pattern?

Yes, but changing yarn weight will alter the final size; choose an appropriate hook and adjust stuffing and finishing accordingly.

Do I need prior crochet experience for this pattern?

This pattern is rated intermediate, so basic knowledge of single crochet, increases, decreases, and working in rounds is recommended.

How long does this project typically take to complete?

Most crocheters finish this project in 5-7 hours, though time may vary by experience and the number of decorative details you add.