🧢 Beautiful ✨ Detailed πŸ’ Adorable

Ladybug Keychains Amigurumi Pattern

Ladybug Keychains Amigurumi Pattern
4.4β˜… Rating
2-3 Hours Time Needed
1.9K Made This
βœ‚οΈ

Intermediate Level

Ideal for those with basic crochet experience, featuring slightly more advanced stitches and techniques to expand your skills.

⏱️

Bite-Sized Project

Finishes in 2-4 hoursβ€”perfect for an afternoon of creative relaxation.

🎁

Tiny Treasure

Small, sweet, and gift-worthy creations that fit perfectly in the palm of your hand with detailed charm.

About This Ladybug Keychains Amigurumi Pattern

This pattern teaches you to crochet small ladybug keychains made from DK yarn, stitched in continuous rounds and finished with embroidered spots. You will create two matching halves, join them together, stuff lightly and attach a simple keychain. Suitable for makers who enjoy small projects with finishing and embroidery details.

Ladybug Keychains Amigurumi Pattern crochet pattern - detailed view of completed project

Clear row-by-row instructions cover forming the back, tummy, joining, head attachment and decoration. Everything you need for a polished, gift-ready ladybug keychain is included.

Why You'll Love This Ladybug Keychains Amigurumi Pattern

I absolutely love this pattern because it turns simple crochet techniques into a charming finished accessory that people actually use. I enjoy the quick satisfaction of making a complete keychain in an afternoon and the tiny scale makes them addictive to stitch. The embroidery step is a lovely way to add personality and practice embroidery skills on crochet fabric. I also appreciate that the pattern uses small amounts of yarn so you can experiment with many colorways without waste.

Ladybug Keychains Amigurumi Pattern step 1 - construction progress Ladybug Keychains Amigurumi Pattern step 2 - assembly progress Ladybug Keychains Amigurumi Pattern step 3 - details and accessories Ladybug Keychains Amigurumi Pattern step 4 - final assembly and finishing

Switch Things Up

I love swapping colors to make each ladybug unique; try coral, mustard or teal instead of red for a modern twist.

I sometimes use a 4mm hook and bulky yarn to make a chunky, plush keychain version that stands out on a bag.

I also experiment with metallic or variegated DK yarns for subtle shimmer or color changes along the back.

For a miniature charm, use sport or fingering weight yarn with a 2.5mm hook and reduce stuffing to keep it delicate.

I like to replace embroidered spots with tiny felt circles glued or sewn on for a different texture.

Try adding a tiny bow, bell or crocheted scarf to personalize each ladybug for gifting occasions.

I add a short length of jewelry chain between the keyring and head for a more professional keychain look.

For safety around children, I sew on a tiny crocheted loop and secure the keyring with extra whipping stitches instead of leaving a metal split ring exposed.

I also create matching sets in complementary colors and package them as gift bundles for craft sales.

Sometimes I embroider simple faces or antennae with black yarn to give each ladybug a playful personality.

Common Mistakes & How to Fix Them

βœ— Skipping the stitch marker during continuous rounds leads to lost stitch counts; place a marker at the end of each round to maintain accuracy. βœ— Overstuffing the body causes the seams to stretch and stuffing to show through; stuff gradually and keep pressure moderate so sections can be gently squeezed when pinched. βœ— Cutting ends flush immediately leaves nothing to weave in for secure joins; leave the specified long ends for sewing and weaving, then trim flush after securing. βœ— Joining wrong sides together without aligning stitches can create uneven seams; line up starting points and count stitches before slip stitching to join for a neat finish.

Ladybug Keychains Amigurumi Pattern

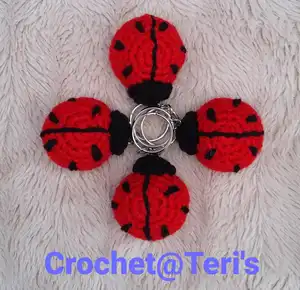
Create charming ladybug keychains using DK weight yarn and a 3mm hook. This pattern guides you through making small, stuffed ladybird halves, joining them, embroidering spots and attaching a keychain for a delightful finished piece. Perfect for gifting or selling as tiny handmade treasures, the instructions are clear and easy to follow.

Intermediate 2-3 Hours

Materials Needed for Ladybug Keychains Amigurumi Pattern

β€” Main Fabric

  • 01
    Hayfield Bonus (DK) Ladybird 0698 - 5g (red)
  • 02
    Hayfield Bonus (DK) Black 0965 - oddment (black)
  • 03
    Hi-Loft quality toy stuffing - small amount
  • 04
    Keychain - metal split ring or key ring

β€” Tools Required

  • 01
    3mm crochet hook
  • 02
    Wool needle (for sewing and embroidery)
  • 03
    Scissors
  • 04
    Stitch marker
  • 05
    Small pins (optional for positioning)
  • 06
    Tapestry needle for weaving ends

Progress Tracker

0% Complete

β€” Materials :

Info :

Hayfield Bonus (DK) Ladybird 0698 - 5g. Hayfield Bonus (DK) Black 0965 - Oddment. Hi-Loft Quality Toy Stuffing. Keychain. 3mm Crochet Hook. Wool Needle (for sewing).

β€” Abbreviations :

Info :

ch - chain. dc - double crochet. htr - half treble crochet. inc - 2 double crochet stitches into next stitch. sl st - slip stitch. f/o - fasten off by slip stitch in next stitch.

β€” Note :

Info :

Unless stated work in continuous rounds marking last stitch of each row with a stitch marker before proceeding with the next. When stuffing parts make sure that you don’t overstuff them as you don’t want the stuffing to show through when complete. Each part should be filled just enough that it can be easily squeezed when pinched firmly.

β€” Ladybug Back :

Round 1 :

ch2, dc 6 into 2nd st from hook (alternatively dc 6sts into magic ring) (6)

Round 2 :

inc x6 (12)

Round 3 :

(dc into next st, inc) x6 (18)

Round 4 :

dc (18)

Round 5 :

(dc into next 2sts, inc) x6 (24)

Round 6 :

dc (24)

Info :

F/O leaving a short end. Weave short end through back of bun. DO NOT CUT FLUSH.

β€” Ladybug Tummy :

Round 1 :

ch2, dc 6 into 2nd st from hook (alternatively dc 6sts into magic ring) (6)

Round 2 :

inc x6 (12)

Round 3 :

(dc into next st, inc) x6 (18)

Round 4 :

(dc into next 2sts, inc) x6 (24)

β€” Joining Row :

Round 5 :

place the 2 halves of the ladybug wrong sides together and sl st to join, ch1, htr into next 23sts (24, ch1 counts as 1st st) sl st to join

Info :

F/O leaving a 15cm end. Secure ends with a couple of small sts. Weave end through body and cut flush to finish.

β€” Ladybug Back (second piece) :

Round 1 :

leaving a 15cm end, ch2, dc 6 into 2nd st from hook (alternatively dc 6sts into magic ring) (6)

Round 2 :

flip 15cm end to front of work, inc x6 (12)

Round 3 :

dc (12)

Info :

F/O leaving a 50cm end.

β€” Attaching Head :

Info :

Using 50cm end from head, thread through tummy section just behind the F/O join. Then working straight up from entry point, come out through the ladybugs back, 3 rows above the htr join row. Catch in opposite edge of head and pull tight to position. Using small mattress sts attach head to body. DO NOT CUT END.

β€” Back Stripe and Spots :

Info :

Using remainder of 50cm end and small running sts, embroider a straight line down the ladybug’s back making sure that you go across the starting circle. Now using a split st (small running sts that catch in each end of previous running st), work back along the back finishing up at head join. Using small embroidery daisy (ch) sts sew 3 spots on each side of back making sure that they are fairly symmetrical.. Weave ends through inside of ladybug’s body and cut flush to finish.

β€” Attaching Keychain :

Info :

Thread keychain onto 15cm end. Do 3 small back sts to attach the keychain to top of head. Secure end with a couple of small sts. Weave end through body and cut flush to finish.

β€” US Terms :

Info :

The following is the US terms version of the same pattern for makers using US stitch names. Materials and amounts are the same as listed above.

β€” Abbreviations (US) :

Info :

ch - chain. sc - double crochet. hdc - half treble crochet. inc - 2 double crochet stitches into next stitch. sl st - slip stitch. f/o - fasten off by slip stitch in next stitch.

β€” Note (US) :

Info :

Unless stated work in continuous rounds marking last stitch of each row with a stitch marker before proceeding with the next. When stuffing parts make sure that you don’t overstuff them as you don’t want the stuffing to show through when complete. Each part should be filled just enough that it can be easily squeezed when pinched firmly.

β€” Ladybug Back (US) :

Round 1 :

ch2, sc 6 into 2nd st from hook (alternatively sc 6sts into magic ring) (6)

Round 2 :

inc x6 (12)

Round 3 :

(sc into next st, inc) x6 (18)

Round 4 :

sc (18)

Round 5 :

(sc into next 2sts, inc) x6 (24)

Round 6 :

sc (24)

Info :

F/O leaving a short end. Weave short end through back of bun. DO NOT CUT FLUSH.

β€” Ladybug Tummy (US) :

Round 1 :

ch2, sc 6 into 2nd st from hook (alternatively sc 6sts into magic ring) (6)

Round 2 :

inc x6 (12)

Round 3 :

(sc into next st, inc) x6 (18)

Round 4 :

(sc into next 2sts, inc) x6 (24)

β€” Joining Row (US) :

Round 5 :

place the 2 halves of the ladybug wrong sides together and sl st to join, ch1, hdc into next 23sts (24, ch1 counts as 1st st) sl st to join

Info :

F/O leaving a 15cm end. Secure ends with a couple of small sts. Weave end through body and cut flush to finish.

β€” Ladybug Back (US second piece) :

Round 1 :

leaving a 15cm end, ch2, sc 6 into 2nd st from hook (alternatively sc 6sts into magic ring) (6)

Round 2 :

flip 15cm end to front of work, inc x6 (12)

Round 3 :

sc (12)

Info :

F/O leaving a 50cm end.

β€” Attaching Head (US) :

Info :

Using 50cm end from head, thread through tummy section just behind the F/O join. Then working straight up from entry point, come out through the ladybugs back, 3 rows above the hdc join row. Catch in opposite edge of head and pull tight to position. Using small mattress sts attach head to body. DO NOT CUT END.

β€” Back Stripe and Spots (US) :

Info :

Using remainder of 50cm end and small running sts, embroider a straight line down the ladybug’s back making sure that you go across the starting circle. Now using a split st (small running sts that catch in each end of previous running st), work back along the back finishing up at head join. Using small embroidery daisy (ch) sts sew 3 spots on each side of back making sure that they are fairly symmetrical.. Weave ends through inside of ladybug’s body and cut flush to finish.

β€” Attaching Keychain (US) :

Info :

Thread keychain onto 15cm end. Do 3 small back sts to attach the keychain to top of head. Secure end with a couple of small sts. Weave end through body and cut flush to finish.

Assembly Instructions

  • Join the two ladybug halves wrong sides together with a slip stitch, then work around with ch1 and htr/hdc into the next 23 stitches, slip stitch to join; leave a 15cm end for the keychain and finish as instructed.
  • Using the 50cm tail from the head, thread through the tummy section behind the F/O join, come out 3 rows above the join on the back, catch the opposite edge and pull tight, then attach the head to the body with small mattress stitches.
  • Embroider the centre back stripe with remaining tail using small running stitches and a split stitch to work back along the line, then add three daisy (chain) stitch spots on each side symmetrically.
  • Thread the keyring onto the 15cm tail, secure with three small back stitches at the top of the head, reinforce with a couple of small stitches and weave the end through the body before cutting flush.

Important Notes

  • πŸ’‘Work in continuous rounds and mark the last stitch of each round with a stitch marker to keep track of rounds.
  • πŸ’‘Do not overstuff the parts; fill just enough so they can be slightly squeezed when pinched for correct shaping.
  • πŸ’‘Leave specified long ends for sewing and attaching head/keychain; weave and secure before trimming flush.

These tiny ladybug keychains are a delightful project for using up small yarn scraps and practicing finishing skills. They make wonderful gifts, bag charms or market items and come together quickly with pleasant finishing steps. Try different colorways for unique little friends and enjoy the satisfaction of tiny handmade creations. 🐞🧢

You ask,

we answer.

FAQs

What size will the finished piece be?

The finished ladybug keychain measures approximately 4-5 cm across when using DK weight yarn and a 3mm hook, though size may vary slightly with tension.

Can I use different yarn weights for this pattern?

Yes, you can use different yarn weights; using a thicker yarn and larger hook will make a chunkier keychain while thinner yarn will make a smaller one. Adjust stuffing and keychain attachment accordingly.

Do I need prior crochet experience for this pattern?

This pattern is rated intermediate; you should be comfortable working in continuous rounds, increasing, and sewing pieces together, although the individual stitches are straightforward.

How long does this project typically take to complete?

Most crocheters can finish a single ladybug keychain in about 2-3 hours, depending on experience and how much time is spent on embroidery and finishing.