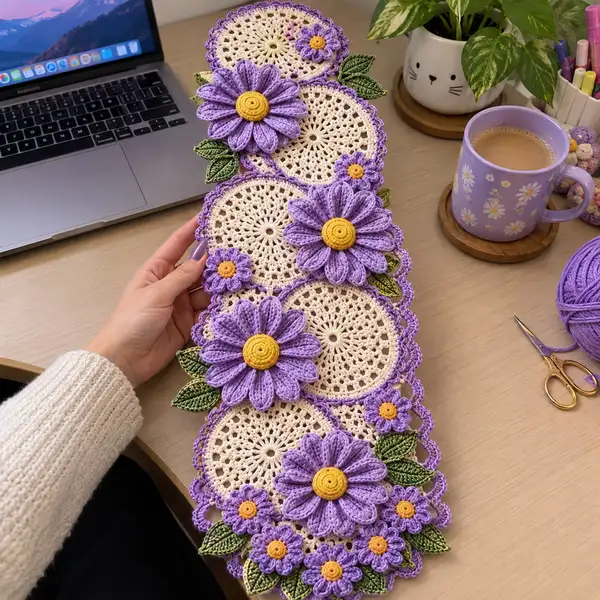
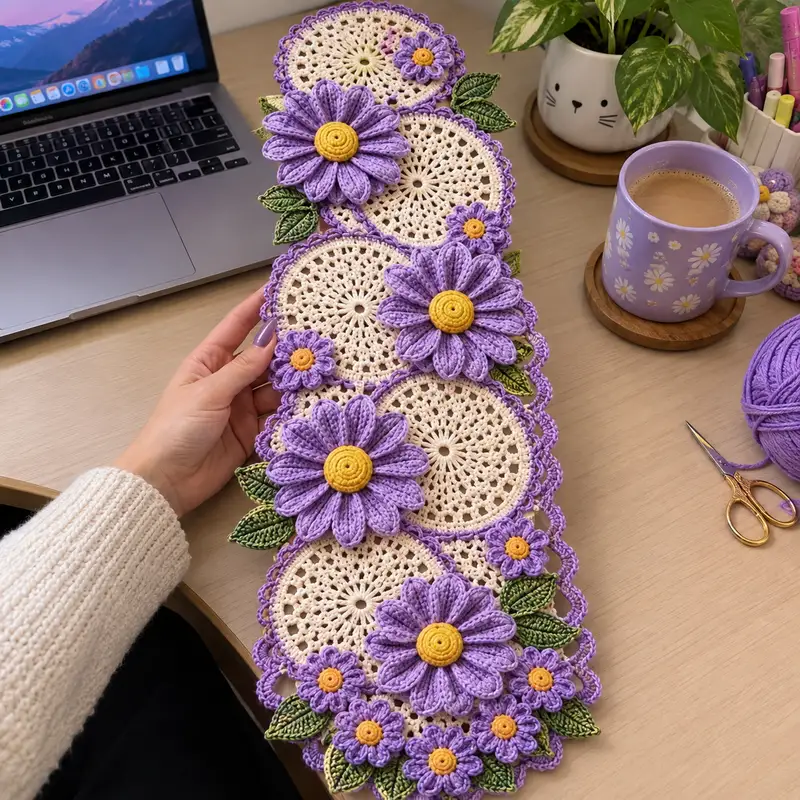
Create a charming lavender daisy table runner made from linked cream doily motifs, raised purple daisies with bright yellow centers, and sculpted green leaves. This decorative runner features scalloped edging and layered floral appliques for a handmade centerpiece that brightens any table. Perfect for spring or summer decor, the pattern uses cotton or cotton-blend yarn for crisp stitch definition and easy blocking. Detailed step-by-step rounds and assembly guidance included to recreate this piece with precision.
Progress Tracker
0% Complete
— Center Doily Motif (Make 5) :
Round 1 :
Make a magic ring, ch1, 8 sc in ring, pull tight (8)
Round 2 :
Inc in each st around (16)
Round 3 :
(1 sc, inc) x 8 (24)
Round 4 :
(2 sc, inc) x 8 (32)
Round 5 :
(3 sc, inc) x 8 (40)
Info :
Keep rounds tight and even; this early solid round gives a stable base for later lace. Use a stitch marker to mark round start.
Round 6 :
(4 sc, inc) x 8 (48)
Round 7 :
1 sc in each st around (48)
Round 8 :
Ch3 (counts as dc), *sk 1 st, 5 dc in next st (shell), sk 1 st, dc in next st* repeat around to make 12 shells and 12 dc (visual count: 12 shells)
Info :
Round 8 forms the first ring of shells; do not fasten off. The counts are shells rather than single-stitch totals—treat each shell as a unit for alignment.
Round 9 :
In each shell: ch2, (3 dc, ch2, 3 dc) in ch between shell peaks, sl st to join (12 clusters)
Round 10 :
Ch1, sc evenly in each dc and ch space around (count: 48 sc equivalent across round)
Round 11 :
*Ch4, skip 3 sc, sc in next st* around (12 ch4 loops)
Round 12 :
In each ch4 loop: sc, hdc, 3 dc, hdc, sc (12 picot shells)
Info :
At this stage your doily should be approximately 10-11 cm across (depending on yarn). Block now to flatten and set lace before attaching petals or edging.
Round 13 :
Ch1, sc in each stitch and in each picot apex around to create an even ring suitable for attaching edging (approx 72 sc counted including picot apexes)
Round 14 :
*(Ch3, sl st) in next st to create small decorative loops* repeat around to create 24 small loops for scallop anchors (24 loops)
Round 15 :
1 sc in each st around providing a smooth border for joining (approx 72)
Info :
Make five identical doily motifs. After finishing, gently block each motif to exact diameter and shape. Pin rounds into position to match size before joining to maintain consistent scallops.
— Lavender Scalloped Border for Each Doily :
Info :
Use lavender yarn for the scalloped edging. Work into Round 13/15 edge of blocked doily. If you prefer deeper scallops, work larger shells; pattern below makes medium scallops.
Round 1 :
Join lavender with sl st to an edge stitch, ch1, 1 sc in same st (counts vary), *ch3, sk 2, 5 dc in next st, sk 2, ch3, sc in next st* repeat around so each scallop is made by 5 dc shell; you should end with 12 scallops (12 shells)
Round 2 :
In each 5-dc shell: sl st, ch1, (sc, hdc, 3 dc, hdc, sc) into shell apex to form a raised scallop (12 scallops)
Round 3 :
1 sc in each st around including scallop bases to tidy edges (approx 72)
Info :
If you plan to join motifs by slip-stitching through scallop loops, leave last round open to allow stitch-through joins without visible stitches on the front.
— Large Daisy Petals (Make 5 flowers, 10 petals each) :
Round 1 :
Work a small ring at diameter roughly 6-7 cm to anchor petals. Ch8, join to form loop, or make mr, ch4 to begin. For this construction we will make a petal strip and attach petals circularly.
Round 2 :
Ch2, 16 hdc into loop, join with sl st (16)
Round 3 :
Ch1, 1 sc in each st around (16)
Info :
These inner rounds form a firm base for the petals. Keep rounds compact; this inner ring will be covered by the yellow center later.
Round 4 :
*Ch8, sl st in next st* around to create 16 ch8 loops for petal anchors (16 loops)
Round 5 :
Petal foundation: In each ch8 loop work: sl st, ch1, (sc, hdc, 3 dc, tr, 3 dc, hdc, sc) - finish by sl st to base to create a full elongated petal. Repeat for 16 small petals or alternate to make 10 larger petals: for classic daisy do 10 evenly spaced larger petals by skipping every other loop (10 petals)
Info :
For the pictured look there are approximately 10 pronounced petals on the large daisies; to achieve this, make petals in every other loop on Round 4 so you have 8-10 larger petals depending on spacing and tension.
Round 6 :
After creating petals, work 1 sc in each base stitch around the central ring and between petals to secure edges (count depends on petal count; for 10 petals aim for ~40 sc around)
Round 7 :
Work around petals in BLO only: 1 sc in each st BLO to create a defined ridge and to help petals stand up (approx same count as previous round)
Info :
Use the BLO round to create a neat foundation for sewing the flower to the doily motif; this gives a small lip that helps center placement and hides the join.
Round 8 :
Fasten off leaving long tail for sewing to the doily; weave tail through the base ring and secure in place when attaching.
— Yellow Spiral Flower Centers (Make 5 + several small centers) :
Round 1 :
With mustard yellow, make a magic ring, ch1, 6 sc in mr (6)
Round 2 :
Inc in each st around (12)
Round 3 :
(1 sc, inc) x 6 (18)
Round 4 :
(2 sc, inc) x 6 (24)
Info :
For a tightly coiled center, continue a short spiral instead of working complete rounds—work in continuous spiral and place last stitch behind previous to hide seam.
Round 5 :
(3 sc, inc) x 6 (30)
Round 6 :
Ch1, sl st around the outside edge to tidy and form a raised ridge and slightly cup the center (30)
Round 7 :
Fasten off leaving a long tail to sew to the flower center base. Make smaller centers for tiny flowers by stopping at Round 3 or 4 (18 or 24) as required.
— Small Purple Flowers (Make 8-10) :
Round 1 :
Make a magic ring, ch1, 6 sc in mr, pull tight (6)
Round 2 :
Inc in each st around (12)
Round 3 :
*Ch4, sl st in next st* around to create 6 loops for petals (6 loops)
Round 4 :
In each ch4 loop make (sc, hdc, 3 dc, hdc, sc) to form small rounded petals (6 petals)
Round 5 :
Attach small yellow center by sewing a tiny round (make a little spiral of 6-12 sc) and sew into the flower center. Fasten off (approx 12-18 for small center)
Info :
These small flowers act as cluster fillers between large daisies. Make 8-10 in differing sizes to create a natural clustered arrangement.
— Leaf (Make 10-14) :
Round 1 :
Ch10, sc in 2nd ch from hook, hdc in next, 3 dc in next, hdc in next, sc in next, sl st in next to form half-leaf base. Turn and work along other side: sc, hdc, 3 dc, hdc, sc, sl st to base. Fasten but do not cut if making contoured leaves (approx 18 sts)
Round 2 :
With contrasting green, sl st to base center, ch1, 1 sc around perimeter to neaten edge (approx 18)
Round 3 :
Work 1 sc in each sc, but in the center area of the leaf work FPdc to make a raised vein down the middle (approx 18; 4-6 FPdc forming a vein)
Info :
For more realistic leaves, block them over a slight curve while damp and use a small amount of starch. Use two shades of green to layer leaves for depth.
Round 4 :
Fasten off leaving long tail for sewing. Make between 10 and 14 leaves to place around flowers as pictured.
— Joining Motifs into Runner :
Info :
Decide layout: the pictured runner uses five circular doily motifs placed in a straight line with slight overlaps; daisies sit partly over two adjacent doilies creating a cascading effect. Join motifs by sewing through scalloped loops (lavender scallops) or using slip-stitch join in back loops to keep the front neat.
Round 1 :
Place two doilies right sides together aligning scalloped edges where you want overlap. Using lavender yarn and tapestry needle or yarn hooked tapestry join, whip stitch through corresponding loops with matching tension until motifs sit flat (join seam length approx 12-16 stitches depending on overlap)
Round 2 :
Continue adding motifs one by one, checking alignment and ensuring scallops form a consistent scalloped border along both sides of the runner (5 motifs joined yield runner approx 90-110 cm long depending on yarn and tension)
Info :
When joining, sometimes a slight curvature is natural; pin motifs and check on a flat surface frequently to keep the runner straight. Use blocking pins to flatten joins before final sewing.
Round 3 :
After joining all doilies, work a connecting round in lavender through the outer scallop holes: attach yarn, ch1, sc into each scallop base around the joined runner to even out edges (approx stitch count will depend on number of scallops; work to keep tension consistent)
Round 4 :
Work a decorative join round: *ch3, sc into next scallop*, repeating along edges to create small connection loops for later sewing of flowers and leaves (loop count variable)
Info :
If you prefer an invisible join, use mattress stitch or whip stitch from the back; for a visible decorative join use sl st or sc across scallop edges to create a cohesive border for flower placement.
— Attaching Flowers and Leaves :
Round 1 :
Plan placement by laying out all motifs and appliques on the runner. Position large daisies so each covers the seam between two adjacent doilies by approximately one-third of its base, alternating sides for a natural cascade.
Round 2 :
Sew large lavender daisy bases to the doily with matching lavender yarn: use long tail from petal base; sew through the inner foundation rounds (the hdc ring) and through doily Round 13 to anchor. Use ladder stitch or whip stitch around the base and secure with multiple passes in hidden places (aim 12-16 securing stitches per flower).
Round 3 :
Sew yellow centers on top of the daisy bases, sinking their edges into the inner petal ring. Sew tightly around center so it slightly cups outward to mimic pictured 3D center look (6-10 stitches around center circumference).
Info :
Place leaves in clusters around daisies, sewing only at the base so leaves can lift slightly for a natural shadow. Small flowers are sewn into gaps and cluster points, creating interest along runner edges.
Round 4 :
Use tiny whip stitches along petal bases to tack petals down onto doily where they overlap adjacent motifs to prevent catching. On the underside, secure extra thread with a dab of glue if desired for durability.
Round 5 :
Weave in all tails along the seam and through both layers where possible; trim close and secure with a small knot hidden beneath appliques. Final check: gently steam or lightly mist and press to set shape.
Info :
If you plan to launder the runner, use cotton yarn and avoid hot water or heavy agitation; hand-wash cold and re-block while damp to maintain shape.
— Final Scalloped Edge and Finishing Touches :
Round 1 :
With lavender, join at one outermost scallop and work around entire runner outer edge: *ch3, 5 dc in next scallop apex, ch3, sc in next base* repeating to create unified outer scallop (repeat count depends on motifs but expect ~60-70 shells across full runner)
Round 2 :
In each outer 5-dc shell: sl st, ch1, (sc, hdc, 3 dc, hdc, sc) into apex to form finished scallops. Fasten off and weave tails (shell count around runner approx 60-70)
Info :
Ensure scallops are evenly spaced; pin the runner on a flat blocking surface before working this final round to guarantee regular spacing and tidy curvature.
Round 3 :
If desired, add tiny picot edging in contrast yellow in a few outer scallops to echo flower centers: attach yellow and *ch3, sl st in same st* selectively, then fasten off and weave in ends.
Info :
Final blocking: pin runner to size, ensure petals and leaves are shaped, spray lightly with water or a fabric stiffener as preferred, and let dry completely overnight before use.
This lavender daisy runner brings a garden-fresh touch to any table and combines crisp lace with sculpted flowers for beautiful dimension. Each motif and applique is crafted to layer together into a cohesive, elegant centerpiece. Blocking and finishing transform the piece into a polished home accent you'll be proud to display. 🧶 Add it to a sunny table or give it as a handmade gift for a special seasonal touch. 🌼