🧶 Beautiful ✨ Detailed 💝 Adorable

Lavender Pattern

Lavender Pattern
4.3★ Rating
2-4 Hours Time Needed
4.1K Made This
✂️

Beginner Friendly Level

Perfect for those just starting their crochet journey, with clear instructions and simple techniques

⏱️

Bite-Sized Project

Finishes in 2-4 hours—perfect for an afternoon of creative relaxation.

🏡

Cozy Accent

A warm touch for your space that transforms ordinary corners into inviting nooks filled with handmade charm.

About This Lavender Pattern

This pattern teaches you how to crochet delicate lavender stalks using worsted weight yarn and simple stitches. You will also learn an optional small leaf motif and how to assemble the flower onto floral wire stems. The result is a realistic, long-lasting bouquet perfect for decorating or gifting. The steps are clear and suited to crocheters with basic stitch knowledge.

Lavender Pattern crochet pattern - detailed view of completed project

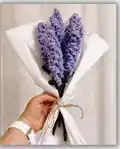
Includes a materials list, abbreviations, and step-by-step assembly instructions for attaching the lavender to stems. Optional leaves add a finishing touch to make each stalk look natural and elegant.

Why You'll Love This Lavender Pattern

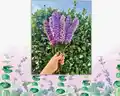
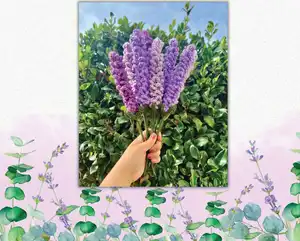
I absolutely love this pattern because it transforms simple yarn into a beautiful, lifelike bouquet that lasts forever. I enjoy how quickly each lavender stalk comes together—just a short chain and a few textured stitches create so much detail. The assembly steps let me personalize each stem and arrange bouquets easily for gifts or home decor. Making these feels meditative and rewarding, and I love gifting them to friends who appreciate handmade touches.

Lavender Pattern step 1 - construction progress Lavender Pattern step 2 - assembly progress Lavender Pattern step 3 - details and accessories Lavender Pattern step 4 - final assembly and finishing

Switch Things Up

I love how easy it is to customize these lavender stems; try different purples or ombre yarns to create a gradient bouquet.

You can change the size by adjusting the starting chain—shorter chains make petite stems perfect for small arrangements or wreaths.

For a more rustic look, use natural fiber yarns or twine-wrapped stems to add texture to your bouquet.

If you want an ultra-realistic version, make clusters of shorter stalks on a single thicker stem to mimic natural sprigs.

I often add tiny embroidered French knots or bead accents between the chain loops for a dewy or sparkly effect.

Try using metallic or glitter yarn for the leaves or stem wrap if you want a festive or gift-ready finish.

Make mini versions for keychains or gift tags by using a lighter weight yarn and a smaller hook.

I sometimes combine lavender stalks with other crocheted flowers like baby breaths or daisies to create a mixed bouquet.

If you prefer non-glue assembly, you can sew the lavender end to a felt-wrapped stem base for a different finish and added durability.

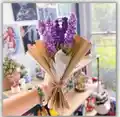
Experiment with vase display ideas—cluster many stems tall in a narrow vase or make short bunches tied with ribbon for centerpieces.

Common Mistakes & How to Fix Them

✗ Skipping the required chain length will change the final size of the lavender; always chain 63 or adjust intentionally to get the desired length. ✗ Using a heavier yarn than suggested will make the lavender too chunky and lose texture; use Weight 4 yarn as recommended to preserve the delicate look. ✗ Not pulling the magic ring tail tightly can leave a large center hole that won’t hide the floral wire; pull the MR tail tight so the hole is the correct size for your stem. ✗ Forgetting to keep the chain loops facing outwards when winding will hide the textured petals; orient the chain loops outward while winding and glue the ends securely.

Lavender Pattern

Create a beautiful, long-lasting lavender bouquet with this easy crochet pattern. You will make delicate lavender stalks and optional leaves, then assemble them onto floral stems for a stunning display. Perfect as a handmade gift or a lovely addition to your home decor. Clear step-by-step instructions make it fun and approachable.

Beginner Friendly 2-4 Hours

Materials Needed for Lavender Pattern

— Main Fabric

  • 01
    Worsted weight yarn (Weight 4) - Purple (main lavender color), small amounts per stalk
  • 02
    Worsted weight yarn (Weight 4) - Green (for leaves and wrapping stems)
  • 03
    Recommended brands: Big Twist Value or Red Heart Super Saver

— Tools Required

  • 01
    Crochet hook 4.0mm
  • 02
    Darning needle
  • 03
    Scissors
  • 04
    Hot glue and hot glue gun
  • 05
    Floral wire stems (2mm, 15" long) OR wooden skewers if you don't have wire stems
  • 06
    Ribbon for bouquet finishing
  • 07
    Decorative paper and mesh for wrapping bouquets

Progress Tracker

0% Complete

— Lavender Pattern :

Step 1 :

Ch 63*

Step 2 :

In the fourth chain from the hook, place 4 TR, ch 3, sl st to the same ch you started with.

Step 3 :

Sl st to the next ch. [Ch 7. Sl st back to the same ch you started with. Sl st to the next stitch.] Repeat [_] down the entire length of your chain.

Step 4 :

FO once you reach the last ch. Leave a 6" tail. Using a darning needle, weave in the end.

Infos :

* The length of your chain will alter the length of your lavender. If you want a shorter lavender, chain fewer stitches. *

— Lavender Leaf :

Step 1 :

Place 5 HDC in a MR. After the fifth HDC, sl st to the top of your first HDC to form a ring. Pull the end of the MR tail tightly to close the circle. Make sure to leave the center hole large enough for your floral wire to fit through.

Step 2 :

Ch 6. Working down the chain, 4 sl st, 1 sc in the last chain. Sl st to the next stitch from the MR. Repeat this process until you have 5 leaves. FO and leave a tail of a few inches. Using a darning needle, weave in the ends.

Info :

Working down the chain: 4 sl st, 1 sc, sl st to the next st of the MR. Create 5 leaves.

— Lavender Assembly :

Step 1 :

Cut your floral wire to your desired length.

Step 2 :

Put a small amount of hot glue on one end of the floral wire. Before the glue dries, place your green yarn on the glue to attach it.

Step 3 :

Twist the floral wire to wind the green yarn around the entire length of the wire.

Step 4 :

Place a small amount of hot glue on the other end of the wire, cut your green yarn, and glue it down.

Step 5 :

Place a small amount of hot glue on the end of the lavender where you made the 4 treble crochet stitches. Attach the lavender to the end of the floral wire.

Step 6 :

Wind the lavender around the floral wire. Make sure the chain loops face outwards. Once you reach the end of the lavender, glue the end down to the floral to secure it.

Step 7 (Optional) :

With the correct side of your work facing upwards, insert the stem through the center of the magic ring. Make sure the correct side faces upwards so the leaves curl upwards and inwards.

Step 8 (Optional) :

Place a small amount of hot glue in a circle around the MR. Slide the leaf upwards to the bottom of the lavender stalk to glue it in place.

Assembly Instructions

  • Cut the floral wire to your desired length, then secure green yarn to one end with a small amount of hot glue and wind the yarn along the wire to create a wrapped stem.
  • Attach the crocheted lavender to the end of the floral wire by placing a small amount of hot glue on the end where the 4 treble crochet stitches are, then press the lavender onto the wire until secure.
  • Wind the lavender stalk around the floral wire with the chain loops facing outwards; when you reach the end, glue the tail down to secure the stalk to the stem.
  • Optional: Insert the stem through the center of the leaf magic ring with the correct side facing up so the leaves curl upwards and inwards, then glue the leaf in place around the base of the stalk.

Important Notes

  • 💡Please read pages 3-4 in full before starting the pattern to understand materials and basic notes.
  • 💡This pattern is written in US crochet terminology; ensure you follow the US stitch names.
  • 💡Use Weight 4 acrylic yarn as recommended; using thicker yarn will make the lavender appear chunky and lose fine detail.

Thank you for choosing this Lavender Pattern to create your own everlasting bouquet! 🧶 These delicate stems are perfect for gifts, decor, or a relaxing afternoon project. 🌸 Happy crocheting and enjoy arranging your handmade lavender! ✨

You ask,

we answer.

FAQs

What size will the finished piece be?

The finished lavender stalk length depends on your starting chain; chaining 63 will make a long stalk similar to the photos, but you can chain fewer stitches for a shorter stem.

Can I use different yarn weights for this pattern?

Yes, but using a heavier yarn will make the lavender bulky and reduce detail; the pattern is written for Weight 4 (worsted) yarn for best results.

Do I need prior crochet experience for this pattern?

This pattern is rated beginner friendly, so basic knowledge of chain, slip stitch, treble and half double crochet is helpful for a smooth experience.

How long does this project typically take to complete?

Most crafters finish a handful of stalks in a 2-4 hour session, though total time varies with number of stems and assembly complexity.