🧢 Beautiful ✨ Detailed πŸ’ Adorable

Le Pere Noel Amigurumi Pattern

Le Pere Noel Amigurumi Pattern
4.8β˜… Rating
5-7 Hours Time Needed
2.8K Made This
βœ‚οΈ

Intermediate Level

Ideal for those with basic crochet experience, featuring slightly more advanced stitches and techniques to expand your skills.

⏱️

Weekend Treat

Takes 5-7 hours, making it an enjoyable project to finish over a couple of days.

🧸

Cute Companion

An adorable friend to cherish, handcrafted with love to bring comfort and joy for years to come.

About This Le Pere Noel Amigurumi Pattern

This pattern makes a lovable Le Pere Noel amigurumi with distinctive details like a voluminous beard, striped sleeves, suspenders, and a beret. The doll is worked in pieces and assembled with clear step-by-step instructions and photos. The pattern supports two yarn options for different finished sizes and includes helpful notes on shaping and color changes.

Le Pere Noel Amigurumi Pattern crochet pattern - detailed view of completed project

Worked in continuous rounds with U.S. terminology, it features puff stitches for beard texture and careful placement notes for facial features. Ideal for gifting or seasonal decor, the design balances simplicity with charming details.

Why You'll Love This Le Pere Noel Amigurumi Pattern

I absolutely love this pattern because it captures a warm, nostalgic Santa character with simple techniques that yield a high-impact result. I enjoy the playful contrast of the striped arms and the lush, puffy beard β€” it always brings a smile. The construction is clever: legs are joined to a middle connector so the body forms naturally, which I find satisfying to crochet. I also love that the pattern gives clear placement notes for eyes, nose, and straps so each finished doll looks balanced and professional.

Le Pere Noel Amigurumi Pattern step 1 - construction progress Le Pere Noel Amigurumi Pattern step 2 - assembly progress Le Pere Noel Amigurumi Pattern step 3 - details and accessories Le Pere Noel Amigurumi Pattern step 4 - final assembly and finishing

Switch Things Up

I love how easy it is to customize this pattern: swap the mustard shirt for a deep green or navy to create different seasonal looks.

I often change sleeve stripe colors to match holiday themes β€” silver and blue for winter, or pastels for a soft, modern take.

If you want a cuddlier, larger Santa, I try bulky or plush yarn with a larger hook and adjust stuffing for a softer finish.

For a mini or keychain version I use thinner yarn and a smaller hook, and reduce stuffing so the piece stays lightweight and portable.

I sometimes add wire inside the arms (wrapped with tape) so the figure can hold tiny props or be posed on a shelf.

Try embroidering different facial expressions: moving the eye placement or altering the eyebrow shape gives the doll unique personality.

Swap the beret for a classic Santa hat by crocheting a cone-shaped hat and adding a pompom in coordinating yarn.

I like to embellish suspenders with different buttons or tiny metal charms to make each one special.

For gifting, I add a small embroidered name tag on the inside of the trousers or a tiny crocheted gift bag accessory.

Don't be afraid to mix yarn brands: combining a semi-cotton body with a plush beard gives great texture contrast and a unique finished look.

Common Mistakes & How to Fix Them

βœ— Skipping stitch markers when joining legs and the middle connector causes misaligned rounds; mark the joining points and each attachment location before crocheting to ensure proper alignment. βœ— Changing colors without securing transitions can cause loose loops and gaps; weave in and secure color changes as you go and consider shifting stitches to align stripes evenly. βœ— Overstuffing limbs and the head creates distortion and makes sewing difficult; stuff gradually and evenly to maintain smooth shaping and proper seam alignment. βœ— Not counting stitches after increases or decreases leads to wrong stitch counts in later rounds; count your stitches at the end of each round and especially after shaping rounds to stay accurate. βœ— Finishing the beard pieces separately and cutting all threads can complicate joining; keep the thread on the final beard detail and join the five pieces together as instructed for an even beard seam.

Le Pere Noel Amigurumi Pattern

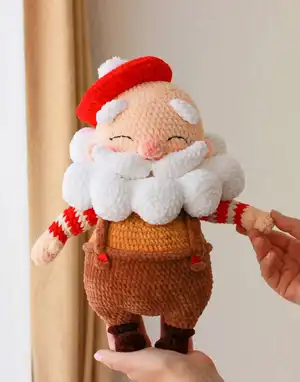
Create a charming Le Pere Noel (Father Christmas) amigurumi with this detailed intermediate crochet pattern. You will make a cuddly, well-shaped Santa with a fluffy beard, striped sleeves, and charming suspenders. The pattern includes step-by-step rounds, color-change notes, and photos to guide you as you stitch. Perfect for holiday gifts, decorations, or a festive handmade keepsake.

Intermediate 5-7 Hours

Materials Needed for Le Pere Noel Amigurumi Pattern

β€” Main Fabric

  • 01
    YarnArt Jeans (semi-cotton) - sample skein 174 yds/1.76 oz (used with 2.2 mm hook for a toy approx 17 cm tall)
  • 02
    Himalaya Dolphin Baby (plush) - sample skein 131 yds/3.5 oz (used with 3.5 mm hook for a larger toy approx 33 cm tall)
  • 03
    Deep-brown (shoes) - less than 50 g of semi-cotton or small amount of plush yarn
  • 04
    Brown (trousers) - less than 50 g
  • 05
    White/Ivory (beard, mustache, eyebrows, hair, sleeve stripes, pompom) - one full ball for plush type or 10-20 g for semi-cotton
  • 06
    Mustard (shirt) - less than 50 g
  • 07
    Cream (head, nose, ears) - less than 50 g
  • 08
    Red (stripes on sleeves, beret) - less than 50 g

β€” Tools Required

  • 01
    Crochet hook size 2.2 mm (recommended for this pattern)
  • 02
    Optional crochet hook size 3.5 mm (if using plush yarn for larger toy)
  • 03
    Black thin thread to embroider the eyes
  • 04
    Two red buttons 0.6-1 cm
  • 05
    Optional pink artistic pastel for blush
  • 06
    Sewing needle to sew body parts
  • 07
    Stitch markers
  • 08
    Pins with large head
  • 09
    Scissors
  • 10
    Fiber filling (polyester stuffing)
  • 11
    Yarn needle for weaving ends and sewing
  • 12
    Insulated metal wire (optional) to insert into arms for posability

Progress Tracker

0% Complete

β€” Arm :

Infos :

*start with cream yarn, 2.2 mm hook. *stuff well the palm, stuff a bit the rest of the arm. *crochet 2 details.

Round 0 :

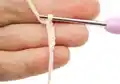
Chain 5; - work in spiral (without a turning CH and SS) as in all amigurumi toys (oval-shape detail)

Round 1 :

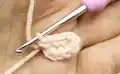
start in the 2nd chain from the hook: 3 SC, 3 SC into the last chain from the hook, on the other side: 2 SC, INC (10)

Round 2 :

(4 SC, INC)*2 (12)

Round 3-4 :

2 rounds 12 SC

Round 5 :

5 SC, PS, 6 SC (12)

Round 6 :

12 SC

Info :

*change color to red

Round 7-8 :

2 rounds 12 SC

Info :

*change color to white

Round 9 :

(INC, 5 SC)*2 (14)

Round 10 :

14 SC

Info :

*change color to red

Round 11 :

(INC, 6 SC)*2 (16)

Round 12 :

16 SC

Info :

*change color to white

Round 13-14 :

2 rounds 16 SC

Info :

*change color to red

Round 15-16 :

2 rounds 16 SC

Info :

*change color to white

Round 17-18 :

2 rounds 16 SC - work several additional SC to the side edge of the detail (when folding); - fix and cut the thread

β€” Leg :

Infos :

*start with deep-brown yarn, 2.2 mm hook. *crochet 2 details. *stuff in process

Round 0 :

Chain 7; - work in spiral (without a turning CH and SS)

Round 1 :

start in the 2nd chain from the hook: 5 SC, 3 SC into the last chain from the hook, on the other side: 4 SC, INC (14)

Round 2 :

INC, 4 SC, 3 INC, 4 SC, 2 INC (20)

Round 3 :

20 SC

Round 4 :

4 SC, 6 DEC, 4 SC (14)

Round 5 :

3 SC, 4 DEC, 3 SC (10)

Round 6 :

(INC, 4 SC)*2 (12)

Round 7 :

(3 SC, INC)*3 (15)

Info :

*change color to brown

Round 8 :

BLO: 15 SC

Round 9 :

(4 SC, INC)*3 (18)

Round 10 :

18 SC

Round 11 :

(5 SC, INC)*3 (21) - fix and cut the thread

Info :

Turn the detail upside down, attach the thread to Round 8, work FLO 15 SC; - join the first and the last Sts, fix the thread and hide it inside

β€” Body-Head :

Leg connector (middle part) :

*brown yarn, 2.2 mm hook. 1. 8 SC in MR; 2. 8 INC (16); 3. (SC, INC)*8 (24); - don't fasten off; - mark 6 SC on the sides at a distance of 6 SC; - mark 6 SC on the side inside parts of the legs

Info :

Now join the middle part and the legs: place them on the sides of the middle part, so that the continuation of crocheting is behind the side of the left leg, the middle part is upwards; - work each leg and the middle part together with SS using separate brown thread

Info :

- continue crocheting using the thread from the middle part; - stuff in process; - rounds numbering starts with Round 12, from the left leg

Round 12 :

on the left leg: (2 SC, INC)*2, 3 SC, INC, 2 SC, INC, 2 SC, on the middle part: INC, 4 SC, INC, on the right leg: (2 SC, INC)*2, 3 SC, INC, 2 SC, INC, 2 SC, on the middle part: INC, 4 SC, INC (54)

Info :

- if there are gaps between the legs and the middle part, sew them with the thread end on the wrong side

Round 13 :

5 SC, INC, 4 SC, (2 SC, INC)*8, 6 SC, INC, 5 SC, INC, 6 SC, INC (66)

Round 14 :

15 SC, (3 SC, INC)*6, 27 SC (72)

Round 15-25 :

11 rounds 72 SC

Info :

*change color to mustard

Round 26 :

BLO: 72 SC

Round 27-28 :

72 SC

Info :

- go back to Round 26 and work FLO 72 SC with brown thread (don't fasten off the mustard thread); - join the first and the last Sts, fix the thread and hide it inside; - continue crocheting with the mustard thread; - place the stitch marker exactly in the middle of the back

Round 29 :

20 SC, (3 SC, DEC)*6, 22 SC (66)

Round 30 :

20 SC, (2 SC, DEC)*6, 22 SC (60)

Round 31 :

20 SC, (SC, DEC)*6, 22 SC (54)

Info :

- in Round 32 we are going to attach the arms; - place the stitch marker exactly in the middle of the back (if required); - mark 8 SC on each arm (place of attachment); - thumbs forward; - for accuracy of attachment mark 8 SC on the sides on the body at a distance of 18 SC on the chest and 20 SC on the back; - if required, adjust (shift) the stitch marker in Round 32

Round 32 :

10 SC, 8 SC with the arm, 18 SC, 8 SC with the arm, 10 SC (54)

Round 33 :

10 SC, 8 SC on the outer edge of the arm, 18 SC, 8 SC on the outer edge of the arm, 10 SC (54)

Round 34 :

(7 SC, DEC)*6 (48)

Round 35 :

48 SC

Round 36 :

(6 SC, DEC)*6 (42)

Round 37 :

(5 SC, DEC)*6 (36)

Round 38 :

(4 SC, DEC)*6 (30)

Round 39 :

(3 SC, DEC)*6 (24)

Info :

*change color to cream

Round 40 :

24 SC

Round 41 :

(SC, INC)*12 (36)

Round 42 :

(2 SC, INC)*12 (48)

Round 43 :

(3 SC, INC)*12 (60)

Round 44-55 :

12 rounds 60 SC

Round 56 :

(8 SC, DEC)*6 (54)

Round 57 :

(7 SC, DEC)*6 (48)

Round 58 :

(6 SC, DEC)*6 (42)

Round 59 :

(5 SC, DEC)*6 (36)

Round 60 :

(4 SC, DEC)*6 (30)

Round 61 :

(3 SC, DEC)*6 (24)

Round 62 :

(2 SC, DEC)*6 (18)

Round 63 :

(SC, DEC)*6 (12)

Round 64 :

6 DEC (6) - tighten the hole, fix the thread and hide the end inside the head

β€” Straps :

Infos :

*brown yarn, 2.2 mm hook. *crochet 2 details. - leave a long end at the beginning for sewing; - work a series of chain stitches, so that its length is slightly longer than the distance from the back edge of the trousers over the shoulder to the front edge of the trousers; - I have a series of 35 CH; - then work 2 turning chains (total chain 37) and start in the 3d chain from the hook: 35 HDC; - fix the thread and leave a long end for sewing; - sew the straps in the back, fix with a stitch on the shoulder, so that they do not fall down, and sew in front, just below the upper line of the trousers; - sew buttons on the straps and body in front.

β€” Nose :

Infos :

*cream yarn, 2.2 mm hook. *don't stuff

Round 1 :

6 SC in MR

Round 2 :

6 INC (12)

Round 3 :

12 SC - fix the thread and leave a long end for sewing; - fold, so that the shape becomes a bit oval and sew in the area of Rounds 46-48

β€” Embroidering eyes :

Info :

- mark with pins an eye contour in Round 49 at a distance of 6 SC; - insert the sewing needle with black thin thread from below and withdraw it near side pin; - stretch the thread above the pins, insert the needle to the opposite side point and fix the thread with 2 stitches in points marked with pins in the middle; - embroider eyelashes; - blush the nose and cheeks with pink artistic pastel (optional)

β€” Beard :

Infos :

*white yarn, 2.2 mm hook - first crochet 5 details:

Round 1 :

6 SC in MR

Round 2 :

6 INC (12)

Round 3 :

(SC, INC)*6 (18)

Round 4 :

(2 SC, INC)*6 (24)

Round 5 :

24 SC - fix the thread and cut it from 4 details; - don't cut the thread from the 5th detail, continue crocheting, joining together all 5 details

Round 6 :

12 SC on the 5th detail, 12 SC on the 4th detail, 12 SC on the 3d detail, 12 SC on the 2nd detail, 24 SC on the 1st detail, 12 SC on the 2nd detail, 12 SC on the 3d detail, 12 SC on the 4th detail, 12 SC on the 5th detail (120)

Assembly Instructions

  • Join the five beard details by leaving the thread on the 5th detail and continue crocheting to join all five into one beard assembly; position and sew the beard to the lower front of the head as shown in photos.
  • Place the legs and the middle connector together, then join each leg and the middle part with slip stitches using a separate brown thread so the continuation of crocheting lines is correct; stuff in process before closing.
  • Attach arms in Round 32 by placing each arm so that 8 SC on the arm align with the 8 SC attachment marks on the body (18 SC on chest side and 20 SC on the back between markers), then crochet around to secure.
  • Sew the straps with the long ends left from the chains; fix each strap in the back and secure with a stitch on the shoulder, then sew the front ends just below the upper line of the trousers and add buttons to the front.
  • Sew the nose in the area of Rounds 46-48 after folding to an oval shape; embroider the eyes following the pin marking at Round 49 and add blush to cheeks and nose if desired.

Important Notes

  • πŸ’‘Use stitch markers to mark the middle of the back and arm attachment points, especially before Round 32 to ensure correct placement.
  • πŸ’‘Stuff limbs and body gradually during assembly to maintain smooth shaping and avoid lumps; overstuffing can distort the finished shape.
  • πŸ’‘When changing colors for stripes, check alignment and, if the color change line shifts, work shifting stitches to align the round and maintain neat stripes.
  • πŸ’‘Keep one beard detail's thread attached when joining the beard pieces together to create a seamless assembly; do not cut the thread on the final joining piece.
  • πŸ’‘If gaps appear between legs and the middle part, sew them with the thread ends on the wrong side to hide seams and reinforce the join.

This sweet Le Pere Noel amigurumi brings holiday charm to any mantel or gift pile with its fluffy beard and cozy suspenders. Make one as a heartfelt handmade present, or stitch a whole family for festive decor. Each doll is full of character and tiny details that make them truly special. πŸ§ΆπŸŽ„βœ¨

You ask,

we answer.

FAQs

What size will the finished piece be?

The finished amigurumi measures approximately 17 cm tall when using YarnArt Jeans with a 2.2 mm hook; using plush yarn (Himalaya Dolphin Baby) with a larger hook will yield a larger toy (approx 33 cm).

Can I use different yarn weights for this pattern?

Yes, you can use different yarn weights but the final size will change. Use a suitable hook for your chosen yarn and adjust stuffing and assembly accordingly.

Do I need prior crochet experience for this pattern?

This pattern is rated intermediate, so knowledge of continuous rounds, increases, decreases, and simple joining techniques is recommended for best results.

How long does this project typically take to complete?

Most crocheters complete this project in 5-7 hours, though time may vary based on experience, yarn choice, and how much detailing you add.