🧶 Beautiful ✨ Detailed 💝 Adorable

Tishka the cat Amigurumi Pattern

Tishka the cat Amigurumi Pattern
4.3★ Rating
5-7 Hours Time Needed
2.8K Made This
✂️

Intermediate Level

Ideal for those with basic crochet experience, featuring slightly more advanced stitches and techniques to expand your skills.

⏱️

Weekend Treat

Takes 5-7 hours, making it an enjoyable project to finish over a couple of days.

🧸

Cute Companion

An adorable friend to cherish, handcrafted with love to bring comfort and joy for years to come.

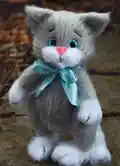
About This Tishka the cat Amigurumi Pattern

This pattern creates a small, jointed amigurumi cat named Tishka with a sculpted furry muzzle and expressive eyes. You will work with fuzzy yarn (Nako Paris) and assemble plastic joints for poseable limbs. The design includes head, body, ears, muzzle, paws, tail, and decorating steps for a finished character. Suitable for crafters comfortable with basic shaping, increases, and decreases.

Tishka the cat Amigurumi Pattern crochet pattern - detailed view of completed project

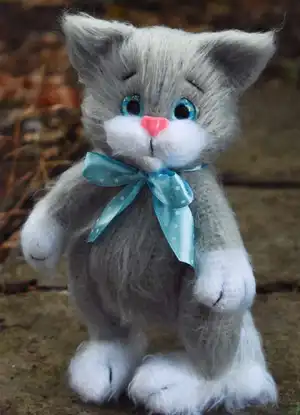
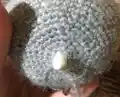
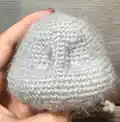
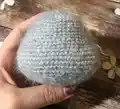
Detailed round-by-round instructions are included for every piece so you never miss a stitch. Helpful photos and notes explain muzzle sculpting, eye placement, and finishing touches.

Why You'll Love This Tishka the cat Amigurumi Pattern

I absolutely love this pattern because it combines classic amigurumi shaping with a sculpted muzzle that gives Tishka so much personality. I enjoy working with fluffy yarn to create a soft, tactile finish that feels special in your hands. The jointed limbs make the finished toy poseable, which always brings a playful life to my creations. Sharing clear, step-by-step rounds and decorating tips means you can recreate this character with confidence and joy.

Tishka the cat Amigurumi Pattern step 1 - construction progress Tishka the cat Amigurumi Pattern step 2 - assembly progress Tishka the cat Amigurumi Pattern step 3 - details and accessories Tishka the cat Amigurumi Pattern step 4 - final assembly and finishing

Switch Things Up

I love how easily you can customize Tishka by changing colors; try pastel shades for a soft nursery friend or bright colors for a playful pet.

I often swap the Nako Paris yarn for a different fuzzy yarn to create a longer or shorter fur effect, which changes the character completely.

If you want a mini keychain version, I make the toy smaller by using a thinner yarn and a smaller hook—perfect for portable gifts.

I sometimes replace the plastic joint with stitched thread joints to keep the limbs non-removable and child-safe, which also gives a vintage look.

For expressive eyes, experiment with safety eyes of different sizes or add felt eyelids for a sleepy expression—placement makes a big difference.

I like to embroider subtle whisker marks or nose lines to give personality; a few small stitches can change the character's mood.

Want a fully posable figure? I add thin wire inside the limbs for gentle poseability while still keeping a soft exterior.

I create tiny outfits—scarves, bows, or little sweaters—to seasonally style the cat, using leftover yarn and simple chains and single crochet rounds.

To vary texture, combine two yarns held together (one furry, one smooth) for a unique mixed-fiber finish that photographs beautifully.

I also experiment with muzzle size and stuffing levels to make faces rounder or flatter; adjusting these subtly alters the expression and charm.

Finally, I recommend trying different nose styles (pink plastic, embroidered, or clay) to see which matches your aesthetic and intended recipient best.

Common Mistakes & How to Fix Them

✗ Skipping stitch markers during rounds can make it difficult to find the start of a round; place a marker at the beginning of each round to stay oriented. ✗ Overstuffing the head or body causes distortion of shaping and makes sewing parts together awkward; stuff gradually and shape as you go for even, natural curves. ✗ Placing eyes too low or far apart changes facial expression dramatically; follow the muzzle and eye placement notes and check positioning before gluing or securing. ✗ Not locking the plastic joint in the correct row will misalign limbs when attached; lock the plastic joint in the 7th row as instructed for correct positioning. ✗ Using overly large or heavy eyes without proper reinforcement can pull through the muzzle; glue or secure glass eyes well and consider backing or hot glue for stability.

Tishka the cat Amigurumi Pattern

Make your own charming Tishka the Cat with this friendly crochet amigurumi pattern. You'll shape a sculpted muzzle, add glass eyes or safety eyes, and assemble jointed limbs for a posable finish. Clear step-by-step rounds guide you from head to paws so you can follow along confidently. Perfect for gifting or keeping as a cozy handmade companion.

Intermediate 5-7 Hours

Materials Needed for Tishka the cat Amigurumi Pattern

— Main Fabric

  • 01
    1 skein Nako Paris color #10914 (grey) - main body yarn
  • 02
    Small amount Nako Paris color #208 (white) - muzzle, paw and foot accents
  • 03
    Assorted small yarn scraps for details (optional)

— Tools Required

  • 01
    Crochet hook size 2.0 mm
  • 02
    Toy eyes 12-14 mm (I use glass eyes)
  • 03
    Pink toy nose
  • 04
    Super clear glue or hot glue gun
  • 05
    Toy stuffing (polyester fiberfill)
  • 06
    Plastic toy joint (20-30 mm) for posable limbs
  • 07
    Black thread to embroider eyebrows and nose line
  • 08
    Scissors
  • 09
    Yarn needle for sewing parts
  • 10
    Stitch markers
  • 11
    Pins for positioning parts
  • 12
    Velcro or slicker brush for combing fur (optional)

Progress Tracker

0% Complete

— Head :

Info :

Grey color:

Round 1 :

start 6 sc in a mr (6)

Round 2 :

6 inc (12)

Round 3 :

(1 sc, inc)6 (18)

Round 4 :

(2 sc, inc)6 (24)

Round 5 :

(3 sc, inc)6 (30)

Round 6 :

(4 sc, inc)6 (36)

Round 7 :

(5 sc, inc)6 (42)

Round 8-9 :

42 sc

Round 10 :

(6 sc , inc)6 (48)

Round 11-12 :

48 sc

Round 13 :

(7 sc, inc)6 (54)

Round 14-15 :

54 sc

Round 16 :

16 sc, 8 inc, 6 sc, 8 inc, 16 sc (70)

Round 17-21 :

70 sc

Round 22 :

16 sc, (1 sc, dec)6, 2 sc, (1 sc, dec)6 , 16 sc (58)

Info :

Align marker by the middle of back side!

Round 23-24 :

58 sc

Round 25 :

2 sc, (7 sc, dec)6, 2 sc (52)

Round 26 :

2 sc, (6 sc, dec)6, 2 sc (46)

Round 27 :

2 sc, (5 sc, dec)6 , 2 sc (40)

Round 28 :

(6 sc, dec)5 (35)

Round 29 :

(5 sc, dec)5 (30) stuff tight

Round 30 :

(4 sc, dec)5 (25) insert plastic joint

Round 31 :

(3 sc, dec)5 (20)

Round 32 :

(2 sc, dec)5 (15)

Round 33 :

(1 sc, dec)5 (10)

Round 34 :

5 dec

Info :

Video: Muzzle sculpting: https://drive.google.com/file/d/1wWRUWe4GofKxjePI-TIuR42hRDVhRj13W/view?usp=drivesdk

— Muzzle :

Info :

White color:

Round 1 :

start 6 sc in a mr (6)

Round 2 :

6 inc (12)

Round 3 :

(1 sc, inc)6 (18)

Info :

Make 2

Info :

Connect 2 parts with sl st and crochet 36 sc ( do not crochet sc into sl st)

— Lip :

Round 1 :

Start 5 sc in a mr

Info :

Do not join a circle, turn the item, ch

Round 2 :

1 sc, 3 inc, 1 sc

— Muzzle decoration :

Info :

Muzzle: Sew muzzle close to eyes

Info :

Eyes: I used glass eyes and hot glue gun. When you've finished sculpting, glue eyes into eyes sockets you formed. Embroider eyebrows

Info :

Nose: I glued nose. If you use safety one, cut leg and glue nose. Glue nose above the muzzle, in the middle, where 2 parts meet. Embroider black nose line (w.pic. below)

Info :

Lip: Sew lip in bottom, where 2 parts meet

— Ears :

Round 1 :

start 6 sc in a mr (6)

Round 2 :

6 sc

Round 3 :

6 inc (12)

Round 4 :

12 sc

Round 5 :

(1 sc, inc)6 (18)

Round 6-7 :

18 sc

Round 8 :

(2 sc, inc)6 (24)

Round 9 :

24 sc

— Body :

Round 1 :

start 6 sc in a mr (6)

Round 2 :

6 inc (12)

Round 3 :

(1 sc, inc)6 (18)

Round 4 :

(2 sc, inc)6 (24)

Round 5 :

(3 sc, inc)6 (30)

Round 6 :

(4 sc, inc)6 (36)

Round 7-13 :

36 sc

Round 14 :

(5 sc, inc)6 (42)

Round 15 :

42 sc

Round 16 :

(6 sc, inc)6 (48)

Round 17 :

48 sc

Round 18 :

16 sc, (1 sc, inc)8, 16 sc (56)- inc are placed in front - it is belly

Round 19-25 :

56 sc

Round 26 :

(5 sc, dec)8 (48)

Round 27-30 :

48 sc

Round 31 :

(6 sc, dec)6 (42)

Round 32 :

(5 sc, dec)6 (36)

Round 33 :

(4 sc, dec)6 (30)

Round 34 :

(3 sc, dec)6 (24)

Round 35 :

(2 sc, dec)6 (18) Набить

Round 36 :

(1 sc, dec)6 (12)

Round 37 :

6 dec

Info :

Crochet body from top to bottom. Lock plastic joint in the 7th row

Info :

Marker is placed in the middle of back side!

— Tail :

Info :

Crochet tail alternating grey and white colors: 4 rows - grey color, 2 rows - white

Round 1 :

Start 7 sc in a mr (7)

Round 2 :

7 inc (14)

Round 3-4 :

14 sc

Round 5 :

(6 sc, inc) 2. (16)

Round 6 :

16 sc

Info :

Attach grey yarn and alternate colors now:

Round 7-32 :

16 sc, stuff tail a little

Round 33 :

Put together and crochet 8 sc grabbing loops of both sides

— Front paws :

Info :

White color:

Round 1 :

start 6 sc in a mr (6)

Round 2 :

6 inc (12)

Round 3 :

(1 sc, inc)6 (18)

Round 4 :

(2 sc, inc)6 (24)

Round 5-6 :

24 sc

Round 7 :

( dec, 1 sc)4, 12 sc (20)

Round 8 :

20 sc

Round 9 :

1 sc, 4 dec, 11 sc (16)

Round 10 :

16 sc, change color to grey

Round 11-25 :

16 sc

Round 26 :

(2 sc, dec)4 (12)

Round 27 :

6 dec

Info :

Embroider black stripes on paws to imitate fingers. Sew arms (thread jointing)

— Back paws :

Info :

White color:

Round 1 :

Start 7 sc in a mr (7)

Round 2 :

7 inc (14)

Round 3 :

(1 sc, inc)7 (21)

Round 4-12 :

21 sc

Round 13 :

(5 sc, dec)3. (18)

Round 14-15 :

18 sc

Round 16 :

(4 sc, dec)3 (15), stuff a little

Round 17 :

(1 sc, dec)5 (10)

Round 18 :

5 dec

Info :

Make 2

— Legs :

Info :

Crochet on top of foot 14 sc, ~ on the 16th row of white foot, start working in back (right), if you look from back to front, crochet clock-wise.

Info :

Crochet 5 sc horizontally, 2 sc vertically, Crochet 5 sc horizontally, 2 sc vertically again. You get 14 sc now

Round 1-5 :

14 sc

Round 6 :

7 sc, 5 inc, 2 sc (19)-inc are in front, this is a knee

Round 7 :

19 sc

Round 8 :

7 sc, (1 sc, inc)5, 2 sc (24)- inc are in front, this is a knee

Round 9-18 :

24 sc. Stuff

Round 19 :

(6 sc, dec)3 (21)

Round 20 :

(1 sc, dec)7 (14) stuff, do not stuff tight top part

Round 21 :

7 dec

— Assembly & Finishing :

Info :

Sew legs (thread jointing). Do not sew them too high.

Info :

Combing: Use Velcro or slicker brush. Align yarn when you've finished combing. I trimmed muzzle a little and hid some threads inside (from edges).

Assembly Instructions

  • Sew the muzzle close to the eyes, positioning the joined white muzzle piece so the seam sits directly beneath the eyes and stitching securely.
  • Glue the eyes into the sculpted eye sockets using a hot glue gun or super clear glue after finishing sculpting to lock them in place.
  • Glue the nose above the muzzle in the middle where the two muzzle parts meet; if using a safety nose, cut off the safety leg and glue the nose instead.
  • Sew the lip into the bottom where the two muzzle parts meet to create the mouth shape and secure the lower facial details.
  • Attach arms and legs using thread jointing (or plastic joints) and position them so the toy can sit naturally; do not sew the legs too high on the body.

Important Notes

  • 💡Place a stitch marker at the start of each round and align the marker in the middle of the back side for consistent shaping and assembly.
  • 💡Lock the plastic toy joint in the 7th row of the body as instructed to ensure limbs are positioned correctly and function properly.
  • 💡Stuff parts gradually and avoid overstuffing the head and top parts; stuff tighter toward the base for stable shaping and looser at the top for natural form.

Your Tishka the Cat is ready to cuddle and display — handmade with heart and character. Have fun combing and trimming the furry yarn to bring out that soft look. Share your finished Tishka with friends, or gift it to someone special for a sweet handmade surprise. 🧶💖

You ask,

we answer.

FAQs

What size will the finished piece be?

The finished amigurumi measures approximately 18-22 cm tall when using the recommended Nako Paris yarn and a 2.0 mm hook; size may vary with yarn and hook choice.

Can I use different yarn weights for this pattern?

Yes, you can use different yarn weights, but the final size and appearance will change; choose an appropriate hook for your yarn and be prepared to adjust stuffing and joint sizes.

Do I need prior crochet experience for this pattern?

This pattern is rated intermediate, so basic knowledge of crochet stitches (sc, inc, dec, sl st) and experience with shaping and sewing pieces together is recommended.

How long does this project typically take to complete?

Most crocheters complete this project in 5-7 hours depending on experience and how much time you spend on sculpting, combing, and finishing details.

Are glass eyes safe for children?

Glass eyes can be decorative but are not recommended for toys intended for young children; use safety eyes or securely glue glass eyes and avoid giving to small children.