🧢 Beautiful ✨ Detailed πŸ’ Adorable

Lemon gnome Amigurumi Pattern

Lemon gnome Amigurumi Pattern
4.6β˜… Rating
5-7 Hours Time Needed
2.1K Made This
βœ‚οΈ

Intermediate Level

Ideal for those with basic crochet experience, featuring slightly more advanced stitches and techniques to expand your skills.

⏱️

Weekend Treat

Takes 5-7 hours, making it an enjoyable project to finish over a couple of days.

🧸

Cute Companion

An adorable friend to cherish, handcrafted with love to bring comfort and joy for years to come.

About This Lemon gnome Amigurumi Pattern

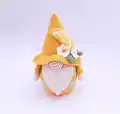
This pattern creates a whimsical Lemon Gnome amigurumi complete with hat decorations, lemon slices, leaves and flowers. Each piece is worked in rounds and assembled to form a sweet collectible toy. The design uses cotton yarn for a neat, detailed finish and is perfect for gifting or display.

Lemon gnome Amigurumi Pattern crochet pattern - detailed view of completed project

Includes full round-by-round instructions for the body, hat, beard, nose, hands and decorative elements. Helpful photos show assembly and placement so you can recreate the look exactly.

Why You'll Love This Lemon gnome Amigurumi Pattern

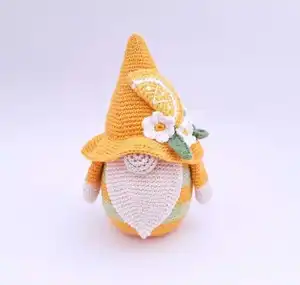
I absolutely love this pattern because it blends simple amigurumi shapes with playful citrus details that make it unique. I enjoyed designing the lemon slices and tiny flowers β€” they add personality without complicated stitches. The pattern is satisfying to work through and produces a polished, giftable toy. I also love how the cotton yarn gives crisp stitch definition for the small decorative elements.

Lemon gnome Amigurumi Pattern step 1 - construction progress Lemon gnome Amigurumi Pattern step 2 - assembly progress Lemon gnome Amigurumi Pattern step 3 - details and accessories Lemon gnome Amigurumi Pattern step 4 - final assembly and finishing

Switch Things Up

I love customizing this gnome by changing colors β€” try pastel shades for a soft, springtime look or bright citrus tones for a summery vibe.

I often make the gnome larger by using a bulkier cotton yarn and a larger hook for a chunky, cuddly version.

I sometimes replace the cotton with a wool blend for a warmer, fuzzier texture; just check gauge and adjust hook size accordingly.

For portable mini versions, use thinner thread and a smaller hook to make keychain-sized gnomes.

I like adding tiny accessories like a crocheted scarf or a little felt tag embroidered with a name for a personalized gift touch.

If you want a posable gnome, add a thin wire armature inside the arms before seaming to create bendable limbs.

Try different hat decorations: swap the lemon slice for a tiny mushroom or acorn appliquE9 to change the theme.

I sometimes embroider different facial expressions or change the nose size to alter the personality of each gnome.

To create a set, make several gnomes in coordinating colors and vary the hat trims for a cohesive collection.

I recommend practicing the flower petal stitch on a scrap before working on the hat so your petals look even and neat when sewn on.

Common Mistakes & How to Fix Them

βœ— Skipping the stitch marker during continuous rounds leads to lost round starts; always place a marker at the first stitch of each round to keep your counting accurate. βœ— Stuffing too early or too much causes distortion of the shape; stuff gradually and firmly only after shaping more of the body so the form stays even and smooth. βœ— Forgetting to crochet the specified back loop row will change the texture; follow the R10 instruction to crochet the row in the back wall of the loops for correct detail. βœ— Not securing color changes tightly causes loose joins and gaps; when switching yarns, fasten off and weave in ends or join with a neat knot to keep edges tidy.

Lemon gnome Amigurumi Pattern

Make a charming lemon-themed gnome with this detailed crochet pattern. You will create a striped body, a pointy hat, a floppy beard, hands, nose, leaves, flowers and lemon slices to decorate. The pattern walks you through every piece with clear round-by-round instructions so you can assemble a delightful, gift-ready amigurumi.

Intermediate 5-7 Hours

Materials Needed for Lemon gnome Amigurumi Pattern

β€” Main Fabric

  • 01
    YarnArt Begonia (100% cotton, 169 m/50 g = 185 yds / 1.76 oz)
  • 02
    Yellow yarn - small amount (used for body stripes, hat, lemon slices)
  • 03
    Green yarn - small amount (used for stripes and leaves)
  • 04
    Beige yarn - small amount (used for nose)
  • 05
    Light beige yarn - small amount (used for beard and hand tips)
  • 06
    White yarn - small amount (used for flower petals and lemon segment details)

β€” Tools Required

  • 01
    Crochet hook size 1.75 mm ( US 4 )
  • 02
    Sewing needle and scissors
  • 03
    Stitch marker
  • 04
    Poly fiber fill (holofiber)
  • 05
    Plastic or paper circle (for the bottom of the gnome)
  • 06
    Pins for assembly
  • 07
    Yarn needle for sewing and weaving ends

Progress Tracker

0% Complete

β€” Materials :

Infos :

PDF pattern on 16 pages. each PDF file can be printed on A4 paper or viewed on the screen. Yarn: YarnArt Begonia (100 % cotton, 169 m/50 g= 185 yds /1.76 oz ). Hook size: 1.75 mm ( US 4 ). Sewing needle and scissors. Stitch marker. Poly fiber fill. Plastic or paper circle.

Info :

DIFFICULTY LEVEL: Intermediate. These crochet patterns do not contain crochet lessons. You need to have basic crochet skills to finish the pattern! If you have any trouble following the pattern, feel free to contact the designer.

Info :

Size information: If you use the same yarn and hook the toy will be about 13 cm = 5.1 inches tall. You can make it bigger or smaller using another type of yarn but, please, adapt the crochet hook accordingly.

Infos :

Notes: Fasten off your work always with needle join and you will get a neat result. Stuff your amigurumi as you go. Use a stitch marker or a piece of yarn to mark the beginning of a round.

Infos :

Abbreviations used on the patterns: R = row. MR = magic ring. ch = chain. sc = single crochet. sl st = slip stitch. dc = double crochet. Inc = increase (2 sc into one loop). HDC = half double crochet. tr, trc = treble crochet. Dec = decrease (2 sc together). (12) = number of stitches you should have at the end of the round/row. (...) x 6 = repeat whatever is between the brackets the number of times stated.

β€” The body of a gnome :

Round 1 :

6 sc in MR (6)

Round 2 :

( inc ) x 6 (12)

Round 3 :

( 1 sc, inc) x 6 (18)

Round 4 :

( 2 sc, inc) x 6 (24)

Round 5 :

( 3 sc, inc) x 6 (30)

Round 6 :

( 4 sc, inc) x 6 (36)

Round 7 :

( 5 sc, inc) x 6 (42)

Round 8 :

( 6 sc, inc) x 6 (48)

Round 9 :

( 7 sc, inc) x 6 (54)

Round 10 :

54 sc ( 1 row) - crochet this row for the back wall of the loops !!!!!

Round 11 :

54 sc ( 1 row)

Round 12 :

( 8 sc, inc) x 6 (60)

Round 13 :

60 sc ( 1 row)

Round 14 :

( 9 sc, inc) x 6 (66)

Info :

Change to green yarn !!!!!

Round 15-19 :

66 sc ( 5 rows)

Info :

Change to yellow yarn !!!!!

Round 20-24 :

66 sc ( 12 rows)

Info :

Change to green yarn !!!!!

Round 25-26 :

66 sc ( 12 rows)

Round 27 :

( 20 sc, dec) x 3 (63)

Round 28-29 :

63 sc ( 2 rows)

Info :

Change to yellow yarn !!!!!

Round 30 :

( 19 sc, dec) x 3 (60)

Round 31-32 :

60 sc ( 2 rows)

Round 33 :

( 18 sc, dec) x 3 (57)

Round 34-35 :

57 sc ( 2 rows)

Round 36 :

( 17 sc, dec) x 3 (54)

Round 37 :

54 sc ( 1 row)

Round 38 :

( 7 sc, dec) x 6 (48)

Round 39 :

48 sc ( 1 row)

Round 40 :

( 6 sc, dec) x 6 (42)

Round 41 :

42 sc ( 1 row)

Round 42 :

( 5 sc, dec) x 6 (36)

Round 43 :

36 sc ( 1 row)

Round 44 :

( 7 sc, dec) x 4 (32)

Round 45 :

( 6 sc, dec) x 4 (28)

Round 46 :

( 5 sc, dec) x 4 (24)

Round 47 :

24 sc ( 1 row)

Round 48 :

( 4 sc, dec) x 4 (20)

Round 49 :

20 sc ( 1 row)

Round 50 :

( 3 sc, dec) x 4 (16)

Round 51 :

( 2 sc, dec) x 4 (12)

Round 52 :

( 1 sc, dec) x 4 (8)

Round 53 :

( dec ) x 4 (4)

Info :

Do not forget to put a plastic or paper circle on the bottom of the gnome's body (the diameter of the circle should correspond to the diameter of the bottom of the body). After that, fill the body with holofiber.

β€” Nose ( make 1 ) :

Round 1 :

7 sc in MR (7)

Round 2 :

( inc ) x 7 (14)

Round 3 :

( 1 sc, inc ) x 7 (21)

Round 4-5 :

21 sc ( 2 rows)

Round 6 :

( 1 sc, dec) x 7 (14)

Round 7 :

( dec ) x 7 (7)

Info :

Fill the nose with holofiber. F.o. and leave a long tail for sewing

β€” Beard (make 1) :

Round 1 :

6 sc in MR (6)

Round 2 :

6 sc ( 1 row)

Round 3 :

( 1 sc, inc) x 3 (9)

Round 4 :

( 2 sc, inc) x 3 (12)

Round 5 :

( 2 sc, inc) x 4 (16)

Round 6 :

( 3 sc, inc) x 4 (20)

Round 7 :

( 4 sc, inc) x 4 (24)

Round 8 :

24 sc ( 1 row)

Round 9 :

( 5 sc, inc) x 4 (28)

Round 10 :

( 6 sc, inc) x 4 (32)

Round 11 :

( 7 sc, inc) x 4 (36)

Round 12 :

( 8 sc, inc) x 4 (40)

Round 13-19 :

40 sc ( 7 rows)

Round 20 :

( 8 sc, dec) x 4 (36)

Round 21 :

( 7 sc, dec) x 4 (32)

Round 22-23 :

32 sc ( 2 rows)

Info :

Don't stuff with fiberfill. We fold the part in half and knit 1 row, tying both halves together. F.o. and leave a long tail for sewing

β€” Hands (make 2) :

Round 1 :

6 sc in MR (6)

Round 2 :

( inc ) x 6 (12)

Round 3 :

( 2 sc, inc) x 4 (16)

Round 4-7 :

16 sc ( 4 rows)

Info :

Change to yellow yarn !!!!!

Round 8-11 :

16 sc ( 4 rows)

Round 12 :

( 6 sc, dec) x 2 (14)

Round 13-20 :

14 sc ( 8 rows)

Info :

Don't stuff with fiberfill. We fold the part in half and knit 1 row, tying both halves together. F.o. and leave a long tail for sewing

β€” Gnome hat (make 1) :

Round 1 :

8 sc in MR (8)

Round 2 :

8 sc ( 1 row)

Round 3 :

( 1 sc, inc) x 4 ( 12 )

Round 4 :

12 sc ( 1 row)

Round 5 :

( 2 sc, inc) x 4 (16)

Round 6 :

16 sc ( 1 row)

Round 7 :

( 3 sc, inc) x 4 (20 )

Round 8 :

20 sc ( 1 row)

Round 9 :

( 4 sc, inc) x 4 (24 )

Round 10 :

24 sc ( 1 row)

Round 11 :

( 5 sc, inc) x 4 (28 )

Round 12 :

28 sc ( 1 row)

Round 13 :

( 6 sc, inc) x 4 (32 )

Round 14 :

32 sc ( 1 row)

Round 15 :

( 7 sc, inc) x 4 (36 )

Round 16 :

36 sc ( 1 row)

Round 17 :

( 5 sc, inc) x 6 (42 )

Round 18 :

42 sc ( 1 row)

Round 19 :

( 6 sc, inc) x 6 (48 )

Round 20 :

48 sc ( 1 row)

Round 21 :

( 7 sc, inc) x 6 (54 )

Round 22 :

54 sc ( 1 row)

Round 23 :

( 8 sc, inc) x 6 (60 )

Round 24 :

60 sc ( 1 row)

Round 25 :

( 9 sc, inc) x 6 (66 )

Round 26 :

66 sc ( 1 row)

Round 27 :

( 10 sc, inc) x 6 (72 )

Round 28 :

72 sc ( 1 row)

Round 29 :

( 8 sc, inc) x 8 (80 )

Round 30 :

80 sc ( 1 row)

Round 31 :

( 9 sc, inc) x 8 (88 )

Round 32 :

( 10 sc, inc) x 8 (96 )

Round 33 :

96 sc ( 1 row)

Round 34 :

( 11 sc, inc) x 8 (104 )

Round 35-36 :

104 sc ( 2 rows)

Info :

F.o. and leave a long tail for sewing

β€” Slice of lemon (make 1) :

Round 1 :

6 sc in MR (6)

Round 2 :

( inc ) x 6 (12)

Round 3 :

( 1 sc, inc) x 6 (18)

Round 4 :

( 2 sc, inc) x 6 (24)

Round 5 :

( 3 sc, inc) x 6 (30)

Info :

Change to white yarn !!!!!

Round 6 :

( 4 sc, inc) x 6 (36)

Info :

Change to yellow yarn !!!!!

Round 7 :

( 5 sc, inc) x 6 (42)

Info :

Don't stuff with fiberfill. We fold the part in half and knit 1 row, tying both halves together. F.o. and leave a long tail for sewing

β€” Flowers (make 3) :

Round 1 :

6 sc in MR (6)

Info :

Change to white yarn !!!!!

Info :

Next, we crochet 6 flower petals. Crochet 1 petal in each of the 6 loops. Petal: 1 sl st ,2 ch, 2 dc , 2 ch, 1 sl st in the same loop (in the one in which we knit the petal)

β€” Small leaf (make 1) :

Info :

green yarn. Make 12 ch. From the 2nd ch from hook: 1 sl st, 1 sc, 1 HDC, 2 dc, 2 tr , 2 dc, 1 HDC, 1 sl st

β€” Big leaf (make 1) :

Info :

green yarn. Make 12 ch. From the 2nd ch from hook: 1 sl st, 1 sc, 1 HDC, 2 dc, 2 tr , 2 dc, 1 HDC, 3 sc in 1 loop ; further crochet the second half of the braid 1 HDC, 2 dc, 2 tr , 2 dc, 1 HDC, 1 sc, 1 sl st

β€” Assembly :

Info :

Sew the beard and nose. Sew the hands to the body. Sew a hat. Gradually fill the hat with holofiber during sewing. Make the design of the hat - sew a slice of lemon, leaves and flowers (see photo).

Assembly Instructions

  • Place a plastic or paper circle on the bottom of the gnome's body (the diameter should correspond to the bottom). After placing the circle, fill the body with holofiber and close the opening.
  • Sew the beard to the front of the body and place the nose over the top center of the beard, securing it with the long tail and sewing tightly so it sits centered.
  • Sew each hand to the sides of the body, positioning them approximately at the level of the middle stripe rows and angling slightly toward the front.
  • Sew the hat onto the top of the body, stuffing the hat gradually with holofiber as you attach it so it holds its shape.
  • Decorate the hat by sewing the lemon slice, leaves and three flowers onto the brim and side as shown in the photos, pinning pieces first to check placement.

Important Notes

  • πŸ’‘Fasten off your work always with needle join to achieve a neat and secure finish.
  • πŸ’‘Stuff your amigurumi as you go to keep shapes even and avoid lumps; add filling gradually while shaping.
  • πŸ’‘Use a stitch marker or a piece of yarn to mark the beginning of a round and check stitch counts frequently.
  • πŸ’‘Place a plastic or paper circle on the bottom of the body before stuffing to stabilize the toy and ensure a flat base.

This Lemon Gnome amigurumi is a bright, cheerful project that adds a pop of handmade charm to any shelf. The small lemon slices and floral accents make it delightfully whimsical and perfect for gifts. Create one for yourself or to brighten a loved one's day β€” happy crocheting! πŸ§ΆπŸ‹βœ¨

You ask,

we answer.

FAQs

What size will the finished piece be?

The finished amigurumi measures approximately 13 cm (5.1 inches) tall when using YarnArt Begonia and the recommended hook size.

Can I use different yarn weights for this pattern?

Yes, you can use different yarn weights but this will change the final size. Adjust the hook size to suit your chosen yarn and expect a larger or smaller gnome.

Do I need prior crochet experience for this pattern?

This pattern is rated Intermediate, so basic knowledge of amigurumi techniques and stitches (sc, inc, dec, HDC, dc) is recommended.

How long does this project typically take to complete?

Most crocheters complete this project in 5-7 hours, depending on experience level and how familiar you are with amigurumi assembly.