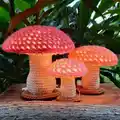
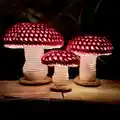
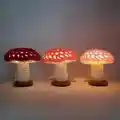
Make a set of charming illuminated flat mushrooms with this cozy crochet pattern. You will create small, medium, and large self-standing mushrooms with flat caps and internal gills that let LED fairy lights glow through. The mushrooms are worked in one continuous piece from cap to base — no sewing required — and include instructions for inserting clear craft plastic and fairy lights. Perfect for mood lighting, gifts, or seasonal displays, these mushrooms bring a warm handmade touch to your space.
Progress Tracker
0% Complete
— Instructions for All Mushrooms :
Info :
When the mushroom cap is complete, you will be instructed to pause without finishing off in order to measure and insert clear craft plastic. This piece will help preserve the mushroom's shape and provide additional structure. Refer to the detailed steps below for cutting, taping, and fitting the clear craft plastic before continuing with the gills and stem.
Infos :
For the small or medium mushroom, cut four strips of 6 mil clear craft plastic. For the large mushroom, cut six strips of 6 mil clear craft plastic. Small Flat Mushroom: 4 strips, width 3/4" length 6". Medium Flat Mushroom: 4 strips, width 7/8" length 9". Large Flat Mushroom: 6 strips, width 1" length 12". Use clear tape to fasten strips into X shapes as directed to create evenly spaced spokes radiating from the center.
Info :
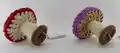
All mushrooms: Holding the mushroom cap as though it were a bowl, insert the finished plastic piece inside, matching the center of the plastic spokes with the center of the cap. Trim off excess plastic even with the last round of single crochet. Continue working the pattern with the fitted plastic inside the cap. After crocheting, insert the fairy lights through the base up into the cap and leave the battery control outside the base for easy access.
Info :
The clear craft plastic tube: Measure the mushroom's height from the bottom of the stem to the top of the cap and subtract 1/4". Roll the strip into a tube small enough to fit into the stem; insert so the bottom of the tube is slightly inset within the base. Allow the plastic to naturally expand until the stem becomes firm. Trim the tube as necessary to adjust how the cap meets the gills visually.
— Small Size: Lighted Flat Mushroom :
Info :
Cap: With the cap color, ch 2. In second chain from hook, work–
Round 1 :
6 sc. Sl st to join. (6 st)
Round 2 :
ch 3 (counts as first dc + ch), dc in same st, ch 1, (dc, ch 1, dc, ch 1) in next 5 stitches. Sl st in second chain to join. (24 st)
Round 3 :
sl st into ch-1 space, ch 3 (counts as first dc + ch), dc in same st, ch 1, sk st, *dc in next ch-1 space, ch 1, sk st, (dc, ch 1, dc, ch 1) in next ch-1 space, sk st,** repeat from * to ** 4 more times, dc in next ch-1 space, ch 1, sk st. Sl st in second chain to join. (36 st)
Round 4 :
sl st into ch-1 space, ch 3 (counts as first dc + ch), sk st, [dc in next ch-1 space, ch 1, sk st] all the way around. Sl st in second chain to join. (36 st)
Round 5 :
sl st into ch-1 space, ch 3 (counts as first dc + ch), dc in same st, ch 1, sk st, *[dc in next ch-1 space, ch 1, sk st] 2 times, (dc, ch 1, dc, ch 1) in next ch-1 space, sk st,** repeat from * to ** 4 more times, [dc in next ch-1 space, ch 1, sk st] 2 times. (48 st)
Info :
Note: There is no "sl st in second ch to join" between Rounds 5 & 6. Skip the last stitch in Round 5 as instructed, and begin the first sc of Round 6 directly in the second chain. (Fig. S-1)
Round 6 :
sc in each st around. Sl st in first st to join. DO NOT FINISH OFF. (48 st)
Info :
Pause here to insert clear plastic into mushroom cap. After the plastic is in place inside the cap, continue working the mushroom gills.
Round 7 :
– working in back loops only – ch 3 (counts as first dc + ch), sk st, dc in next st, ch 1, sk st, *dc2tog across next 3 st, ch 1, sk st, [dc in next st, ch 1, sk st] 2 times,** repeat from * to ** 4 more times, dc2tog across next 3 st, ch 1, sk st. Sl st in second chain to join. (Fig. S-3 & S-4) (36 st)
Round 8 :
– working in both loops only – ch 3 (counts as first dc + ch), sk st, [dc2tog across next 3 st, ch 1, sk st, dc in next st, ch 1, sk st] 5 times, dc2tog across next 3 st, ch 1, sk st. Sl st in second chain to join. (24 st)
Round 9 :
ch 1 (does not count as first st), [sc in next st, sk st] all the way around. Sl st in first st to join. (Fig. S-5) (12 st)
Round 10 :
– working in front loops only – ch 1 (does not count as first st), sc in each st around. (12 st)
Round 11-14 :
– working in both loops from now on – sc in each st around. (12 st)
Round 15 :
[2 sc in next st, sc in next 3 st] 3 times. (15 st)
Round 16-17 :
sc in each st around. (15 st)
Round 18 :
[invdec, sc in next 3 st] 3 times. DO NOT FINISH OFF. (Fig. S-6) (12 st)
Info :
Note: Use safety-pin style stitch markers to mark the back loops of the first and last stitches of Round 18. These will come in handy later on when finishing the base. (Fig. S-7)
Round 19 :
– working in front loops only – [2 sc in next st, sc in next st] 6 times. (18 st)
Round 20 :
– working in both loops from now on – [sc in next st, 2 sc in next st, sc in next st] 6 times. (24 st)
Round 21 :
sc in each st around. (24 st)
Round 22 :
[sc in next st, invdec, sc in next st] 6 times. (18 st)
Round 23 :
[invdec, sc in next st] 6 times. (12 st) (Fig. S-8)
Info :
Flatten the base to create a disc-shape. Locate the stitch markers from Round 18. Align the first stitch from Round 18 with the first stitch to be worked in the following round...
Round 24 :
sl st through both loops of Round 23 and back loops of Round 18, all the way around. FINISH OFF AND HIDE END. (Fig. S-9) (12 st)
— Medium Size: Lighted Flat Mushroom :
Info :
Cap: With the cap color, ch 2. In second chain from hook, work–
Round 1 :
6 sc. Sl st to join. (6 st)
Round 2 :
ch 3 (counts as first dc + ch), dc in same st, ch 1, (dc, ch 1, dc, ch 1) in next 5 stitches. Sl st in second chain to join. (Fig. M-1) (24 st)
Round 3 :
sl st into ch-1 space, ch 3 (counts as first dc + ch), dc in same st, ch 1, sk st, *dc in next ch-1 space, ch 1, sk st, (dc, ch 1, dc, ch 1) in next ch-1 space, sk st,** repeat from * to ** 4 more times, dc in next ch-1 space, ch 1, sk st. Sl st in second chain to join. (36 st)
Round 4 :
sl st into ch-1 space, ch 3 (counts as first dc + ch), sk st, [dc in next ch-1 space, ch 1, sk st] pattern expanded all the way around to increase to 48 st. Sl st in second chain to join. (48 st)
Round 5 :
Continue pattern increases in the cap per diagrammed instructions to reach 60 st. Sl st in second chain to join. (60 st)
Round 6 :
Continue pattern increases as directed to reach 64 st. Sl st in second chain to join. (64 st)
Round 7 :
sl st into ch-1 space, ch 3 (counts as first dc + ch), sk st, [dc in next ch-1 space, ch 1, sk st] all the way around. (64 st)
Info :
Note: There is no "sl st in second ch to join" between Rounds 7 & 8. Skip the last stitch in Round 7 as instructed, and begin the first sc of Round 8 directly in the second chain. (Fig. M-3)
Round 8 :
sc in each st around. Sl st in first st to join. DO NOT FINISH OFF. (64 st)
Info :
Pause here to insert clear plastic into mushroom cap. After the plastic is in place inside the cap, continue working the mushroom gills.
Round 9 :
– working in back loops only – ch 3 (counts as first dc + ch), sk st, [dc in next st, ch 1, sk st] sequences combined with dc2tog across next 3 st in the pattern to create 52 stitches total. Sl st in second chain to join. (52 st)
Round 10 :
– working in both loops from now on – ch 3 (counts as first dc + ch), sk st, sequences including dc2tog repeats as directed to create 40 stitches. Sl st in second chain to join. (40 st)
Round 11 :
ch 1 (counts as first half of dc2tog across next 3 st), sk st, dc in next st, ch 1, sk st, [dc2tog across next 3 st, ch 1, sk st] 9 times. Sl st in top of first dc2tog to join. (20 st)
Round 12 :
ch 1 (does not count as first st), [sc in next 8 st, sk st, sc in next st] 2 times. Sl st in first st to join. (18 st)
Round 13 :
– working in front loops only – ch 1 (does not count as first st), sc in each st around. (18 st)
Round 14-17 :
– working in both loops from now on – sc in each st around. (18 st)
Round 18 :
[sc in next 4 st, 2 sc in next st, sc in next 4 st] 2 times. (20 st)
Round 19 :
sc in each st around. (20 st)
Round 20 :
[2 sc in next st, sc in next 9 st] 2 times. (22 st)
Round 21-23 :
sc in each st around. (22 st)
Round 24 :
[sc in next 3 st, invdec, sc in next 4 st, invdec] 2 times. DO NOT FINISH OFF. (18 st)
Info :
Note: Use safety-pin style stitch markers to mark the back loops of the first and last stitches of Round 24. These will come in handy later on when finishing the base. (Fig. M-8)
Round 25 :
– working in front loops only – [2 sc in next st, sc in next st] 6 times. (24 st)
Round 26 :
– working in both loops from now on – [2 sc in next st, sc in next 3 st] 6 times. (30 st)
Round 27 :
[sc in next 2 st, 2 sc in next st, sc in next 2 st] 6 times. (36 st)
Round 28 :
sc in each st around. (36 st)
Round 29 :
[sc in next 2 st, invdec, sc in next 2 st] 6 times. (30 st)
Round 30 :
[invdec, sc in next 3 st] 6 times. (24 st)
Round 31 :
[sc in next st, invdec, sc in next st] 6 times. (18 st)
Info :
Flatten the base to create a disc-shape. Locate the stitch markers from Round 24. Align the first stitch from Round 24 with the first stitch to be worked in the following round.
Round 32 :
sl st through both loops of Round 31 and back loops of Round 24, all the way around. FINISH OFF AND HIDE END. (18 st)
— Large Size: Lighted Flat Mushroom :
Info :
Cap: With the cap color, ch 2. In second chain from hook, work–
Round 1 :
6 sc. Sl st to join. (6 st)
Round 2 :
ch 3 (counts as first dc + ch), dc in same st, ch 1, (dc, ch 1, dc, ch 1) in next 5 stitches. Sl st in second chain to join. (24 st)
Round 3 :
sl st into ch-1 space, ch 3 (counts as first dc + ch), dc in same st, ch 1, sk st, *dc in next ch-1 space, ch 1, sk st, (dc, ch 1, dc, ch 1) in next ch-1 space, sk st,** repeat from * to ** 4 more times, dc in next ch-1 space, ch 1, sk st. Sl st in second chain to join. (36 st)
Round 4 :
sl st into ch-1 space, ch 3 (counts as first dc + ch), sk st, [dc in next ch-1 space, ch 1, sk st] repeats increasing to 48 st. Sl st in second chain to join. (48 st)
Round 5 :
Continue pattern increases to reach 60 st as directed. Sl st in second chain to join. (60 st)
Round 6 :
Continue pattern increases to reach 72 st. Sl st in second chain to join. (72 st)
Round 7 :
sl st into ch-1 space, ch 3 (counts as first dc + ch), sk st, [dc in next ch-1 space, ch 1, sk st] all the way around. (84 st)
Round 8 :
sl st into ch-1 space, ch 3 (counts as first dc + ch), sk st, [dc in next ch-1 space, ch 1, sk st] all the way around to 84 st. Sl st in second chain to join. DO NOT FINISH OFF. (84 st)
Info :
Pause here to insert clear plastic into mushroom cap. After the plastic is in place inside the cap, continue working the mushroom gills.
Gills :
With gill color, follow the same pattern structure as the smaller sizes but with expanded repeats. Rnd 12 begins working in back loops only followed by rounds that decrease the stitch count via dc2tog across next 3 st until Rnd 16 where shaping continues to reduce to 24 stitches at the appropriate point for stem insertion. (See photos and figures for exact placement.)
Stem :
With stem color, Rnd 17: – working in front loops only – ch 1 (does not count as first st), sc in each st around. (24 st) Rnd 18-24: – working in both loops from now on – sc in each st around. (24 st) Continue shaping rounds and follow marking instructions. DO NOT FINISH OFF at the end of the stem until instructed.
Base :
With base color, begin working front-loop increases then switch to both loops as directed to create a disc-shaped base. Work rounds 34-43 with increases and decreases as shown to flatten the base and finish by sl st through both loops of the final round and back loops of the marked round to join. FINISH OFF AND HIDE END. (24 st)
Info :
Refer to the figures and photos in the pattern for exact stitch placement, special stitch techniques (Invisible Decrease and dc2tog across next 3 st), and how to mark the back loops for aligning the base. Finish by inserting lights and fitting the clear craft plastic tube in the stem for stability before closing the base.
These lighted mushrooms make a magical addition to any shelf, bedside, or centerpiece, combining cozy crochet with warm LED glow. They are quick to make, endlessly customizable with color choices, and perfect for gifting or seasonal displays. Make a trio in varying sizes to create a whimsical arrangement that brightens up any corner of your home. 🧶✨