🧢 Beautiful ✨ Detailed πŸ’ Adorable

Lily Bunny Amigurumi Pattern

Lily Bunny Amigurumi Pattern
3.9β˜… Rating
5-7 Hours Time Needed
3.0K Made This
βœ‚οΈ

Intermediate Level

Ideal for those with basic crochet experience, featuring slightly more advanced stitches and techniques to expand your skills.

⏱️

Weekend Treat

Takes 5-7 hours, making it an enjoyable project to finish over a couple of days.

🧸

Cute Companion

An adorable friend to cherish, handcrafted with love to bring comfort and joy for years to come.

About This Lily Bunny Amigurumi Pattern

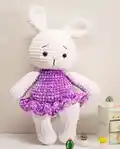
This pattern creates a soft, plush Lily Bunny amigurumi with a sweet ruffled skirt and embroidered facial details. It uses chenille sport yarn and a 5 mm hook to produce a cuddly toy approximately 35 cm tall. The pattern covers head sculpting, sewing parts together, and a simple dress attachment for a finished look.

Lily Bunny Amigurumi Pattern crochet pattern - detailed view of completed project

Clear step-by-step rounds are provided for each part: arms, legs, body, skirt, head and ears. US terminology is used and the pattern level is easy to medium, suitable for intermediate crocheters.

Why You'll Love This Lily Bunny Amigurumi Pattern

I absolutely love this pattern because it combines ultra-soft chenille yarn with a charming ruffled skirt, making the bunny both huggable and visually delightful. I enjoy how the simple shaping methods yield a professional-looking amigurumi without complicated steps. I love adding small embroidered facial details β€” they give each bunny a unique personality and warmth. I also appreciate that the pattern is structured so you can work in short sessions and still see steady progress toward a finished toy.

Lily Bunny Amigurumi Pattern step 1 - construction progress Lily Bunny Amigurumi Pattern step 2 - assembly progress Lily Bunny Amigurumi Pattern step 3 - details and accessories Lily Bunny Amigurumi Pattern step 4 - final assembly and finishing

Switch Things Up

I love how this pattern lends itself to so many playful variations β€” I often swap the purple skirt for pastel shades to make a whole set of themed bunnies.

I sometimes change yarn weight and hook size to make minis or jumbo versions; chunky yarn with a larger hook gives a super cuddly bunny while thin yarn makes a tiny keychain friend.

I add embroidered cheeks and different eye styles to change the expression; felt eyes or smaller safety eyes create a very different look.

I also experiment with outfit changes: swap the ruffle skirt for a little vest or a removable dress to create mix-and-match play options.

Try adding a small pompom tail in a contrasting color or sewing on tiny felt patches to personalize each bunny.

For stability or poseability, I sometimes insert a short length of wire into the limbs before stuffing; this helps the bunny hold a seated pose.

If you want a more realistic ear shape, adjust the number of rounds in the ear or add a row of contrasting color inside the ear for depth.

I often use embroidery to change the facial features β€” a tiny mouth, different brow shapes, or freckles instantly alter personality.

Want a gender-neutral or holiday-themed bunny? Change yarn colors to neutrals, pastels, or seasonal shades like red and green for festive versions.

I recommend making one sample bunny first to practice placement and stuffing, then customize subsequent bunnies with patterns, accessories, and color stories to build a charming collection.

Common Mistakes & How to Fix Them

βœ— Skipping stuffing until the end can make it difficult to shape the limbs and neck; stuff gradually as you go to maintain even shape and control. βœ— Not placing a stitch marker at the start of rounds leads to miscounted stitches and uneven shaping; use a marker at the first stitch of each round and move it after each round. βœ— Overstuffing the head or body can distort shaping and make sewing pieces together awkward; use moderate, even stuffing and adjust incrementally to keep smooth contours. βœ— Forgetting to secure color changes or ends causes unraveling later; fasten off securely, weave ends into the body, and hide threads inside before finishing. βœ— Sewing parts without pinning can result in asymmetrical placement and an unbalanced look; pin and align arms, legs, and ears first, then stitch firmly in place.

Lily Bunny Amigurumi Pattern

Make an adorable Lily Bunny amigurumi using soft chenille yarn and simple crochet techniques. This pattern walks you through head, body, limbs, ears and a ruffled skirt so you can create a cuddly 35 cm bunny. Perfect for gifting or decorating nurseries, the pattern uses clear US terminology and step-by-step rounds so you can follow along with confidence.

Intermediate 5-7 Hours

Materials Needed for Lily Bunny Amigurumi Pattern

β€” Main Fabric

  • 01
    Sport yarn (Chenille) White - Chenille 01, amount sufficient for head, limbs and body (approx. majority of skein)
  • 02
    Sport yarn (Chenille) Purple - Chenille 13, amount for skirt and dress (small skein)
  • 03
    Brown embroidery thread - for eyebrows and muzzle details (small skein)
  • 04
    Pink embroidery thread - for nose details (small amount)
  • 05
    White sewing thread - for head sculpting (small amount)
  • 06
    Polyester stuffing (fiber fill) - enough to firmly stuff head, body, arms and legs (approx. 100-150g)

β€” Tools Required

  • 01
    Crochet hook 5 mm
  • 02
    Safety eyes 14 mm (2 pieces)
  • 03
    Scissors
  • 04
    Yarn needle for sewing and weaving ends
  • 05
    Stitch markers
  • 06
    Pins for assembly (optional)
  • 07
    Polyester stuffing (fiber fill)

Progress Tracker

0% Complete

β€” Arms :

Info :

CCrochet with white yarn. Stuff only 2/3 of the arm.

Round 1 :

6 sc into a magic ring (6)

Round 2 :

6 inc (12)

Round 3 :

(3 sc, inc) * 3 (15)

Round 4-5 :

15 sc (2 rounds)

Round 6 :

(3 sc , dec ) * 3 ( 12 )

Round 7-14 :

8 sc ( 8 rounds )

Round 15 :

( 4 sc , dec ) * 2 ( 10 )

Round 16 :

10 sc

Info :

Fold the arm in half and crochet 5 sc through both sides.

Info :

Fasten off and cut the yarn, leaving a tail for sewing.

Info :

Sew the arms two rounds under the beginning of the head.

β€” Legs :

Info :

Crochet with white yarn. Stuff as you go.

Round 1 :

7 sc into a magic ring (7)

Round 2 :

7 inc (14)

Round 3 :

(sc, inc) * 7 (21)

Round 4-5 :

21 sc (2 rounds)

Round 6 :

7 sc, 4 dec, 6 sc (17)

Round 7 :

7 sc, 2 dec, 6 sc (15)

Round 8-10 :

15 sc (3 rounds)

Round 11 :

(4 sc, inc) * 3 (18)

Round 12 :

18 sc

Round 13 :

For the left leg: crochet only 14 sc Fasten off, cut the yarn.

Round 13 :

For the right leg: 18 sc Don't cut the yarn, we will continue with the body:

β€” Body :

Round 1 :

Crochet 7 sc on the right leg; make 3 chains; 18 sc on the left leg; 3 sc on the chain; 18 sc on the right leg ; 3 sc on the chain; put the marker here ( 42 )

Round 2 :

(6 sc, inc ) * 6 ( 48 )

Round 3-6 :

48 sc (4 rounds). Change the yarn to pink color:

Round 7 :

48 sc

Round 8 :

back loops only: 48 sc

Round 9 :

( 6 sc, dec ) * 6 ( 42 )

Round 10-11 :

42 SC ( 2 rounds )

Round 12 :

( 5 sc, dec ) * 6 ( 36 ).

Round 13-14 :

36 sc ( 2 rounds )

Round 15 :

( 4 sc, dec ) * 6 ( 30 )

Round 16-17 :

30 sc ( 2 rounds )

Round 18 :

( 3 sc, dec ) * 6 ( 24 ).

Round 19 :

24 sc

Round 20 :

( 6 sc, dec ) * 3 ( 21 )

Info :

Stuff the body firmly, especially in the neck. Cut the pink yarn, we will continue with the head, but first, we need to make the dress.

β€” Skirt :

Info :

Attach the pink yarn to the back of the body in the front loops of round 8.

Info :

Crochet with the body turned upside down: 1. ( 2 dc in one stitch ) * 48 ( 96 )

Round 2 :

96 dc Fasten off, and cut the yarn. Hide the thread inside the body.

β€” Head :

Info :

Change the yarn to white color. Stuff as you go.

Round 1 :

21 sc

Round 2 :

21 inc ( 42 )

Round 3 :

( 6 sc, inc ) * 6 ( 48 )

Round 4 :

( 7 sc, inc ) * 6 ( 54 )

Round 5-9 :

54 sc ( 5 rounds ) Insert the safety eyes between rounds 8 and 9 with 8 st between them.

Round 10 :

( 7 sc, dec ) * 6 ( 48 )

Round 11-13 :

48 sc ( 3 rounds )

Round 14 :

( 6 sc, dec ) * 6 ( 42 )

Round 15 :

42 Sc

Round 16 :

( 5 sc, dec ) * 6 ( 36 ) ( 30 )

Round 17 :

( 4 sc, dec ) * 6

Round 18 :

( 3 sc, dec ) * 6 ( 24 )

Round 19 :

( 2 sc, dec ) * 6 ( 18 )

Round 20 :

( sc, dec ) * 6 ( 12 )

Round 21 :

6 Dec ( 6 ) Make sure that the head is stuffed firmly. Close the opening and hide the yarn inside. Head sculpting

β€” Ears :

Info :

Crochet with white yarn .

Round 1 :

6 sc into a magic ring ( 6 )

Round 2 :

6 inc ( 12 )

Round 3 :

( sc , inc ) * 6 ( 18 )

Round 4 :

( 2 sc , inc ) * 6 ( 24 )

Round 5-6 :

24 sc ( 2 rounds )

Round 7 :

( 6 sc , dec ) * 3 ( 21 )

Round 8 :

( 5 sc , dec ) * 3 ( 18 )

Round 9 :

( 4 sc , dec ) * 3 ( 15 )

Round 10-12 :

15 sc ( 3 rounds ) Fasten off and cut the yarn , leaving a tail for sewing. Fold the ear in half and sew the ends together. Sew the ears on the top of the head with 4 stitches between them.

Assembly Instructions

  • Attach safety eyes between rounds 8 and 9 of the head with 8 stitches between them; secure backs and insert eyes before final head stuffing and closing.
  • Fold each ear in half and sew the edges closed; sew the ears on top of the head spaced with 4 stitches between them for balanced placement.
  • Fold each arm in half and crochet 5 sc through both sides to close the edge; fasten off leaving a long tail and sew the arms two rounds under the beginning of the head.
  • Sew the left and right legs to the bottom of the body at the join used in Round 1, ensuring they are evenly spaced and stable for the toy to sit.
  • Attach the skirt by joining pink yarn to the front loops of body Round 8 and crochet the ruffle rounds with the body turned upside down; weave ends inside the body.
  • After closing the head opening, perform head sculpting with white thread as instructed, hide all yarn tails inside the toy and secure firmly.

Important Notes

  • πŸ’‘Use stitch markers at the beginning of each round to keep track of increases and decreases for accurate shaping.
  • πŸ’‘Stuff parts gradually and evenly as you work to maintain the intended proportions and prevent lumps or cavities.
  • πŸ’‘Hide and secure all yarn tails inside the body as you finish pieces to avoid loose ends and to keep the toy child-safe.
  • πŸ’‘When changing colors (to pink for the skirt), secure the join and weave ends inside before continuing to prevent unraveling.

This Lily Bunny amigurumi is crafted to be irresistibly soft and full of charm β€” perfect for gifting or cuddling. The ruffled skirt and embroidered face add lovely personality to every bunny you make. Make one for yourself or stitch a whole family of bunnies to brighten any nursery. 🧢🧡✨

You ask,

we answer.

FAQs

What size will the finished piece be?

The finished amigurumi is around 35 cm tall when using the recommended chenille sport yarn and a 5 mm hook.

Can I use different yarn weights for this pattern?

Yes, you can use different yarn weights but this will affect final size and texture; use an appropriate hook size and adjust stuffing accordingly.

Do I need prior crochet experience for this pattern?

This pattern is rated intermediate (easy to medium), so basic experience with single crochet, increases and decreases is recommended.

How long does this project typically take to complete?

Most crocheters complete this project in 5-7 hours, depending on experience, finishing, and how much time is spent on embroidered details.

Where should I place the safety eyes?

Insert the safety eyes between rounds 8 and 9 on the head, leaving 8 stitches between the eyes for the intended facial spacing.