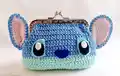
About This Lilo and Stitch Purse Amigurumi Pattern
This pattern creates a small character purse inspired by Stitch, combining simple stitches and playful shaping. You will crochet the body with a contrasting lower band and attach detailed ears for personality. The instructions are row-by-row so you can follow along easily and change colors for your own look.
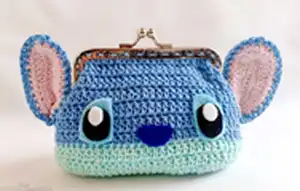
Perfect as a handmade gift or a small accessory for fans, the purse is compact and decorative. It includes ear pieces and guidance for joining and finishing.
Why You'll Love This Lilo and Stitch Purse Amigurumi Pattern
I absolutely love this pattern because it turns a small crochet pouch into a whimsical character with very little extra effort. I enjoy how a few color changes and the addition of ears bring so much personality to a simple shape. I also love that it is quick to make, so you can finish one in an afternoon and gift it the same day. The design is flexible, allowing me to experiment with colors and textures every time I make it.
Switch Things Up
I love changing the color palette to create entirely new looks; swap the mint lower band for a pastel pink for a softer finish.
I often use bulkier yarn and a larger hook when I want a chunkier, more textured purse that's quick to make.
I sometimes make mini versions using fingering weight yarn and a smaller hook to create keychain-sized versions.
I like adding a fabric lining to protect small items; choose a cotton print and hand-sew it in for a professional finish.
I also try felt facial pieces for cleaner eyes and details, glued lightly and then stitched for extra security.
Try embroidering a small smile or nose instead of using felt for a handmade, stitched look that withstands wear.
For variation, change ear shapes slightly—more rounded or longer—to create different character vibes.
I like to mix yarn textures, such as velvet or boucle for the outer edge, to add tactile interest and contrast.
Add tiny accessories like a bow or tiny flower crocheted separately and sewn on to personalize each purse.
If you want a more durable option, stitch the top more tightly or use a smaller hook for the last rows so the clasp fits snugly and items stay secure.
Common Mistakes & How to Fix Them
✗ Skipping the turning chain or starting chain can change the row height and distort the top edge; always work the specified ch 3 at the start of each row to keep your shaping consistent.
✗ Not counting stitches after increases leads to mismatched edges and incorrect stitch counts; count your stitches at the end of every row, especially after increase rounds.
✗ Changing color without securing tails can cause gaps or loose ends; carry the yarn neatly or weave in ends before continuing to the next color to keep the edge tidy.
✗ Joining ears or applique pieces without pinning causes uneven placement; pin both ear halves and check symmetry before sewing to ensure balanced positioning.