🧢 Beautiful ✨ Detailed πŸ’ Adorable

Little Frog Amigurumi Pattern

Little Frog Amigurumi Pattern
4.0β˜… Rating
3-4 Hours Time Needed
2.2K Made This
βœ‚οΈ

Beginner Friendly Level

Perfect for those just starting their sewing journey, with clear instructions and simple techniques

⏱️

Bite-Sized Project

Complete in under 2 hoursβ€”quick, fun, and perfect for a little creative escape.

🐸

Charming Critter

Delightful animal designs with sweet details that capture the essence of your favorite woodland and farmyard friends.

About This Little Frog Amigurumi Pattern

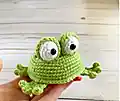
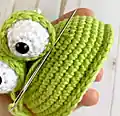
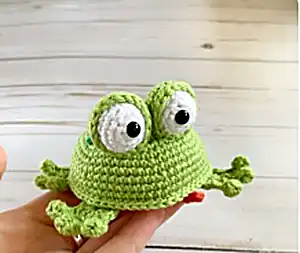
This little frog pattern brings together simple crochet techniques to create an absolutely charming amigurumi friend. The pattern features a unique construction method where you crochet separate belly and back pieces, then join them together for a perfectly rounded body shape. The bulging eyes with green eyelids give this frog so much personality, while the webbed paws add authentic frog details that make it extra special.

Little Frog Amigurumi Pattern crochet pattern - detailed view of completed project

What makes this pattern particularly enjoyable is the satisfying process of watching your frog come to life as you attach each piece. The French knot embroidery on the back adds a lovely textured detail that really makes this little guy stand out.

Why You'll Love This Little Frog Amigurumi Pattern

I absolutely love how this pattern teaches you the satisfying technique of joining two crocheted pieces to create dimension - it's such a rewarding feeling when you stuff and sew that body together! The bulging eyes give this little frog so much character and personality, and I find myself smiling every time I look at the finished result. The webbed paws are surprisingly fun to make with their puff stitch details, and the optional French knot decoration on the back lets you add your own creative touch.

Little Frog Amigurumi Pattern step 1 - construction progress Little Frog Amigurumi Pattern step 2 - assembly progress Little Frog Amigurumi Pattern step 3 - details and accessories Little Frog Amigurumi Pattern step 4 - final assembly and finishing

Switch Things Up

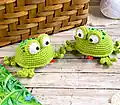
I love experimenting with different color combinations for this little frog pattern! Try making him in bright blue with white spots for a poison dart frog look, or go classic with forest green and add some brown accents. You could even create a whole pond family by making multiple frogs in various shades of green.

For a fun twist, I sometimes add tiny flower embellishments to the back instead of French knots, or use variegated yarn for a magical rainbow effect. The paws look adorable when made in a slightly darker shade than the body, and you can experiment with different eye colors too.

I've also discovered that this pattern works beautifully with cotton-bamboo blends for an extra soft finish, and using a slightly larger hook creates a more relaxed, cuddly version. The beauty of this pattern is how versatile it is - each little frog develops its own unique personality!

Common Mistakes & How to Fix Them

βœ— Crocheting too loosely which causes stuffing to show through - use a smaller hook if needed
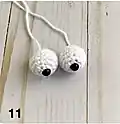
 βœ— Placing eyes too far apart or at wrong angle - position between rows 4-8 as specified βœ— Overstuffing the body making it too firm and losing the cute rounded shape βœ— Forgetting to secure safety eyes before closing magic ring - test fit first before tightening

Little Frog Amigurumi Pattern

Create your own adorable little frog with this delightful amigurumi pattern! This charming 7cm (2.7 inch) frog features bright lime green coloring, cute bulging eyes with green eyelids, and webbed paws that give it authentic frog character. Perfect for beginners looking to expand their amigurumi skills, this pattern uses basic stitches and includes detailed step-by-step photos. The finished frog makes a wonderful gift for children or anyone who loves cute handmade creatures.

Beginner Friendly 3-4 Hours

Materials Needed for Little Frog Amigurumi Pattern

β€” Main Fabric

  • 01
    100% cotton yarn in Lime Green, Paper White, Pillar Red, and Spearmint Green colors
  • 02
    PaintBox Yarns Cotton DK recommended: Lime Green (629), Paper White (601), Pillar Red (615), Spearmint Green (626)

β€” Tools Required

  • 01
    Crochet hook 2.0mm
  • 02
    Safety eyes or black beads 6mm diameter
  • 03
    Stuffing (hollow fiber)
  • 04
    Needle with big eye
  • 05
    Sewing pins

Progress Tracker

0% Complete

β€” Belly :

Row 1 :

6 sc in magic ring (6)

Row 2 :

2 sc in each sc (12)

Row 3 :

(1 sc, sc inc)* 6 (18)

Row 4 :

(2 sc, sc inc)* 6 (24)

Row 5 :

(3 sc, sc inc)* 6 (30)

Row 6 :

(4 sc, sc inc)* 6 (36)

Row 7 :

(5 sc, sc inc)* 6 (42)

Row 8 :

(6 sc, sc inc)* 6 (48)

Row 9 :

(7 sc, sc inc)* 6 (54)

Row 10 :

(8 sc, sc inc)* 6, sl.st (60)

Info :

Tie off the thread and cut it

β€” Back :

Row 1 :

6 sc in magic ring (6)

Row 2 :

2 sc in each sc (12)

Row 3 :

(1 sc, sc inc)* 6 (18)

Row 4 :

(2 sc, sc inc)* 6 (24)

Row 5 :

(3 sc, sc inc)* 6 (30)

Row 6 :

(4 sc, sc inc)* 6 (36)

Row 7 :

(5 sc, sc inc)* 6 (42)

Row 8 :

(6 sc, sc inc)* 6 (48)

Row 9 :

48 sc (48)

Row 10 :

(7 sc, sc inc)* 6 (54)

Row 11 :

54 sc (54)

Row 12 :

(8 sc, sc inc)* 6 (60)

Row 13-14 :

2 rows - 60 sc (60)

Info :

Don't cut the work thread. Join belly and back together: put wrong sides together, insert hook through loops of both pieces and crochet sc around edge. Stuff body as you go. Finish with sl.st.

β€” Eyes (2 pieces) :

Row 1 :

6 sc in magic ring (6)

Info :

Close magic ring, but not too tight so you can insert safety eyes easily

Row 2 :

2 sc in each sc (12)

Row 3 :

(3 sc, sc inc)* 3 (15)

Row 4-5 :

2 rows - 15 sc (15)

Info :

Insert safety eyes into middle of magic ring

Row 6 :

(3 sc, sc dec)* 3 (12)

Info :

Stuff the eye

Row 7 :

6 sc dec (6)

Info :

Finish with sl.st. Leave enough thread for sewing

β€” Eyelids (2 pieces) :

Row 1 :

6 sc in magic ring (6)

Row 2 :

2 sc in each sc (12)

Row 3 :

(1 sc, sc inc) *6 (18)

Row 4-6 :

3 rows - 18 sc (18)

Info :

Finish with sl.st. Leave enough thread for sewing

β€” Paws (4 pieces) :

Row 1 :

2 ch, 12 dc in magic ring, sl.st. (12)

Row 2 :

4 sl.st., (6 ch., puff stitch in 3rd loop from hook and 1 sc in 4th, 5th and 6th loops from hook, 1 sl.st. in next loop of first row) * repeat this pattern two more times, 4 sl.st.

Info :

Tie off thread and leave enough for sewing

β€” Tongue :

Info :

Crochet 4 ch

Row 1 :

Start in second loop from hook and crochet 2 sc, 3 sc in last ch, don't turn work and crochet continuously in circle direction, 1 sc, 1 sc inc (8)

Info :

Finish with sl.st. Leave enough thread for sewing

Assembly Instructions

  • Place eyes into eyelids and sew them together, then tie off white yarn at bottom of eye
  • Sew the assembled eyes onto the head/body between rows 4-8 of the back piece
  • Sew front paws onto bottom of frog symmetrically to the muzzle area
  • Attach back paws to bottom of frog in proper positioning as shown in pattern photos
  • Sew the red tongue onto the muzzle area of the frog
  • Embroider French knots on back of frog using dark green yarn for decoration

Important Notes

  • πŸ’‘Crochet with tight stitches to prevent stuffing from showing through holes
  • πŸ’‘Use smaller hook size if you notice any gaps in your work
  • πŸ’‘Close magic ring loosely at first so safety eyes can be inserted easily
  • πŸ’‘Test fit safety eyes before tightening magic ring completely
  • πŸ’‘Stuff body firmly but not too tightly for best shape

This adorable Little Frog pattern combines simple techniques with charming details to create a delightful woodland friend. The unique two-piece body construction and bulging eyes give this little guy so much personality, while the webbed paws and optional French knot decoration make him truly special. Whether you're new to amigurumi or looking for a quick satisfying project, this little frog will hop right into your heart! 🐸 Happy crocheting! 🧢✨

You ask,

we answer.

FAQs

What size will my finished frog be?

The completed frog measures approximately 7cm (2.7 inches) when using the recommended PaintBox Cotton DK yarn and 2.0mm hook.

Can I use different colors for my frog?

Absolutely! While the pattern uses lime green, you can substitute any colors you prefer. Just maintain the same yarn weight for consistent sizing.

What if I don't have safety eyes?

You can substitute 6mm black beads or even embroider the eyes using black yarn if making this for very young children.

Why are my stitches showing holes?

This usually means your stitches are too loose. Try using a smaller hook size (1.75mm instead of 2.0mm) to create tighter stitches.

Do I need to know puff stitch to make this pattern?

Yes, the webbed paws use puff stitch, but the pattern explains how to make them: crochet 4 dc in the same stitch then join them together.