🧢 Beautiful ✨ Detailed πŸ’ Adorable

Loafie the Bread Loaf Amigurumi Pattern

Loafie the Bread Loaf Amigurumi Pattern
4.7β˜… Rating
2-4 Hours Time Needed
3.5K Made This
βœ‚οΈ

Intermediate Level

Ideal for those with basic crochet experience, featuring slightly more advanced stitches and techniques to expand your skills.

⏱️

Bite-Sized Project

Finishes in 2-4 hoursβ€”perfect for an afternoon of creative relaxation.

🧸

Cute Companion

An adorable friend to cherish, handcrafted with love to bring comfort and joy for years to come.

About This Loafie the Bread Loaf Amigurumi Pattern

This pattern creates a small, adorable loaf-shaped amigurumi with a cream interior and a tan crust. It combines flat panels, simple shaping, and joining to form a plush loaf with tiny bobble feet. The pattern includes clear row instructions, a bobble stitch tutorial, and helpful photos for assembly.

Loafie the Bread Loaf Amigurumi Pattern crochet pattern - detailed view of completed project

Perfect for gift-making or quick handmade decor, Loafie is a cozy project that teaches edge joining and simple embroidery details. Ideal for crafters who enjoy cute food-themed amigurumi.

Why You'll Love This Loafie the Bread Loaf Amigurumi Pattern

I absolutely love this pattern because it transforms simple stitches into a delightful, squishable character with so much personality. I enjoy the way the bobble 'feet' peek out from the crust β€” it gives the loaf so much charm. The pattern is small and satisfying to complete in a couple of sittings, which makes it a perfect gift or a quick shop item. I also love sharing techniques like changing color seamlessly and joining panels with a neat border, because they make the finished piece look polished.

Loafie the Bread Loaf Amigurumi Pattern step 1 - construction progress Loafie the Bread Loaf Amigurumi Pattern step 2 - assembly progress Loafie the Bread Loaf Amigurumi Pattern step 3 - details and accessories Loafie the Bread Loaf Amigurumi Pattern step 4 - final assembly and finishing

Switch Things Up

I love to change the crust color to create different types of loaves β€” try a lighter tan for sourdough or a darker brown for a toasted look.

I often make mini versions for keychains by using a smaller hook and thinner yarn to produce cute pocket-sized loaves.

I sometimes add stripes or a contrasting yarn across the top to simulate seeded bread or a decorative scoring line.

I like to embroider different expressions with the black thread to give each Loafie a unique personality β€” a smile, sleepy mouth, or tiny surprised line all work well.

If you prefer plush over firm, I use softer stuffing and slightly looser tension to create a snuggly, squishier loaf each time.

I occasionally add tiny accessories like a crocheted butter pat or a small scarf to make a themed set for gifts or holidays.

I recommend experimenting with textured yarns for a rustic, artisan-look crust that adds visual interest without changing the pattern stitches.

To create a display set, I make multiple loaves in different shades and sizes and arrange them in a handmade crochet basket for a bakery-style look.

If you want more stability, I sometimes insert a small piece of thin cardboard in the bottom before closing to keep the loaf sitting upright for shelf display.

I also enjoy making the buns more pronounced by doubling the yarn tails when forming the dimples for a deeper, cuter bun effect.

Common Mistakes & How to Fix Them

βœ— Skipping the stitch marker when joining around the panel can cause you to lose the start position; always place a marker in the ch-1 that counts as a stitch so you know exactly where rounds begin. βœ— Changing to the tan color incorrectly can leave a loose loop at the color join; pull the new color through to finish the last stitch of the old color so the transition is tidy and secure. βœ— Not stuffing as you go will make shaping the loaf difficult and can lead to lumps; add small amounts of stuffing gradually to maintain a smooth, even shape. βœ— Forgetting to place safety eyes before joining the panels will make installation tricky; secure safety eyes between the specified rows before closing the pieces together to ensure even placement.

Loafie the Bread Loaf Amigurumi Pattern

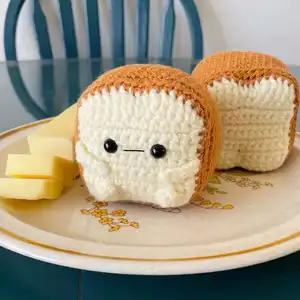
Make a charming little loaf of bread named Loafie with this friendly crochet pattern. You will create a soft, squishy bread toy with a light crust and a creamy face β€” perfect for gifting or displaying. The pattern uses basic stitches plus a bobble for the little feet, and clear photos guide you through assembly. Follow along and enjoy a relaxing, creative project that results in an adorable handmade friend.

Intermediate 2-4 Hours

Materials Needed for Loafie the Bread Loaf Amigurumi Pattern

β€” Main Fabric

  • 01
    Worsted weight yarn in cream (as listed in supplies)
  • 02
    Worsted weight yarn in tan (as listed in supplies)
  • 03
    Black thread for mouth embroidery

β€” Tools Required

  • 01
    3.5 mm crochet hook
  • 02
    8 mm safety eyes (2 pieces)
  • 03
    Stitch marker
  • 04
    Scissors
  • 05
    Sewing needle (yarn needle) for sewing and embroidery
  • 06
    Fiber fill stuffing
  • 07
    Black thread for mouth detail

Progress Tracker

0% Complete

β€” Arms :

Arms (make 2) :

Starting with a long tail ch 6, slst in the 2nd ch from hook and in remaining ch spaces (5) f/o and leave a long tail for attaching

β€” Front of Loaf :

Round 1 :

ch 13, sc across starting in the 2nd ch from the hook (12) ch 1 and turn

Round 2 :

sc 2, BO, sc 6, BO, sc 2. ch 1 and turn

Round 3-10 :

sc across. (12) ch 1 and turn

Round 11 :

(top of the loaf) 2 HDC in one st, dc, dc, tr, tr, dc & HDC in one st, HDC and dc in one st, tr, tr, dc, dc, 2 HDC in last st (16)

Info :

Now you will crochet around the piece. ch 1 and put a st marker in the ch 1 (it counts as a st) then sc 9 down the side

Info :

inc in corner

Info :

sc 10 across bottom

Info :

inc in corner

Info :

sc 10 up the other side

Info :

Change to tan.

Info :

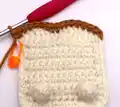
To change to tan, before finishing your last st in cream pull the tan yarn through to finish the st.

Info :

inc in the first st along the top, sc in the next 14 sts, inc in the last st

Info :

You are now back at the st marker... you are going to finish sc around the bread with tan.

Info :

sc 10 down the side

Info :

inc in corner

Info :

sc 12 across the bottom

Info :

inc in corner

Info :

sc 10 up the other side (you will reach the tan yarn across the top)

Info :

There should be 54 sts total around the entire breadβ€”do not fasten off.

Round 1 :

Still using tan, sc around in the BLO (54)

Round 2-10 :

sc around (54) f/o and weave in yarn tail

β€” Back of Loaf :

Round 1 :

ch 13, sc across starting in the 2nd ch from the hook (12) ch 1 and turn

Round 2-10 :

sc across. (12) ch 1 and turn

Round 11 :

(top of the loaf) 2 HDC in one st, dc, dc, tr, tr, dc & HDC in one st, HDC & dc in one st, tr, tr, dc, dc, 2 HDC in last st (16)

Info :

Now you will crochet around the piece. ch 1 and put a st marker in the ch 1 (it counts as a st) then sc 9 down the side

Info :

inc in corner

Info :

sc 10 across bottom

Info :

inc in corner

Info :

sc 10 up the other side

Info :

Change to tan

Info :

inc in the first st along the top, sc in the next 14 sts, inc in the last st.

Info :

You are now back at the st marker... you are going to finish sc around the bread with tan.

Info :

sc 10 down the side

Info :

inc in corner

Info :

sc 12 across the bottom

Info :

inc in corner

Info :

sc 10 up the other side (you will reach the tan yarn that is across the top of the loaf)

Info :

There should be 54 sts total around the entire bread. F/O and leave a long tail for sewing.

β€” Joining and Shaping :

Info :

To attach, line up the front with the back and whip stitch through the BLO of row 10 on the loaf and both loops on the back. Whip stitch through both loops of the back of the loaf and the back loop only of the main piece when attaching.

Info :

Place safety eyes between rows 7&8, approx. 3 sts apart

Info :

Embroider mouth with black thread

Info :

Attach arms to edge of bread, between rows 5&6

Info :

Remove your st marker and place it in the beginning st of the next row before continuing to form the 3D loaf shape

Round 1 :

Still using tan, sc around in the BLO (54)

Round 2-10 :

sc around (54) f/o and weave in yarn tail

Info :

Stuff as you go... as firmly as you prefer.

β€” Making Loafie\'s Buns :

Info :

Poke the needle between rows 8&9 and up through the back through rows 4&5, centered. Repeat twice.

Info :

Pull both tails tightβ€”but not too tight (you don't want to see fiber fill poking out).

Info :

Tie ends together and knot at the bottom then weave in the tails.

Info :

If the feet are facing the wrong way on the front piece, just push them with the end of your crochet hook so they're popped out on the right side.

Info :

*If you don't like his arms flapping around and looking crazy, sew or glue them in the position you like!

Assembly Instructions

  • Place safety eyes between rows 7 and 8 on the front piece, spaced approximately 3 stitches apart, and secure them before joining the front and back.
  • Line up the front and back pieces, then whip stitch through the back loop only (BLO) of row 10 on the crust piece and through both loops on the back panel to join the two pieces evenly.
  • Stuff the loaf as you sew the pieces together, adding fiber fill gradually to keep an even shape and prevent lumps.
  • Attach the arms to the edge of the bread between rows 5 and 6 using the long tail left from each arm; sew securely and weave in tails.
  • Make Loafie's buns by poking a needle between rows 8 and 9 and up through rows 4 and 5, centered; repeat twice, pull tails to form the bun dimples, tie and knot the tails at the bottom, then weave in ends.
  • Embroider the mouth with black thread after eyes are in place and check the correct side facing out before finishing seams.

Important Notes

  • πŸ’‘Use a stitch marker in the ch-1 that counts as a stitch when you begin crocheting around the panel so you can keep track of the start position.
  • πŸ’‘When changing colors, pull the new color through to finish the last stitch of the previous color to create a tidy, secure color join.
  • πŸ’‘Stuff gradually as you join the front and back so you can shape the loaf evenly and avoid overstuffing which can distort the shape.
  • πŸ’‘Check the correct side facing out as you join; border stitches should look like little v's when the correct side is out.

This adorable Loafie the Bread Loaf is a sweet and simple amigurumi you can finish in an afternoon. 🧢 Perfect for gifting, shelf-decor, or a cute handmade addition to your home treats collection. 🍞 Have fun making and customizing each loaf with different yarns and faces to make them truly yours! πŸ™‚

You ask,

we answer.

FAQs

What size will the finished piece be?

The finished amigurumi measures approximately a small palm-sized loaf (about 9-11 cm) when using worsted weight yarn and a 3.5 mm hook; exact size varies with tension.

Can I use different yarn weights for this pattern?

Yes, you can use different yarn weights, but the final size and stitch counts may vary; use an appropriate hook for the yarn and adjust stuffing accordingly.

Do I need prior crochet experience for this pattern?

This pattern is intermediate, so a basic understanding of sc, hdc, dc, tr, bobble stitches, and working in the BLO is recommended for best results.

How long does this project typically take to complete?

Most crocheters complete this project in 2-4 hours, depending on experience and how much time you spend on details and assembly.