🧢 Beautiful ✨ Detailed πŸ’ Adorable

Louisa Llama Amigurumi Pattern

Louisa Llama Amigurumi Pattern
4.0β˜… Rating
5-7 Hours Time Needed
2.8K Made This
βœ‚οΈ

Intermediate Level

Ideal for those with basic crochet experience, featuring slightly more advanced stitches and techniques to expand your skills.

⏱️

Weekend Treat

Takes 5-7 hours, making it an enjoyable project to finish over a couple of days.

🧸

Cute Companion

An adorable friend to cherish, handcrafted with love to bring comfort and joy for years to come.

About This Louisa Llama Amigurumi Pattern

This pattern creates a delightful Louisa Llama amigurumi complete with a beret, blanket and scarf with pom poms. Youll work all parts from the legs and body to the head, muzzle, ears and tail with clear round-by-round instructions. It uses medium weight yarn and includes optional pieces for a cozy, photographed finish.

Louisa Llama Amigurumi Pattern crochet pattern - detailed view of completed project

The instructions are written in US terms and use a 3.5mm hook for the llama body and 5mm for the scarf. Helpful photos, a pom pom tutorial and joining guidance are included to make assembly straightforward.

Why You'll Love This Louisa Llama Amigurumi Pattern

I absolutely love this pattern because it balances simple amigurumi techniques with charming accessories that bring the character to life. I enjoy how the blanket, beret and scarf let you personalise the llama with colors and textures. The construction that joins legs and shapes the body creates a sturdy, well-proportioned toy I am proud to gift. Making the pom poms and beret gives me a relaxed, creative break that still produces a delightful finished piece. Overall, this pattern gives me a lovely little project that looks impressive without being overly complicated.

Louisa Llama Amigurumi Pattern step 1 - construction progress Louisa Llama Amigurumi Pattern step 2 - assembly progress Louisa Llama Amigurumi Pattern step 3 - details and accessories Louisa Llama Amigurumi Pattern step 4 - final assembly and finishing

Switch Things Up

I love how easy it is to customise this pattern by swapping yarn colours; try a soft pastel palette for a nursery-friendly version or deep earthy tones for a rustic look.

You can make the llama larger or smaller by changing the yarn weight and hook size β€” bulky yarn with a larger hook gives a cuddly chunky llama, while fingering yarn produces a petite collectible.

I often add embroidered details like eyelashes or rosy cheeks to give the face more personality; small changes to the placement of the muzzle or eyes will change the expression dramatically.

Replace the beret with a tiny beanie or a flower crown to suit different seasons and gift recipients.

If you want more playability, thread a thin wire through the neck before stuffing to create a slightly posable head.

For a modern twist, swap the blanket for a removable crocheted saddlebag or tiny pocket to hold small treasures.

You can experiment with different pom pom sizes and textures β€” fluffy chunky pom poms or sleek mini poms both look charming.

I like to mix yarn types for contrast: cotton for crisp feet and muzzle, and plush acrylic for a soft body.

Try surface crochet or slip stitch stripes on the blanket for an easy textured effect that doesnt add bulk.

Make a whole herd by altering colours and accessories β€” scarves, hats and blankets make each llama unique and gift-ready.

Common Mistakes & How to Fix Them

βœ— Skipping stitch markers when joining legs or starting rounds can cause misaligned joins; place a stitch marker at the start of each round and mark the joining stitch to maintain orientation. βœ— Not stuffing evenly causes the legs and body to wobble or sit unevenly; stuff gradually, push filling into the legs first and check that all four legs touch the surface before closing. βœ— Closing the leg joins prematurely will make assembling the body harder; follow the instructions to leave legs 2 and 4 open, chain and join them to the correct legs before continuing. βœ— Using a hook that is too large for the yarn will show filler and create a floppy fabric; use the recommended 3.5mm hook for the body and a 5mm hook for the scarf or choose a smaller hook if your tension is loose. βœ— Forgetting to weave in tails as you go leaves many ends to hide at the end; weave in ends throughout and crochet over loose ends where suggested to keep finishing time short.

Louisa Llama Amigurumi Pattern

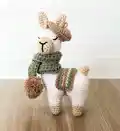
Make your own charming Louisa Llama with this detailed amigurumi pattern. Youll create a sweet stuffed llama complete with a beret, scarf and pom poms using clear step-by-step rounds and helpful photos. Perfect as a special handmade gift or a cozy shelf buddy, this pattern walks you through each piece from legs to accessories. Grab your yarn and hooks and enjoy crocheting this adorable little companion.

Intermediate 5-7 Hours

Materials Needed for Louisa Llama Amigurumi Pattern

β€” Main Fabric

  • 01
    Medium weight cotton/acrylic/polyester yarn in your choice of colours for the body, feet, muzzle, ears and tail
  • 02
    Black yarn for embroidering facial features
  • 03
    Abbey Road kung fu cotton (cream) - suggested for feet, muzzle, ears and tail (cotton for firm stitches)
  • 04
    Makr Colourmate - suggested soft polyester/acrylic for the body
  • 05
    Medium weight acrylic/polyester/wool yarn for blanket, scarf and beret (I use Heirloom Easy Care in magnolia, pale eucalyptus and hazelnut)

β€” Tools Required

  • 01
    US size E/3.5mm crochet hook (use for entire llama body and beret)
  • 02
    US size H/5.00mm crochet hook (use for scarf)
  • 03
    Polyester fiberfill for stuffing
  • 04
    Yarn needle (a bent tip yarn needle is generally easier for amigurumi)
  • 05
    Stitch markers
  • 06
    Scissors
  • 07
    Piece of cardboard for pom poms (or small pom pom maker if you have one)

Progress Tracker

0% Complete

β€” Legs :

Info :

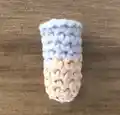
(Make 4) Start with cream yarn

Round 1 :

6 SC in a MR (6)

Round 2 :

(2 SC, inc) x 2 (8)

Round 3 :

8 SC (8)

Round 4 :

(3 SC, inc) x 2 (10)

Round 5 :

10 SC (10)

Info :

Change to main body yarn

Round 6 :

10 SC (10)

Round 7 :

(4SC, inc) x 2 (12)

Round 8-9 :

12 SC (12)

For legs 1 and 3 :

sl st and close after R9 Cut the yarn and weave in the tail
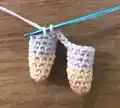
For legs 2 and 4 :

Do not close after R9. Chain 4, then join to legs 1 and 3 respectively with a SC (it helps to place a marker in this st) Do not cut the yarn So leg 2 connects to leg 1, and leg 4 connects to leg 3

β€” Legs/ Belly :

Info :

(For each of the two sets of joined legs) After the SC done in the previous step:

Round 1 :

8 SC, 3 inc, 4 SC (in the 4 ch between legs), 3 inc, 13SC (takes you to end of ch) sl st back into the SC with the stitch marker (38)

Info :

Close and cut the yarn. Weave in the ends.

β€” Body :

Info :

Line up the two leg sets on their flatter sides, and stitch 12 sl sts to attach them together (Use the middle 12 sts as per the image)

Info :

Ch 1 (put stitch marker in this ch, to mark where next round ends)

Round 1 :

54 SC around (26 SC, 1 SC in between the legs, 26 SC, 1 SC in marked ch stitch)

Round 2 :

13 SC, dec, 24 SC, dec, 13 SC (52)

Round 3 :

12 SC, dec, 24 SC, dec, 12 SC (50)

Round 4-6 :

50 SC (50)

Info :

Crochet 1 or 2 SC to get to the middle of the back of the llama and start next round from here

Round 7 :

4 SC, dec, 38 SC, dec, 4 SC (48)

Round 8 :

3 SC, dec, 38 SC, dec, 3 SC (46)

Round 9 :

2 SC, dec, 38 SC, dec, 2 SC (44)

Round 10 :

SC, dec, 38 SC, dec, SC (42)

Info :

Crochet 1 or 2 SC to get to the middle of the back of the llama

Info :

Make 12 sl sts to join two sides of back together (leave the one stitch at the very back unstitched)

Info :

This leaves 17 SC left over for the neck

β€” Neck :

Round 1 :

17 SC around, and 1 SC in middle line (18)

Info :

Stuff the legs and body of the llama, making sure to get filling all the way down the legs, and that all 4 legs touch the ground at once

Round 2 :

18 SC (18)

Round 3 :

(7 SC, dec) x 2 (16)

Round 4 :

16 SC (16)

Round 5 :

(6 SC, dec) x 2 (14)

Round 6 :

14SC (14)

Round 7 :

(5 SC, dec) x 2 (12)

Round 8 :

12 SC (12)

Info :

Stuff the neck

Info :

Do not close. The head continues straight from here

β€” Head :

Round 1 :

(SC, inc) x 6 (18)

Round 2 :

(2 SC, inc) x 6 (24)

Round 3 :

(3 SC, inc) x 6 (30)

Round 4-8 :

30 SC (5 rows of 30)

Round 9 :

(3 SC, dec) x 6 (24)

Round 10 :

(2 SC, dec) x 6 (18)

Round 11 :

(SC, dec) x 6 (12)

Info :

Stuff the head

Round 12 :

6 dec (6)

Info :

Close and cut the yarn, sew the hole closed and weave in the tail

β€” Tail :

Round 1 :

4 SC in a MR (4)

Round 2 :

4 inc (8)

Round 3-4 :

8 SC (8)

Info :

Close with a sl st and cut the yarn, leaving a long tail for sewing

Info :

Sew the tail to the body, above the first slip stitches that join the back

β€” Muzzle :

Round 1 :

6 SC in a MR (6)

Round 2 :

6 inc (12)

Round 3 :

(SC, inc) x 6 (18)

Round 4-5 :

18 SC (18)

Info :

Close with a sl st and cut the yarn, leaving a long tail for sewing

Info :

Sew muzzle to head, stuffing before you reach the end

β€” Ears :

Info :

(Make 2)

Round 1 :

4 SC in a MR (4)

Round 2 :

(SC, inc) x 2 (6)

Round 3 :

(2 SC, inc) x 2 (8)

Round 4 :

(3 SC, inc) x 2 (10)

Round 5-8 :

10 SC (10)

Info :

Flatten the ear and sl st closed along the top

Info :

Close and cut the yarn, leaving a long tail for sewing

Info :

Pinch the base of the ear and sew in place, before sewing on to the head

β€” Face :

Info :

Embroider the face using black yarn

β€” Blanket :

Info :

- Use size E/3.5mm hook - Colour change after each row if desired, using your preferred method. I alternate 3 colours as pictured below - Crochet over the ends as you go, or you can weave in the ends on the underside of the blanket at the end

Round 1 :

Make a slip knot, ch 19, 1 SC into 2nd ch from hook, 17 SC (18)

Round 2-5 :

Ch 1, turn, 18 SC (18)

Info :

Close with a sl st, cut the yarn and weave in the tails.

β€” Blanket Border :

Info :

Using border colour yarn, sl st on to the edge of the blanket and ch 1 (you can start in the corner if you prefer)

Info :

SC all the way around, with 3 SC in each of the corners

Info :

Sl st back into 1st st, close and cut the yarn and weave in the tail

Info :

Tie the blanket to the body by wrapping a piece of yarn around 2 or 3 times, and securing with a knot under the belly

β€” Scarf :

Info :

- Use size H/5mm crochet hook

Round 1 :

Make a slip knot, ch 62, HDC into 3rd ch from hook, 59 HDC (60)

Round 2 :

Ch 2, turn, 60 HDC (60)

Info :

Close and cut the yarn, and weave in the ends.

β€” Pom Poms for Scarf :

Info :

(Make 2) (You can use a small pom pom maker instead if you have one, or use another method if you prefer)

Step 1 :

Cut a piece of cardboard to 5cm (2 inch) wide

Step 2 :

Cut a slit down the middle of the cardboard, 3/4 of the way down

Step 3 :

Cut a piece of yarn around 25cm (10 inch) long and insert it between the slit, sliding it to the bottom of the opening

Step 4 :

Wrap the working yarn around the cardboard 80 or more times (the more times, the fuller the pom pom will be). Cut the working yarn

Step 5 :

Pull down on the 25cm (10 inch) length of yarn that's in the slit in the cardboard. Tie it tightly around the wraps and secure it with a knot

Step 6 :

Slide the pom pom off the cardboard. Tie an extra piece of yarn around the middle and knot to ensure it's tight

Step 7 :

Cut the ends of the loops

Info :

Trim the pom pom where necessary, making sure to leave two long ends for sewing on to the scarf

Info :

Use the long pieces of yarn from the pom poms to sew on to each end of the scarf, and secure with a double knot

Info :

Fold the scarf in half, place around the llama's neck and pull the ends through the loops to fit snugly

β€” Beret :

Info :

- Use size E/3.5mm hook - This is made using joined rounds, not a continuous spiral

Round 1 :

Start with a MR, leaving a 20cm (8 inch) tail for the beret's loop Ch 3 (count as a st), 10 DC (11)

Round 2 :

Sl st into 3rd ch of last round, ch 3 (count as a st), DC in same st, ch 4, sk 2, DC inc x 8 (22)

Round 3 :

Sl st into 3rd ch of last round, ch 3 (count as a st), DC inc, 6 DC in ch 4 space, (1 DC, DC inc) x 8 (33)

Round 4 :

Sl st into 3rd ch of last round, ch 3 (count as a st), DC around (33)

Round 5 :

Sl st into 3rd ch of last round, ch 1 (count as a st), inv dec, (SC, inv dec) x 10 (22)

Info :

Close with a sl st, cut the yarn and weave in the tail

Info :

Make a loop with yarn tail on top of the beret. Sew in a few stitches to secure, and finish with a knot inside the beret

Info :

Put the beret on the llama's head, with the hole over one ear

Assembly Instructions

  • Sew the muzzle to the head, stuffing the muzzle as you go so it sits rounded and secure on the face.
  • Pinch the base of each ear, sew the base closed and attach the ears to the top of the head, positioning them symmetrically.
  • Sew the tail to the body above the first slip stitches that join the back, using the long tail left for sewing to secure it firmly.
  • Attach the blanket by wrapping yarn around the body 2 or 3 times and tying a knot under the belly to secure the blanket in place.
  • Sew pom poms to each end of the scarf using the long yarn tails from the pom poms and knot securely; fold scarf and pull ends through the loop around the neck.

Important Notes

  • πŸ’‘Use stitch markers to keep track of your rounds and where you start/end each round for accurate shaping.
  • πŸ’‘Stuff firmly but not too tightly; overstuffing can distort shape while under stuffing will make the llama floppy.
  • πŸ’‘Crochet tightly enough so filler doesnt show; if your tension is loose, use a smaller hook to achieve a neater fabric.
  • πŸ’‘Weave in ends as you go or crochet over loose ends to reduce finishing work and keep the underside tidy.

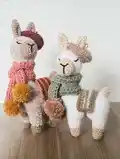
This lovely Louisa Llama pattern brings a tiny touch of handmade warmth to your home and makes a perfect gift for loved ones. Whether you choose soft pastels or bold contrasts, the blanket, beret and scarf let you customise the look with ease. Enjoy the relaxing process of crocheting and finishing the tiny details β€” each stitch adds personality and charm. 🧢🧡

You ask,

we answer.

FAQs

What size will the finished piece be?

The finished llama measures approximately 9-10 inches tall depending on yarn and tension: the white llama pictured (acrylic) is about 9 inches/23cm, and the beige llama (poly yarn) is about 10 inches/26cm.

Can I use different yarn weights for this pattern?

Yes, but changing yarn weight will affect final size and fabric. Use the recommended hook sizes for the yarn you choose and make a gauge swatch if you want a specific finished size.

Do I need prior crochet experience for this pattern?

This pattern is rated intermediate, so basic crochet skills (MR, SC, increases, decreases and joining) are recommended for best results.

How long does this project typically take to complete?

Most crocheters complete the llama and accessories in around 5-7 hours, though time may vary based on experience and how many accessories you make.

Are the rounds worked in a spiral or joined rounds?

The majority of the llama is worked in a spiral (continuous rounds) unless otherwise specified; the beret is made with joined rounds as noted in the instructions.