Make a charming Lucky Gnome Wreath to celebrate St. Patrick's Day or add a whimsical touch to your home. This pattern combines a striped crochet wreath with a sweet gnome, beard, hat, hands, shoes, and shamrocks. You'll enjoy simple shaping, bubble stitch texture for the beard, and easy assembly instructions to create a delightful handmade decoration.
Progress Tracker
0% Complete
— Materials :
Info :
Size 4 worsted weight yarn in 4 colors of green (Light, Lime, Forest, and Dark Green) and white, peach (skin tones) and brown (shoes) Orange (beard). I used Red Heart and Caron One Pound Greens, Lion brand antipill in the other colors. Fiber fill Stuffing 4.0 mm hook (wreath and gnome) 5mm hook (Shamrocks), Needle/Scissors Foam 10” wreath from (I got mine at the dollar tree.)
— Terms :
Infos :
Yarn Over – YO. Stitch – ST. Chain - CH. Single Crochet – SC. Double Crochet - DC. Slip Stitch – SL ST. Half Double Crochet – HDC. Triple Crochet - TR. Single Crochet 2 stitches together – SC2TOG (An invisible decrease stitch makes these look nice and smooth). Half Double Crochet 2 stitches together – HDC2TOG. Magic Circle – MC. Great tutorial for MC: https://www.youtube.com/watch?v=p298HxgsO1s. Half Double Crochet Foundation Stitch - HDCFS. Great Tutorial if this is unfamiliar: https://www.youtube.com/watch?v=I9Og5cd2L0o. Bubble Stitch – BS (explained in beard section). Between * * repeat this many additional times “x”. End of row (Parenthesis) total number of stitches in row. Note: when changing colors work ends into stitches as you go along. This allows for less end weaving at the end of project. Also, when changing colors, always finish previous stitch with new color this makes for a smoother color change. Big Note: I’m left-handed; all pictures are shown with left handed progress unless otherwise stated. Pattern works for both left and right-handed crafters.
— Rotating Greens :
Info :
4mm hook. Lime – A. Light Green – B. Forest Green – C. Dark Green – D. White – E
Round 1 :
With Color A - Chain 21, sc into 2nd chain from the hook and sc in each st across. Ch 1, Turn (20)
Round 2 :
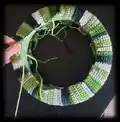
sc in each st across, ch 1, turn (20) This is a good time to wrap this piece around your wreath, it should wrap just right around. If not, start over and add a few stitches, if it's too loose, do a few less. Every row is crochet exactly as row 2. 20 stitches in each row.
Round 3 :
Colors are repeated as follows: -2 rows in color A (completed in rows 1 and 2) -3 rows in color B -4 rows in color C -1 rows in color D -1 rows in color E -4 rows in color A -2 rows in color B -1 rows in color C -4 rows in color D -3 rows in color E
Round 4 :
This pattern is repeated 4 more times. (A total of 5 times) (125 rows)
Round 5 :
Bring ends right sides together. Put hook into each 1st st, in row 125 and row 1. Sl ST across joining ends together and making a circle.
Round 6 :
Slide onto foam wreath right side out. Use color A about 40 inches long strand, sew sides together around the wreath. Be sure to match up stripes as you sew along. Its also a good idea to tuck in loose strands as you sew. Weave end ends.
— Gnome Hat :
Info :
With Forest Green, 4mm hook. Work in rounds.
Round 1 :
Hdcfs 38, join first and last stitch creating a circle with a slip stitch (be sure chain isn’t twisted.) You now will be working in rounds.
Round 2 :
HDC all the way around (38)
Round 3 :
HDC all the way around (38)
Round 4 :
HDC all the way around (38)
Round 5 :
HDC all the way around (38)
Round 6 :
HDC all the way around (38)
Round 7 :
HDC all the way around (38)
Round 8 :
*HDC next 4 st, HDC2tog* repeat 5x, HDC, HDC (32)
Round 9 :
HDC all the way around (32)
Round 10 :
*HDC next 6, HDC2tog* repeat 3x (28)
Round 11 :
HDC around (28)
Round 12 :
HDC around (28)
Round 13 :
*HDC next 5, HDC2tog* repeat 3x (24)
Round 14 :
HDC around (24)
Round 15 :
HDC around (24)
Round 16 :
*HDC next 4, HDC2tog* repeat 3x (20)
Round 17 :
HDC around (20)
Round 18 :
*HDC next 3, HDC2tog* repeat 3x (16)
Round 19 :
HDC all around (16)
Round 20 :
HDC all around (16)
Round 21 :
*HDC next 2, HDC2tog* repeat 3x (12)
Round 22 :
HDC all around (12)
Round 23 :
*HDC, HDC2tog* repeat 3x (8)
Round 24 :
HDC2tog 4 times. Leaving a long tail, cut and pull yarn through last stitch, thread with needle, push needle through front loops only of the 4 remaining stitches all the way around. Pull tight closing the hat. Weave through securing closed. Stuff very slightly with fiber fill. Put to the side.
— Beard :
Info :
With Orange, 4mm hook. Bubble stitch (BS) explained here.
Round 1 :
Ch4, turn, sc 2nd chain from the hook, 4dc bubble stitch (BS), sc, ch 1, turn.
Round 2 :
2sc in first st, sc, 2sc, ch1, turn. (5)
Round 3 :
sc, bs, sc, bs, sc, ch1, turn (5)
Round 4 :
2sc, sc, sc, sc, 2sc, ch1 turn (7)
Round 5 :
sc, bs, sc, bs, sc, bs, sc, ch1, turn (7)
Round 6 :
2sc, sc next 5, 2sc, ch 1 turn (9)
Round 7 :
sc, bs, sc, bs, sc, bs, sc, bs, sc, ch1, turn (9)
Round 8 :
2sc, sc next 7, 2sc, ch 1, turn (11)
Round 9 :
*sc, bs* 4x, sc, ch 1 turn (11)
Round 10 :
2sc, sc next 9, 2sc, ch 1, turn (13)
Round 11 :
*sc, bs* 5x, sc, ch 1 turn (13)
Round 12 :
2sc, sc next 11, 2sc, ch1, turn (15)
Round 13 :
*sc, bs* 6x, sc, ch 1 turn (15)
Round 14 :
2sc, sc next 13, 2sc, ch 1 turn (17)
Round 15 :
*sc, bs* 7x, sc, ch 1 turn (17)
Round 16 :
2sc, sc next 15, 2sc, ch1, turn (19)
Round 17 :
sc in each st across (19)
Info :
Tie off. Weave in all ends.
— Nose :
Round 1 :
With Skin Color, 4mm hook. sc 6 in mc. Pull tight. (6)
Round 2 :
2sc in each stitch around (12)
Round 3 :
*2 sc, 1 sc* repeat 5x (18)
Round 4 :
*2 sc, 1 sc, 1 sc* repeat 5x (24)
Round 5 :
sc all the way around
Round 6 :
sc all the way around
Round 7 :
*sc, sc, sc2tog* repeat 5x (18)
Round 8 :
sc all the way around (18)
Round 9 :
*sc, sc2tog* repeat 5x (12) Stuff with fiber fill
Round 10 :
*sc, sc, sc2tog* repeat 2x (9)
Round 11 :
sc around (9) Pinch opening flat, and sl st across both edges securing opening closed.
Info :
Place end of beard into bottom edge of hat. Then put nose end in, centered. Sew edges flat and closed.
— Hand :
Round 1 :
With Skin Color, 4mm hook. sc 6 in mc. Pull tight. (6)
Round 2 :
2sc in each stitch around (12)
Round 3 :
*2 sc, 1 sc* repeat 5x (18)
Round 4 :
sc all the way around (18)
Round 5 :
sc all the way around (18)
Round 6 :
*sc, sc2tog* repeat 5x (12)
Round 7 :
BS, sc the rest of the way around (12)
Round 8 :
*sc, sc, sc2tog* repeat 2x (9) Stuff (just the end of hand)
Round 9 :
sc all the way around (9)
Round 10 :
Change color to forest green
Round 11 :
sc all the way around (9)
Round 12 :
sc all the way around (9)
Round 13 :
sc all the way around (9)
Round 14 :
sc all the way around (9)
Round 15 :
sc all the way around (9)
Round 16 :
sc all the way around (9) tie off, leave length for sewing onto wreath.
— Shoes :
Round 1 :
With Brown Color, 4mm hook. Chain 6, start to crochet on the second chain from the hook, sc next 4, 4sc in last st, continue to crochet on the next stitches on the opposite side of the chain, sc next 3, 3 sc in last st (14)
Round 2 :
2sc, sc next 3, 2sc, 2sc, 2sc, 2sc, sc next 3, 2sc, 2sc, 2sc (22)
Round 3 :
Sc next 5, *2sc, sc* repeat 3x, sc next 5, *2sc, sc* repeat 1x (28)
Round 4 :
Back loop only: sc all the way around (28)
Round 5 :
sc next 5, *sc2tog, sc, sc* repeat 3x, sc next 7 (24)
Round 6 :
sc next 3, *sc2tog, sc, sc* repeat 3x, sc next 5 (20) Tie of, leave length for sewing to wreath. Stuff loosely.
— Shamrock :
Info :
With Dark Green Color, (pic shows light color) 5mm hook
Round 1 :
Ch4, sl st into first chain (OR you can do a MC)
Round 2 :
Crochet into the circle: *Ch3, Tr, DC, Tr, ch3, sl st* Repeat 2x making 3 pedals.
Round 3 :
Ch 5, work into chain: sc 2nd chain from the hook, sl st into the next 3, sl st into the circle. Tie off leave length for sewing to wreath.
— Finishing :
Info :
HDCFS 20, fold in half and sew ends to back/top of wreath. Sew hat and beard to bottom of wreath, sew arms to either side of hat at an angle. Sew shoes at an angle under hands to the wreath. Sew tip of hat down (optional). Sew Shamrocks to hat and sides. Hang and Celebrate. Erin go Bragh!
This Lucky Gnome Wreath brings a bit of handmade luck to your door with cozy stripes, a squishy hat, and a fuzzy bubble-stitch beard. It makes a lovely seasonal gift or cheerful home accent you can enjoy all spring long. Happy stitching and Erin go Bragh! 🍀🧶