🧢 Beautiful ✨ Detailed πŸ’ Adorable

Luma Amigurumi Pattern

Luma Amigurumi Pattern
4.7β˜… Rating
2-3 Hours Time Needed
2.7K Made This
βœ‚οΈ

Beginner Friendly Level

Perfect for those just starting their crochet journey, with clear instructions and simple techniques

⏱️

Bite-Sized Project

Finishes in 2-4 hoursβ€”perfect for an afternoon of creative relaxation.

🧸

Cute Companion

An adorable friend to cherish, handcrafted with love to bring comfort and joy for years to come.

About This Luma Amigurumi Pattern

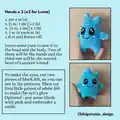
This pattern creates a small plush Luma star amigurumi made from plush or velvet yarn. You will crochet the legs, body and head mostly in one piece and add small hands/horns separately. It includes felt eye templates and simple finishing tips for a charming face.

Luma Amigurumi Pattern crochet pattern - detailed view of completed project

Perfect for beginner crocheters who want a quick stuffed toy project. The soft plush yarn gives a cuddly, velvety texture that children and adults will love.

Why You'll Love This Luma Amigurumi Pattern

I absolutely love this pattern because it turns simple stitches into an irresistibly cute plush in just a few hours. The use of velvet or plush yarn makes the finished toy unbelievably soft and huggable, which is a joy to gift. I appreciate how the pattern combines easy shaping with a little assembly so each maker can practice finishing skills. It feels rewarding to see the Luma come to life with just felt eyes and a stitched smile.

Luma Amigurumi Pattern step 1 - construction progress Luma Amigurumi Pattern step 2 - assembly progress Luma Amigurumi Pattern step 3 - details and accessories Luma Amigurumi Pattern step 4 - final assembly and finishing

Switch Things Up

I love customizing this pattern by changing colorsβ€”try pastel tones for a soft nursery friend or bright shades for a playful look.

I sometimes use a thicker plush yarn and a larger hook to make a chunkier, cuddlier version that works great as a mini pillow.

I also make keychain-sized Lum a by using thinner yarn and a smaller hook for a tiny, portable charm.

I like to swap the felt eyes for safety eyes if I'm making a toy for an older child, ensuring they are securely attached.

Embroidery is another easy change: alter the smile or add freckles to give each Luma unique personality and expression.

Try adding tiny crocheted accessories like a scarf, a tiny hat, or a bow for seasonal variations and gift-ready presentation.

I recommend experimenting with placement of the second horn/hand to create different silhouettes and characters from the same base pattern.

For a posable version, I add a short piece of wire armature to the limbs, which allows mild posing without risking the yarn structure.

If you love texture, combine plush yarn with a smooth cotton for details like a contrasting belly or ear tip.

I always recommend making one as written first, then use these tweaks to create a small collection of playful Lumas to gift or sell.

Common Mistakes & How to Fix Them
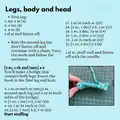
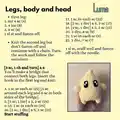
βœ— Skipping the magic ring and starting with chains can leave a hole at the top; always start legs with a magic ring to close the center neatly. βœ— Forgetting to stuff gradually leads to lumps and uneven shaping; stuff the piece bit by bit to maintain smooth contours while crocheting. βœ— Not counting stitches after increases or decreases makes rounds drift off count; count each round carefully, especially after any bracketed repeats. βœ— Fastening off too early when making the second leg bridge can break continuity; do not fasten off the second leg and follow the bridge sequence without cutting the yarn. βœ— Pulling your tension too tight with plush yarn makes stitches hard to work and distorts the fabric; use relaxed, even tension to keep the toy squishy and consistent.

Luma Amigurumi Pattern

Create an adorable plush Luma star with this easy-to-follow crochet pattern. You will crochet legs, body and head in one piece, make small hands/horns, and finish with felt eyes for a sweet expression. The pattern uses plush velvet yarn for a soft, squishy result you can gift or display. Perfect for a quick, satisfying handmade project that brings a smile.

Beginner Friendly 2-3 Hours

Materials Needed for Luma Amigurumi Pattern

β€” Main Fabric

  • 01
    Blue plush or velvet yarn (main color) - thick plush yarn as shown
  • 02
    Yellow plush or velvet yarn (alternate color) - thick plush yarn as shown
  • 03
    Black felt - small pieces for eyes
  • 04
    White felt - small pieces for eye highlights

β€” Tools Required

  • 01
    Crochet hook size 4 mm
  • 02
    Scissors
  • 03
    Knitting needle (for sewing pieces and finishing)
  • 04
    Marker or stitch marker
  • 05
    Stuffing (polyester fiberfill)
  • 06
    Yarn needle for sewing and weaving ends
  • 07
    Small pieces of black and white felt for eyes
  • 08
    Pins for placement (optional)

Progress Tracker

0% Complete

β€” Materials & Abbreviations :

Infos :

Blue and yellow yarn. use thick velvet or plush yarns. Crochet hook (4 mm). Black and white felt for the eyes. Stuffing. Marker. Knitting needle and scissors.

Info :

Note: anything written in brackets will be repeated during the round or the number of times indicated after the bracket.

Infos :

ch = chain. mr = magic ring. sc = single crochet. inc = increase. dec = decrease. sl st = slip stitch.

β€” Legs, body and head :

Info :

First leg:

Round 1 :

mr 4 sc (4)

Round 2 :

4 inc (8)

Round 3 :

8 sc (8)

Info :

1 sl st and fasten off.

Info :

Knit the second leg but don't fasten off and continue with a chain. Turn the work and follow the sequence:

Info :

[3 sc, 1 ch and turn] x 6. You'll make a bridge that connect both legs. Insert the hook in the first leg and knit:

Round 4 :

1 sc in each sc (22) [5 sc around each leg and 6 sc in both sides of the bridge].

Round 5 :

[3 sc, 1 inc] x 5, 2 sc (29)

Round 6-15 :

1 sc in each sc (29)

Round 16 :

[3 sc, 1 dec] x 5, 2 sc (22)

Info :

Start stuffing

Round 17 :

1 sc in each sc (22)

Round 18 :

[2 sc, 1 dec] x 5, 2 sc (17)

Round 18 :

1 sc, 3 dec, 10 sc (14)

Round 19 :

1 sc, 2 dec, 9 sc (12)

Round 20 :

1 sc in each sc (12)

Round 21 :

[1 sc, 1 dec] x 4 (8)

Info :

1 sl st, stuff well and fasten off with the needle.

β€” Legs, body and head (Luma) :

Info :

First leg:

Round 1 :

mr 4 sc (4)

Round 2 :

4 inc (8)

Round 3 :

8 sc (8)

Info :

1 sl st and fasten off.

Info :

Knit the second leg but don't fasten off and continue with a chain. Turn the work and follow the sequence:

Info :

[3 sc, 1 ch and turn] x 6. You'll make a bridge that connect both legs. Insert the hook in the first leg and knit:

Round 4 :

1 sc in each sc (22) [5 sc around each leg and 6 sc in both sides of the bridge].

Round 5 :

[3 sc, 1 inc] x 5, 2 sc (29)

Round 6-15 :

1 sc in each sc (29)

Round 16 :

[3 sc, 1 dec] x 5, 2 sc (22)

Info :

Start stuffing

Round 17 :

1 sc in each sc (22)

Round 18 :

[2 sc, 1 dec] x 5, 2 sc (17)

Round 19 :

[1 sc, 1 dec] x 5, 2 sc (12)

Round 20 :

3 dec, 6 sc (9)

Round 21 :

1 sc in each sc (9)

Round 22 :

2 dec, 7 sc (7)

Info :

1 sl st, stuff well and fasten off with the needle.

β€” Hands :

Info :

Hands x 3 (x2 for Luma)

Round 1 :

mr 4 sc (4)

Round 2 :

[1 sc, 1 inc] x 2 (6)

Round 3 :

[2 sc, 1 inc] x 2 (8)

Round 4 :

1 sc in each sc (8)

Info :

1 sl st and fasten off.

Info :

Leave some yarn to sew it to the head and the body. Two of them will be the hands and the third one will be the second horn of Lumalee's head.

β€” Eyes and Finishing :

Info :

To make the eyes, cut two pieces of black felt, as you can see in the pictures. Then cut four little pieces of white felt to make the eye's glow. Optional - put some blush with pink and embroider a smile.

Assembly Instructions

  • Attach the two hand pieces to the sides of the body at the level of rounds 6-8, leaving the third hand for the second horn; sew securely with matching yarn and a yarn needle.
  • Position the black felt eyes symmetrically on the face and glue or sew them in place, then add four small white felt pieces to create the eye glow as shown in the photos.
  • Stuff the body firmly but evenly before closing the final rounds; use small amounts of stuffing at a time to keep a smooth shape and avoid lumps.
  • Fasten off with a slip stitch, stuff well, and close the opening by sewing with the needle, weaving in the tail neatly inside the body.

Important Notes

  • πŸ’‘Use stitch markers to mark the beginning of rounds to keep track of your stitch counts and shaping.
  • πŸ’‘Start both legs with a magic ring to avoid holes and ensure a neat, tight center.
  • πŸ’‘Stuff gradually while working the shaping rounds so you can control the toy's final silhouette and avoid overstuffing.
  • πŸ’‘Leave adequate yarn tails on small pieces so you can sew them securely; a short tail makes assembly difficult.

This sweet Luma plush is quick to make and wonderfully soft thanks to plush velvet yarn. 🧢 It becomes a charming little companion with simple felt eyes and a stitched smile. 🧡 Make one in blue or yellow for a lovely pocket-sized gift that brightens anyone's day. ✨

You ask,

we answer.

FAQs

What size will the finished piece be?

The finished amigurumi measures approximately 10-14 cm tall when using thick plush velvet yarn and a 4 mm hook, depending on your tension.

Can I use different yarn weights for this pattern?

Yes, you can use different yarn weights, but this will affect the final size and texture; choose a suitable hook and expect size variations.

Do I need prior crochet experience for this pattern?

This pattern is beginner friendly and uses basic stitches like single crochet, increases, and decreases, so beginners with basic knowledge can follow it.

How long does this project typically take to complete?

Most crocheters complete this project in 2-4 hours, though time may vary based on experience level and chosen yarn.