🧶 Beautiful ✨ Detailed 💝 Adorable

Luma Amigurumi Pattern

Luma Amigurumi Pattern
3.9★ Rating
5-7 Hours Time Needed
3.0K Made This
✂️

Intermediate Level

Ideal for those with basic crochet experience, featuring slightly more advanced stitches and techniques to expand your skills.

⏱️

Weekend Treat

Takes 5-7 hours, making it an enjoyable project to finish over a couple of days.

🧸

Cute Companion

An adorable friend to cherish, handcrafted with love to bring comfort and joy for years to come.

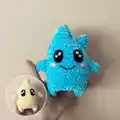
About This Luma Amigurumi Pattern

This pattern teaches you how to crochet a cute plush Luma using thick velvet or plush yarn for a soft, cuddly texture. You will make two connected legs that form the base, then shape the body and head in one continuous piece. Simple felt eyes and minimal embroidery finish the face for a sweet, expressive look.

Luma Amigurumi Pattern crochet pattern - detailed view of completed project

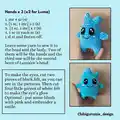
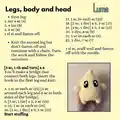
Includes step-by-step rounds for legs, body, head and hands, plus clear assembly notes and material lists. Ideal for making gifts, decorations, or a charming handmade companion.

Why You'll Love This Luma Amigurumi Pattern

I absolutely love this pattern because it turns simple stitches into a character full of charm with minimal pieces to sew. I enjoy how the bridge technique connects the legs for a sturdy base and smooth shaping for the body. I also love using plush yarn here — it makes the finished amigurumi incredibly soft and huggable. Creating the felt eyes and tiny embroidered smile always feels like bringing the character to life, and I find those finishing touches so satisfying.

Luma Amigurumi Pattern step 1 - construction progress Luma Amigurumi Pattern step 2 - assembly progress Luma Amigurumi Pattern step 3 - details and accessories Luma Amigurumi Pattern step 4 - final assembly and finishing

Switch Things Up

I love changing colors to create different personalities — switching the main yarn to pastel shades gives a softer, sweeter Luma.

You can make a mini keychain version by using lighter yarn and a smaller hook to reduce the size considerably.

I sometimes add embroidered freckles or different mouth shapes to alter expressions and make each Luma unique.

Try using safety eyes instead of felt if you prefer a cleaner, glossier eye finish; just be mindful if giving to small children.

I like to make a family of Lumalee in matching or complementary colors for a playful set display.

Swap plush yarn for a standard worsted acrylic for a more defined stitch look and a firmer finished toy.

I often stitch a tiny pocket or accessory onto the body for playful detail, like a mini scarf or a little felt star.

For posability, consider inserting thin wire into limbs during assembly, wrapping it securely with yarn before stuffing.

Use different sizes of hook and yarn to create a brooch, ornament, or larger plush — the pattern scales nicely.

I recommend experimenting with felt shapes and placement for the eyes to explore countless cute expressions on each version you make.

Common Mistakes & How to Fix Them

✗ Skipping the bridge rows between legs can leave a gap at the base; follow the [3 sc, 1 ch and turn] x 6 sequence carefully to form the bridge and then join both legs properly. ✗ Not stuffing gradually will create lumps and uneven shaping; start stuffing at 'Start stuffing' and add fiberfill in small amounts while checking the silhouette. ✗ Forgetting to leave a long tail on the hands will make sewing them on difficult; leave some yarn after fastening off so you can sew hands and the horn securely to the head and body. ✗ Ignoring the bracket note can cause incorrect stitch repeats and wrong stitch counts; remember that anything in brackets is repeated the number of times indicated after the bracket. ✗ Pulling increases or decreases too tightly can distort the shape; keep a consistent, moderate tension so the body retains an even, plump appearance.

Luma Amigurumi Pattern

Make this adorable plush Luma with thick velvet or plush yarn — a cute, squeezable amigurumi perfect for gifting or decorating. The pattern guides you through creating legs, body, head, hands and simple facial details using easy shaping techniques. With felt eyes and a little embroidery, you can personalize its expression and colors to match your style.

Intermediate 5-7 Hours

Materials Needed for Luma Amigurumi Pattern

— Main Fabric

  • 01
    Blue plush/velvet yarn (main color) — enough for one small amigurumi (approx 50-100g depending on yarn brand)
  • 02
    Yellow plush/velvet yarn (alternate color) — enough for one small amigurumi (approx 50-100g)
  • 03
    Black felt — small piece for eyes
  • 04
    White felt — small scraps for eye highlights
  • 05
    Polyester stuffing (fiberfill) — small amount to fill body and limbs

— Tools Required

  • 01
    Crochet hook size 4 mm
  • 02
    Scissors
  • 03
    Marker (stitch marker)
  • 04
    Yarn needle for sewing and weaving ends
  • 05
    Knitting needle (for stuffing or positioning)
  • 06
    Pins for assembly (optional)

Progress Tracker

0% Complete

— Abbreviations & Notes :

Infos :

Note: anything written in brackets will be repeated during the round or the number of times indicated after the bracket. ch = chain. mr = magic ring. sc = single crochet. inc = increase. dec = decrease. sl st = slip stitch.

— Legs, body and head :

Round 1 :

mr 4 sc (4)

Round 2 :

4 inc (8)

Round 3 :

8 sc (8)

Info :

1 sl st and fasten off.

Info :

Knit the second leg but don’t fasten off and continue with a chain. Turn the work and follow the sequence:

Round [bridge] :

[3 sc, 1 ch and turn] x 6

Info :

You’ll make a bridge that connect both legs. Insert the hook in the first leg and knit:

Round 4 :

1 sc in each sc (22) [5 sc around each leg and 6 sc in both sides of the bridge]

Round 5 :

[3 sc, 1 inc] x 5, 2 sc (29)

Round 6-15 :

1 sc in each sc (29)

Round 16 :

[3 sc, 1 dec] x 5, 2 sc (22)

Info :

Start stuffing

Round 17 :

1 sc in each sc (22)

Round 18 :

[2 sc, 1 dec] x 5, 2 sc (17)

Round 18 (alt) :

1 sc, 3 dec, 10 sc (14)

Round 19 :

1 sc, 2 dec, 9 sc (12)

Round 20 :

1 sc in each sc (12)

Round 21 :

[1 sc, 1 dec] x 4 (8)

Info :

1 sl st, stuff well and fasten off with the needle.

— Legs, body and head :

Round 1 :

mr 4 sc (4)

Round 2 :

4 inc (8)

Round 3 :

8 sc (8)

Info :

1 sl st and fasten off.

Info :

Knit the second leg but don’t fasten off and continue with a chain. Turn the work and follow the sequence:

Round [bridge] :

[3 sc, 1 ch and turn] x 6

Info :

You’ll make a bridge that connect both legs. Insert the hook in the first leg and knit:

Round 4 :

1 sc in each sc (22) [5 sc around each leg and 6 sc in both sides of the bridge]

Round 5 :

[3 sc, 1 inc] x 5, 2 sc (29)

Round 6-15 :

1 sc in each sc (29)

Round 16 :

[3 sc, 1 dec] x 5, 2 sc (22)

Info :

Start stuffing

Round 17 :

1 sc in each sc (22)

Round 18 :

[2 sc, 1 dec] x 5, 2 sc (17)

Round 19 :

[1 sc, 1 dec] x 5, 2 sc (12)

Round 20 :

3 dec, 6 sc (9)

Round 21 :

1 sc in each sc (9)

Round 22 :

2 dec, 7 sc (7)

Info :

1 sl st, stuff well and fasten off with the needle.

— Hands x 3 (x2 for Luma) :

Round 1 :

mr 4 sc (4)

Round 2 :

[1 sc, 1 inc] x 2 (6)

Round 3 :

[2 sc, 1 inc] x 2 (8)

Round 4 :

1 sc in each sc (8)

Info :

1 sl st and fasten off.

Info :

Leave some yarn to sew it to the head and the body. Two of them will be the hands and the third one will be the second horn of Lumalee’s head.

— Eyes and finishing :

Info :

To make the eyes, cut two pieces of black felt, as you can see in the pictures. Then cut four little pieces of white felt to make the eye's glow. Optional - put some blush with pink and embroider a smile.

Assembly Instructions

  • Sew the two hand pieces to the sides of the body at approximately the middle of the body height, leaving the third hand/horn to sew at the top side of the head as the second horn.
  • Position the felt black eyes on the face symmetrically and stitch or glue them in place; add the four small white felt pieces on each eye for highlights before securing.
  • Embroider a smile between and slightly below the eyes using black yarn or embroidery floss, and add pink blush with fabric paint or soft chalk if desired.
  • After finishing shaping and stuffing, close the final opening with a slip stitch and weave the yarn tail inside the body using a yarn needle to secure and hide the end.
  • Pin all parts in place and check symmetry before sewing; attach hands/horn firmly with the yarn tails left from each piece and reinforce ties with multiple passes.

Important Notes

  • 💡Use stitch markers to mark the beginning of rounds and maintain correct stitch counts throughout the shaping process.
  • 💡Stuff gradually as you crochet the body to maintain smooth, even shaping; overstuffing can change the silhouette.
  • 💡Leave long yarn tails when finishing the hands so you can neatly sew them to the body and head without extra joins.
  • 💡Pin pieces in place before sewing to ensure correct alignment and symmetry for eyes, hands and horn.
  • 💡Work with consistent tension and check stitch counts after each round to avoid shaping errors.

This cute Luma amigurumi is soft, squishy and perfect for gifting or decorating your space. The plush velvet yarn gives it a dreamy texture and the simple pattern creates a charming character with minimal parts. Make one in your favorite color and add tiny personal touches for a unique companion. 🧶🧵

You ask,

we answer.

FAQs

What size will the finished piece be?

The finished amigurumi measures approximately 10-14 cm tall when using recommended plush yarn and a 4 mm hook; exact size depends on yarn brand and stuffing.

Can I use different yarn weights for this pattern?

Yes, you can change yarn weight, but the final size will vary; use an appropriate hook for your yarn and expect different stitch counts per inch.

Do I need prior crochet experience for this pattern?

This pattern is rated intermediate because it uses continuous rounds, increases and decreases plus assembly; basic crochet skills are recommended.

How long does this project typically take to complete?

Most crocheters finish this project in 5-7 hours, depending on experience and the number of finishing details you add.