About This Luma Star Amigurumi Pattern
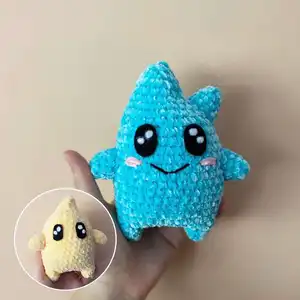
This pattern creates a charming Luma star amigurumi using thick velvet or plush yarn for a super-soft finish. It features two legs joined with a bridge, a rounded body that tapers into a star-like head, and small removable hands/horns. You will also make felt eyes and embroidery details to give Luma a friendly expression.
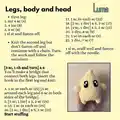
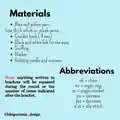
Clear round-by-round instructions are provided for each section (legs, body, head and hands). The pattern includes material and abbreviation lists plus sewing and finishing notes to help you assemble the toy neatly.
Why You'll Love This Luma Star Amigurumi Pattern
I absolutely love this pattern because it turns simple stitches into a delightfully squishy little friend that you can hold in one hand. I enjoy how the bridge between the legs creates a seamless body with a cute silhouette, and the plush yarn gives such a cozy, tactile finish. The felt eyes and embroidered smile let you personalize the expression easily, which is always fun for me. Making a set of these in different colors is something I keep coming back to because each one feels unique and handmade.
Switch Things Up
I love how easy it is to customize Luma's look with just yarn color changes; I often use pastel shades for a sweet baby-friendly version.
I sometimes change yarn weight and hook size to make a mini keychain version or a jumbo cuddle buddy — using thicker yarn makes a chunkier, cuddlier toy.
I like adding wire to the arms for posability; if you do this, insert the wire inside the arm and cover with stuffing before sewing it on securely.
Try embroidering different mouth shapes to change the expression — a wide smile, a surprised O, or a sleepy line can transform the character instantly.
For safety with small children, I recommend sewing felt eyes on securely or using embroidered eyes rather than glued pieces or loose embellishments.
I often add tiny accessories like a crochet scarf, a felt bow, or a tiny hat to personalize each Luma for gifting.
If you prefer a glossier eye look, try using small safety eyes instead of felt and offset them slightly for a different expression.
I recommend experimenting with two-tone bodies by changing color at a round to create a cute belly contrast or a gradient effect with stripes.
To make a set, I pick complementary colors (blue, yellow, pink) and embroider matching cheek colors so the group looks cohesive on display.
When making gifts, I include a small removable felt accessory like a star charm or tiny pocket — I sew a loop into the top seam so it can be changed later.
Common Mistakes & How to Fix Them
✗ Skipping the stitch marker when joining rounds can cause your rounds to drift; place a marker at the start of each round and move it as you go.
✗ Not stuffing gradually will give you an uneven or lumpy shape; stuff a little at a time during shaping to maintain smooth curves and correct form.
✗ Fastening off the first leg too early prevents creating the bridge; do not fasten off the second leg and continue with the chain to join both legs correctly.
✗ Using a hook that is too large for plush yarn will produce loose stitches and gaps; use the recommended 4 mm hook and adjust down if your stitches look too open.