🧢 Beautiful ✨ Detailed πŸ’ Adorable

Margaret Square Pattern

Margaret Square Pattern
4.2β˜… Rating
5-7 Hours Time Needed
3.4K Made This
βœ‚οΈ

Intermediate Level

Ideal for those with basic crochet experience, featuring slightly more advanced stitches and techniques to expand your skills.

⏱️

Weekend Treat

Takes 5-7 hours, making it an enjoyable project to finish over a couple of days.

🏑

Cozy Accent

A warm touch for your space that transforms ordinary corners into inviting nooks filled with handmade charm.

About This Margaret Square Pattern

The Margaret Square is a decorative crochet square featuring layered petals, 3rd-loop placement, post stitches and puff accents. It is worked in rounds with clear stitch counts and round-by-round photos to guide you. This square is ideal for using variegated or coordinated colorways to highlight the texture and shape.

Margaret Square Pattern crochet pattern - detailed view of completed project

Perfect for blankets, cushions, or as a focal square in larger projects. Includes colorway notes, stitch definitions, and detailed finishing tips.

Why You'll Love This Margaret Square Pattern

I absolutely love this pattern because it combines floral motifs with architectural shaping to create a truly captivating square. I designed the rounds to build texture gradually so each layer reads clearly and pops when blocked. I enjoy how the 3rd-loop and post stitch work add depth without overly complicating the construction. I also love that you can experiment with colorways to make the square feel soft and vintage or bold and modern. Working through the 15 rounds is satisfying and the finished, blocked square always looks polished.

Margaret Square Pattern step 1 - construction progress Margaret Square Pattern step 2 - assembly progress Margaret Square Pattern step 3 - details and accessories Margaret Square Pattern step 4 - final assembly and finishing

Switch Things Up

I love how easy it is to personalize this square by swapping colorways; try soft pastels for a vintage look or jewel tones for a bold statement.

I sometimes make a sleepy pastel center then shift to high-contrast outer rounds for a dramatic effect that still reads as a single motif.

If you want a larger motif, use a bulkier yarn and a larger hook β€” the rounds will expand and the texture will become chunkier and cozier.

To make a mini version for a keychain or brooch, use fingering or sport weight yarn with a much smaller hook and stop after round 8 or 9 to keep it small.

I often alter the border rounds to create a scalloped edge or a granny-style join-to-next-square edge depending on whether I need a decorative border or a joinable square.

Try adding beads to the puff stitches before closing off the puff for a subtle sparkle that catches the light in the finished square.

I also like using a variegated yarn for the inner rounds and a solid for outer rounds so the center blooms while the frame remains calm and structured.

For a modern version, use monochrome shades and a metallic thread held together with the main yarn in one or two rounds for a subtle sheen.

You can substitute stitched borders such as reverse single crochet (crab stitch) or a Tunisian simple border for extra texture and stability before blocking.

I recommend making a color plan sketch before starting so the petal layers contrast nicely and your square reads clearly once blocked.

Common Mistakes & How to Fix Them

βœ— Skipping the invisible join at the end of rounds can create uneven joins and bumps; always finish each round with the invisible join as instructed to maintain neat seams. βœ— Not folding and working behind previous rounds when directed will misplace stitches; follow the fold/placement instructions exactly to get the intended layered effect. βœ— Missing or misplacing the 3rd-loop placements will change the texture and stitch counts; locate the 3rd loop carefully and place post and 3LP stitches as shown. βœ— Failing to fasten off and weave in ends between color changes can create bulky joins; fasten off when instructed and weave in ends neatly to keep your square flat. βœ— Ignoring the blocking recommendation will leave your square uneven and slightly misshapen; block the finished piece to reach the correct final shape and size.

Margaret Square Pattern

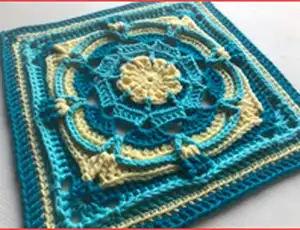
Create a stunning floral-inspired crochet square with layered texture and bold color changes. This pattern guides you through 15 detailed rounds to build a decorative square perfect for blankets, cushions, or standalone art. Youll enjoy the mix of post stitches, puff details, and 3rd-loop accents that give this square its unique depth. Clear round-by-round photos and stitch notes help you through each stage.

Intermediate 5-7 Hours

Materials Needed for Margaret Square Pattern

β€” Main Fabric

  • 01
    I Love This Cotton (Worsted Weight), 100% cotton (used for many sample colorways)
  • 02
    Yarn Bee ~ Tweed Indeed (blend: 36% acetate, 46% cotton, 6% viscose, 2% polyester)
  • 03
    Colorway 1: A - Buttercup (I Love This Cotton); B - Deep Turquoise (I Love This Cotton); C - Turquoise (I Love This Cotton)
  • 04
    Colorway 2: A - Pumpkin Tweed (Yarn Bee); B - Spunky Print (I Love This Cotton); C - Stonewash (I Love This Cotton)

β€” Tools Required

  • 01
    Crochet hook size 4.5 mm (for 11" x 11" finished sample)
  • 02
    Crochet hook size 5.00 mm (for 12" x 12" finished sample)
  • 03
    Stitch markers
  • 04
    Darning needle
  • 05
    Scissors
  • 06
    Pins and blocking board or surface (for blocking)
  • 07
    Tapestry/yarn needle for weaving in ends

Progress Tracker

0% Complete

β€” General Info :

Infos :

Hook/Finished Size: 11" x 11", 4.5 mm; 12" x 12", 5.00 mm. Crochet Terms: US terminology throughout. Skill Level: Intermediate. Yarn and Colors Used: I Love This Cotton (Worsted Weight), 100% cotton; Yarn Bee ~ Tweed Indeed, 36% acetate, 46% cotton, 6% viscose, 2% polyester. Colorway 1, A - Buttercup (I Love This Cotton); B - Deep Turquoise (I Love This Cotton); C - Turquoise (I Love This Cotton). Colorway 2, A - Pumpkin Tweed (Yarn Bee); B - Spunky Print (I Love This Cotton); C - Stonewash (I Love This Cotton). Additional Items Needed: Stitch markers and darning needle.

Infos :

STITCHES USED: magic circle (Double magic circle); standing stitch; Invisible join (Join); st(s) (Stitch/stitches); sp (Space); ch (Chain); yo (Yarn over); rnd (Round); slst (Slip stitch); sc (Single crochet); hdc (Half double crochet); FPhdc (Front post half double crochet); BPhdc (Back post half double crochet); dc (Double crochet); FPdc (Front post double crochet); BPdc (Back post double crochet); BLdc (Back loop double crochet); tr (treble crochet); BPtr (Back post treble crochet); dtr (Double treble crochet); puff (Puff stitch); 3LP (3rd loop of st); BL (Back loop).

Infos :

Special Instructions: All rnds begin with a standing stitch and end with an invisible join unless noted otherwise. To avoid ending a rnd with a ch sp, some rnds will begin with the 2nd st of a group (ex. 5 tr), and the repeat will end with the 1st st of that group. Example: *(4 tr) in ch 3 sp, ch 1; sk to next ch 3 sp, tr in next ch 3 sp*. Round-by-round pictures are also found at the end of the written pattern. The pattern author has added links and videos embedded in the PDF for stitch references and pictures.

β€” Rounds :

Round 1 :

In magic circle, ch 5 (as a dc AND ch 2); [dc, ch 1, dc, ch 2] 7 times; dc, ch 1; Invisible join to 4th ch of rnd, fasten off. Counts: 16 dc, 8 ch-1 sp, 8-ch 2 sp (40 total)

Round 2 :

Starting in any ch 2 sp, * (3 dc) in ch 2 sp; FPdc around dc; ch 1, sk ch 1 sp; FPdc around dc*; REPEAT FROM * TO * 7 MORE TIMES; Join: invisible join to 2nd dc of rnd, fasten off. Counts: 24 dc, 16 FPdc, 8-ch 1 sp (48 total)

Round 3 :

Starting in any ch 1 sp of rnd 1, *fold your work to the front and work behind rnd 2; dc in ch 1 sp of rnd 1, ch 3; sk to next ch 1 sp of rnd 1*; REPEAT FROM * TO * 7 MORE TIMES; Join: invisible join to 1st ch of rnd, fasten off. Counts: 8 dc, 8-ch 3 sp (32 total)

Round 4 :

Starting in any ch 3 sp, * (3 dc) in ch 3 sp; ch 1, sk st; dc in next ch 3 sp*; REPEAT FROM * TO * 7 MORE TIMES; Join: invisible join to 2nd dc of rnd, fasten off. Counts: 32 dc, 8-ch 1 sp (40 total)

Round 5 :

Starting in 1st dc after any ch 1 sp, *sc in 4 sts; tr in ch 1 sp of rnd 2; sk ch 1 sp*; REPEAT FROM * TO * 7 MORE TIMES; Join: invisible join to 2nd sc of rnd, fasten off. Counts: 32 sc, 8 tr (40 total)

Round 6 :

Starting in 2nd sc of any group of 4, *BLdc in 3 sts; (dc, ch 3, dc) in tr AND 3LP; BLdc in next st*; REPEAT FROM * TO * 7 MORE TIMES; Join: invisible join to 2nd dc of rnd, fasten off. Counts: 16 dc, 32 BLdc, 8-ch 3 sp (72 total)

Round 7 :

Starting in any ch 3 sp; * (6 tr) in ch 3 sp, ch 1; sk to next ch 3 sp, tr in next ch 3 sp*; REPEAT FROM * TO * 7 MORE TIMES; Join: invisible join to 2nd tr of rnd, fasten off. Counts: 56 tr, 8-ch 1 sp (64 total)

Round 8 :

Starting in 2nd tr of any group of 7, *[(2 dc) in BL AND 3LP of tr; dc in BL AND 3LP of tr] 3 times; ch 1, sk ch 1 sp; dc in BL AND 3LP of tr*; REPEAT FROM * TO * 7 MORE TIMES; Join: invisible join to 2nd dc of rnd, fasten off. Counts: 80 BLdc, 8-ch 1 sp (88 total)

Round 9 :

Starting in 2nd BLdc after any ch 1 sp, *dc in BL AND 3LP of 9 sts; working in front of rnd 8, (tr, ch 2, tr) in ch 1 sp of rnd 7; sk ch 1 sp, dc in BL AND 3LP of dc*; REPEAT FROM * TO * 7 MORE TIMES; Join: invisible join to 2nd dc of rnd, fasten off. Counts: 80 BLdc, 16 tr, 8-ch 2 sp (112 total)

Round 10 :

Starting in any ch 2 sp, *(2 dtr, ch 2, 2 dtr) in ch 2 sp, sk st; BPtr around 2 sts; BPdc around 2 sts; BPhdc around 6 sts; ch 1, sk st, ([puff, ch 1] 2 times; puff) in ch 2 sp; ch 1, sk st, BPhdc around 6 sts; BPdc around 2 sts; BPtr around 2 sts; sk st*; REPEAT FROM * TO * 3 MORE TIMES; Join: invisible join to 2nd dtr of rnd, fasten off. Counts: 48 BPhdc, 16 BPdc, 16 BPtr, 16 dtr, 12 puff, 16-ch 1 sp, 4-ch 2 corner sp (124 total/31 per side)

Round 11 :

Starting in any ch 2 corner sp, *(2 dc, ch 2, 2 dc) in ch 2 corner sp; dc in 3LP of 5 sts; hdc in 3LP of 4 sts; sc in 3LP of 2 sts; ch 1, sk st AND ch 1 sp, [(FPdc, ch 1) 2 times around puff] 3 times; sk ch 1 sp AND st; sc in 3LP of 2 sts; hdc in 3LP of 4 sts; dc in 3LP of 5 sts*; REPEAT FROM * TO * 3 MORE TIMES; Join: invisible join to 2nd dc of rnd, fasten off. Counts: 16 sc, 32 hdc, 24 FPdc, 56 dc, 28-ch 1 sp, 4-ch 2 corner sp (156 total/39 per side)

Round 12 :

Starting in any ch 2 corner sp, *(2 tr, ch 2, 3 tr) in ch 2 corner sp; ch 1, sk 4 sts; dc in 9 sts; [FPhdc around (FPdc, ch 1, FPdc)] 3 times; dc in 9 sts; ch 1, sk 4 sts; tr in ch 2 corner sp*; REPEAT FROM * TO * 3 MORE TIMES; Join: invisible join to 2nd tr of rnd, fasten off. Counts: 12 FPhdc, 72 dc, 24 tr, 8-ch 1 sp, 4-ch 2 corner sp (116 total/29 per side)

Round 13 :

Starting in any ch 2 corner sp, *(2 dc, ch 2, 2 dc) in ch 2 corner sp; BPdc around 3 sts; dc in ch 1 sp; BPdc around 9 sts; BPhdc around 3 sts; BPdc around 9 sts; dc in ch 1 sp; BPdc around 3 sts*; REPEAT FROM * TO * 3 MORE TIMES; Join: invisible join to 2nd dc of rnd, fasten off. Counts: 24 dc, 96 BPdc, 12 BPhdc, 4-ch 2 corner sp (132 total/33 per side)

Round 14 :

Starting in any ch 2 corner sp, *(sc, ch 2, sc) in ch 2 corner sp; sc in 33 sts*; REPEAT FROM * TO * 3 MORE TIMES; Join: invisible join to 1st ch of rnd, fasten off. Counts: 140 sc, 4-ch 2 corner sp (140 total/35 per side)

Round 15 :

Starting in any ch 2 corner sp, *(2 dc, ch 2, 2 dc) in ch 2 corner sp; BLdc in 35 sts*; REPEAT FROM * TO * 3 MORE TIMES; Join: invisible join to 2nd dc of rnd, fasten off. Counts: 16 dc, 140 BLdc, 4-ch 2 corner sp (156 total/39 per side)

Info :

I highly recommend you block this square to achieve your final shape and size. Blocking will also make your stitches even, more defined and give your square a more professional appearance. You can either wet block or steam block, but always make sure you are careful when steam blocking acrylic yarn. Round-by-round pictures are available at the end of the written pattern for reference. This pattern is copyright protected; you may only print a copy for your own use.

Assembly Instructions

  • Block the finished square to shape and size: wet block or steam block as appropriate for your yarn, pin to a square and allow to dry thoroughly.
  • Weave in all ends securely using a darning/tapestry needle so there are no loose tails at color changes or joins.
  • If joining multiple Margaret Squares, lay squares flat, align motifs and use your preferred join method (whipstitch, single crochet join or mattress stitch) ensuring corners meet and petals align.
  • Pin any layers or sections before final stitching to ensure symmetry; use photos in the round-by-round section as guides for placement.
  • If using for a cushion or pillow, block first, then join to backing fabric or additional squares, sew edges securely and finish with hidden stitches for a neat seam.

Important Notes

  • πŸ’‘Use stitch markers to keep track of rounds, especially during repeats and shaping sections.
  • πŸ’‘Work the 3rd-loop and post stitches carefully; misplacing them will change texture and stitch counts.
  • πŸ’‘Fasten off and weave in ends after color changes as directed to avoid bulky joins and ensure a neat finish.
  • πŸ’‘Block the square to achieve final shape and consistent stitch definition for a professional appearance.

This Margaret Square pattern brings floral texture and structural stitches together for a beautiful decorative square. Use contrasting colorways to highlight the petal layers and third-loop details for extra dimension. Block to reveal crisp edges and let your color choices shine. 🌸🧢

You ask,

we answer.

FAQs

What size will the finished piece be?

The finished square measures approximately 11" x 11" using a 4.5 mm hook and the recommended yarn; using 5.0 mm and slightly different tension can produce a 12" x 12" square.

Can I use different yarn weights for this pattern?

Yes, you can use different yarn weights but this will affect the final size and drape; switch hook size accordingly and make a gauge test square if exact size is important.

Do I need prior crochet experience for this pattern?

This pattern is rated intermediate and uses techniques like 3rd-loop placement, front and back post stitches and puff stitches, so familiarity with post stitches and reading round instructions is recommended.

How long does this project typically take to complete?

Most crocheters complete this square in 5-7 hours depending on experience, color changes and whether you follow the blocking step.