๐Ÿงถ Beautiful โœจ Detailed ๐Ÿ’ Adorable

Market Bag Pattern

Market Bag Pattern
3.9โ˜… Rating
5-7 Hours Time Needed
3.4K Made This
โœ‚๏ธ

Intermediate Level

Ideal for those with basic crochet experience, featuring slightly more advanced stitches and techniques to expand your skills.

โฑ๏ธ

Weekend Treat

Takes 5-7 hours, making it an enjoyable project to finish over a couple of days.

โœจ

Stylish Touch

An elegant detail to elevate any look, combining traditional techniques with contemporary design sensibilities.

About This Market Bag Pattern

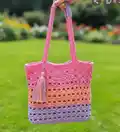
This pattern teaches you how to crochet a colorful market bag using Red Heart Nylon (100% nylon) yarn and simple stitch repeats. Youll work a rectangular bottom, join in the round, build the body with crossed double crochet details, and add handle holes and straps. The bag is lightweight, practical, and finished with optional tassels or shoulder padding.

Market Bag Pattern crochet pattern - detailed view of completed project

Includes full row-by-row written instructions with photos and a tutorial video link for step-by-step help. Ideal for making a gift or a handy everyday tote.

Why You'll Love This Market Bag Pattern

I absolutely love this pattern because it combines simple repeating stitches with a lovely textured crossed double crochet that looks much more complex than it actually is. I enjoy the quick reward of working the flat rectangle bottom, then seeing it transform as you join and build the body in rounds. The handle-hole placement and optional shoulder crochet make it practical and comfortable to use, which I always appreciate when testing bags. It is rewarding to finish a piece that is both beautiful and useful, and I hope you feel that same joy as you crochet this project.

Market Bag Pattern step 1 - construction progress Market Bag Pattern step 2 - assembly progress Market Bag Pattern step 3 - details and accessories Market Bag Pattern step 4 - final assembly and finishing

Switch Things Up

I love experimenting with colors on this bag; you can switch to pastel tones for a soft look or vibrant brights for a statement piece.

I often change yarn weight to make different sizes: use bulky yarn for a chunky carryall or fingering yarn for a delicate mini bag.

I sometimes line the bag with fabric to make it sturdier and to protect small items; add an inner pocket for keys and phone for extra function.

I recommend trying a leather strap instead of crocheted handles for a mixed-material design that adds durability and style.

I like to add a snap or zipper closure across the top for security; sew it to the top row after final SC and slip stitch finishing.

I sometimes create a set of matching accessories like a tassel, coin pouch, or keychain using leftover yarn for a coordinated gift set.

I advise experimenting with handle length: shorten for a hand-held tote or extend for a crossbody by adding more chain length.

I also enjoy embroidery details on the front panel; a few simple chain stitches or french knots highlight the crochet texture beautifully.

I recommend reinforcing handle attachment points with extra stitching or a small fabric patch inside the bag to distribute weight for heavier loads.

I often make the shoulder pad removable by sewing it with buttons or snaps so it can be cleaned separately or swapped for a different color.

Common Mistakes & How to Fix Them

โœ— Not placing stitch markers for rounds and handle-hole markers; place a marker at the start of each round and mark handle-hole positions to avoid misplacing holes or losing the round count. โœ— Skipping the spiral single crochet technique instruction can create visible joins; work SC in spiral and attach a stitch marker in the first stitch every row to keep edges straight. โœ— Forgetting to change yarn color exactly on the instructed row will disrupt the stripe pattern; plan color changes and switch yarn at the end of the specified row so stripes line up evenly. โœ— Not measuring the bag width before placing handle holes may produce uneven holes; measure 21 cm total width and mark 7 cm from each side to place handle-hole markers accurately. โœ— Crocheting with inconsistent tension when making handles will make them uneven or twist; maintain consistent tension and block or press handles lightly if necessary before attaching. โœ— Leaving yarn tails unfastened when cutting will result in loose ends later; cut with a small tail and tidy up ends immediately after finishing rounds or handles for a neater finish.

Market Bag Pattern

Make a stylish, reusable market bag with this clear step-by-step crochet pattern. Youll learn a mix of double crochet and crossed double crochet stitches to create a pretty textured body and neat handle holes. This pattern is perfect for making a colorful, functional tote to carry groceries or everyday items. Follow the photo steps and video link provided for extra guidance.

Intermediate 5-7 Hours

Materials Needed for Market Bag Pattern

โ€” Main Fabric

  • 01
    Red Heart Nylon Crochet Yarn (100% Nylon), Light worsted weight yarn, total approx 654 yards (600 meters) in length
  • 02
    Assorted colors as desired (examples shown: pink, peach, purple) - use enough to create stripes for the body (approx total listed above)

โ€” Tools Required

  • 01
    Crochet hook size 4/0 (2.5 mm) or 5/0 (3.0 mm)
  • 02
    Scissors
  • 03
    Matches
  • 04
    Meter (measuring tape)
  • 05
    Stitch markers
  • 06
    Tapestry needle for sewing handles
  • 07
    Yarn needle for weaving in ends

Progress Tracker

0% Complete

โ€” Preliminary :

Info :

Greetings from us Tutorial Rajut.Id... Thank you for purchasing this Crochet Market bag pattern. I am so proud to be walking down my usual route around the market with a handmade crochet market bag happily swinging on my shoulder. It gets lots of smiles and turns a few heads. Our hope is that this pattern can be understood and practiced easily. Happy Crochetting... ====================== Thank you ======================

Info :

Definition: Crochet market bag is a big need to slung over your shoulders while shopping or on a picnic trip. and crochet market bags also become crucial to stroll through the farmer's market, grocery stores, and local produce shops. The resulting of Crochet Market bag is approximately : Bag Bottom Width 21x6 cm / 8.27"x2.36". Height 24 cm / 9.45"

โ€” Tools and Materials Needed :

Info :

1) Red Heart Nylon Crochet Yarn (100% Nylon), Light Worsted weight yarn 654 yards or 600 meters in length. 2) Hook 4/0(2.5mm) or 5/0 (3.0mm). 3) Scissors. 4) Matches. 5) Meter. 6) Stitch Marker.

โ€” Basic Stitch that Used :

Infos :

In making this Vinta Waistbag, several basic stitches are used, including : 1) Chain (CH) 2) Single Crochet (SC) 3) Double Crochet (DC)

Info :

4) Crossed Double Crochet 5) Slip Stitch (SL-ST) 6) Turn Chain (TCH) 7) Skip (SK)

โ€” Crossed Double Crochet Instruction :

Info :

To Make a Crossed double Crochet : Yarn over, Skip the next stitch and Insert hook into the following stitch. Pull up a loop. Yarn over pull through first two loops, yarn over and pull through last two loops. In the stitch you skipped in number one, yarn over, insert hook and pull up a loop. Yarn over pull through first two loops, yarn over and pull through last two loops.

โ€” Maintenance :

Info :

In caring for knitted/crocheted work there are several things that must be considered : 1) Wash by hand using soft detergent and warm water at 40ยฐc. 2) If there is a stubborn stain, you can brush it with a soft brush with the help of soap. 3) Don't use bleach product. 4) Drying should not be exposed to direct sunlight, just let it dry.

โ€” Pattern :

โ€” Bottom of the bag :

Round 1 :

Row 1: 12CH. And then, 1TCH + 12SC (12sts)

Round 2-48 :

Row 2 - 48: 1TCH + 12SC (12sts)

Round 49 :

Row 49: SC around. And make Slip Stitch as the last step (120sts)

โ€” Body of the bag :

Round 1 :

Row 1: 3CH + 119DC. And slip stitch in 3rd CH for last step (120sts)

Round 2 :

Row 2: (1 Cross Stitch + 2CH + SK 2sts) 30x. And slip stitch in 3rd CH for last step (120sts)

Round 3 :

Row 3: 3CH + 119DC. And slip stitch in 3rd CH for last step (120sts)

Round 4 :

Row 4: (1 Cross Stitch + 2CH + SK 2sts) 30x. And slip stitch in 3rd CH for last step (120sts)

Round 5-6 :

Row 5-6: Odd Row: 3CH + 119DC. And slip stitch in 3rd CH for last step. Even Row: (1 Cross Stitch + 2CH + SK 2sts) 30x. And slip stitch in 3rd CH for last step (120sts)

Round 7 :

Row 7: Change Yarn Color : 3CH + 119DC. And slip stitch in 3rd CH for last step (120sts)

Round 8-18 :

Row 8 - 18: Even Row: (1 Cross Stitch + 2CH + SK 2sts) 30x. And slip stitch in 3rd CH for last step. Odd Row: 3CH + 119DC. And slip stitch in 3rd CH for last step. Don't forget for change the yarn color again in row 13th (120sts)

Round 19 :

Row 19: 3CH + 119DC (120sts)

Round 20-21 :

Row 20-21: 120SC. Make SC with spiral Teqnique, so attach stitch marker in first stitch every row (120sts)

Round 22 :

Row 22: This Bag is 21 cm wide, so I will place 7cm for the right and left sides of the bag to make the handle holes. (Front & Back of Bag). And then continue make SC around, but every Stitch marker for the handle holes, make (3CH + SK 3sts) and make SC around again. See the final result in the photo section.

Round 23 :

Row 23: 120SC. Make SC with spiral Teqnique, so attach stitch marker in first stitch every row. Then make a Slip Stitch in the last stitch for end. Next Cut the yarn and tidy up (120sts)

โ€” Making the Handles :

Round 1 :

Row 1: Make Chain 120cm (length of chain for handle) ( - )

Round 2 :

Row 2: Fill 1DC each stitches and make a slip stitch the last stitch. And then cut a bit long for sewing to the other side ( - )

Round 3 :

Row 3: Attach the handle through the 4 holes, and sew the two ends of the handle with tapestry needle. See the final result in the photo section ( - )

โ€” Make shoulder crochet for a more comfortable handles when used. :

Round 1 :

Row 1: 21CH (21sts)

Round 2 :

Row 2: 3TCH + 20DC (21sts)

Round 3-5 :

Row 3-5: 3TCH + 20DC. And then cut a bit long for sewing to the other side (21sts)

Info :

Make one more shoulder crochet with the same pattern. Sew on the handle of the shoulder bag with tapestry needle.

Info :

Add tassel or other accessories to make the bag more beautiful.

โ€” Notes and Final :

Info :

NB : This is link Tutorial Video Vinta Bags : https://youtu.be/RIemC-A6XkY. You can use Custom Accessories, like the Final Result like the Image at the end of this PDF.

Info :

The Final Result: see photos section for styling ideas and placement of handles and tassels.

Assembly Instructions

  • Attach each handle through the four marked handle holes on the front and back of the bag, then sew the two ends of the handle securely with a tapestry needle.
  • Sew the long shoulder handles (chain + DC) to the bag at the marked handle holes and reinforce stitching by sewing through the bag edge several times for strength.
  • Sew the shoulder crochet pads onto the handle by aligning the shoulder pad center over the handle and whipstitching ends with a tapestry needle for comfortable carrying.
  • Add tassels or accessories by folding yarn strands, inserting them at a chosen stitch on the top edge, and securing with a knot or small whipstitch using a yarn needle.
  • Weave in all yarn tails neatly on the inside of the bag and trim, then tidy up edges and cut excess yarn after making a final slip stitch and knot at the end of Row 23.
  • Before final assembly, pin the handles and accessories in place and check symmetry; adjust and resew if necessary to ensure even placement and comfortable balance.

Important Notes

  • ๐Ÿ’กUse stitch markers to keep track of the start of each round and to mark handle-hole positions for consistent placement across front and back.
  • ๐Ÿ’กMake SC in spiral for Rows 20-23 and attach a stitch marker to the first stitch every row to avoid visible seams and keep edges neat.
  • ๐Ÿ’กMeasure 21 cm width before marking handle holes: leave 7 cm from each side to make the 3CH + SK3sts handle holes in the front and back.
  • ๐Ÿ’กChange yarn colors exactly on the instructed rows (Row 7 and Row 13) to achieve even color stripes and avoid unexpected transitions.
  • ๐Ÿ’กCut a bit of yarn long when finishing handles so you have enough tail to sew and secure the handle ends with a tapestry needle.

This Market Bag pattern brings a bright, handmade touch to your everyday shopping and outings. It combines pretty stitch texture with practical handle holes and comfortable shoulder options. Make it your own with color choices and tassel accents. ๐Ÿ‘œ๐Ÿงถ

You ask,

we answer.

FAQs

What size will the finished piece be?

The finished bag measures approximately 21 cm wide by 24 cm high (bag body) with a 6 cm bottom depth when using the recommended yarn and hook sizes.

Can I use different yarn weights for this pattern?

Yes, you can use different yarn weights but this will change the finished size; adjust your hook size accordingly and test gauge to reach the desired dimensions.

Do I need prior crochet experience for this pattern?

This pattern is rated intermediate and uses double crochet and crossed double crochet; some experience with DC and reading rows is recommended for best results.

How long does this project typically take to complete?

Most crocheters finish this bag in about 5-7 hours depending on speed, experience, and whether you make shoulder padding or extra accessories.

Is there a tutorial video to follow along?

Yes, the PDF includes a tutorial video link (https://youtu.be/RIemC-A6XkY) to help with step-by-step visual guidance for construction and assembly.