🧢 Beautiful ✨ Detailed πŸ’ Adorable

Market Bag Pattern

Market Bag Pattern
4.5β˜… Rating
5-7 Hours Time Needed
1.3K Made This
βœ‚οΈ

Intermediate Level

Ideal for those with basic crochet experience, featuring slightly more advanced stitches and techniques to expand your skills.

⏱️

Weekend Treat

Takes 5-7 hours, making it an enjoyable project to finish over a couple of days.

✨

Stylish Touch

An elegant detail to elevate any look, combining traditional techniques with contemporary design sensibilities.

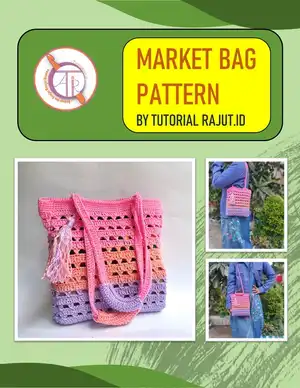
About This Market Bag Pattern

This pattern creates a compact, rectangular market bag worked from a flat bottom rectangle up into a textured body using cross stitches and double crochets. The bag includes instructions for creating handle holes, long carrying handles, and optional comfortable shoulder crochet pads. The pattern includes detailed row-by-row instructions, photos, and finishing notes so you can reproduce the sample exactly or customize it.

Market Bag Pattern crochet pattern - detailed view of completed project

Suitable for light-worsted nylon yarn and a small hook to achieve a neat, sturdy fabric. You will learn spiral single crochet finishing, creating handle holes, and attaching sewn handles securely.

Why You'll Love This Market Bag Pattern

I absolutely love this pattern because it combines practical construction with pretty stitch texture to create a bag you will actually use every week. I enjoy how the repeating cross-stitch rows give a lace-like look while keeping the bag strong enough for errands. Changing yarn colors partway through makes each bag feel unique and gives a fun, ombre result with minimal effort. The handle hole placement and sewn handles provide a secure finish I always appreciate when testing for durability. I also love that the pattern includes photo guidance and a video link, which makes the process more reassuring and enjoyable for makers.

Market Bag Pattern step 1 - construction progress Market Bag Pattern step 2 - assembly progress Market Bag Pattern step 3 - details and accessories Market Bag Pattern step 4 - final assembly and finishing

Switch Things Up

I love how easily this pattern can be customized: swap out yarn colors to create ombre, stripes, or block color effects to suit your wardrobe.

I often make a larger version by using a thicker yarn and a larger hook for a roomy market tote; decrease the foundation chains if you want a smaller pouch.

I sometimes add a cotton lining for extra strength and to keep small items from poking through the holes; sew the lining in before attaching handles.

I recommend experimenting with handle length β€” shorten for a hand-held tote or lengthen for a crossbody style by adding another 20-40 cm to the chain length.

I like to reinforce handle attachment points with an extra row of single crochet or a small leather patch on the inside for heavier loads.

For a more polished look, try hiding color change joins inside a decorative slip-stitch row or by using duplicate stitch to tidy edges.

I also enjoy adding pockets: crochet a small pocket panel and sew it to the inside before finishing the top rows for practical storage.

To make the bag sturdier, consider using two strands of yarn held together at the base or using a linen-cotton blend yarn for extra durability.

I sometimes embellish with tassels, pom-poms, or an appliqued motif to personalize each bag for gift-giving or seasonal themes.

Don't be afraid to combine stitches β€” you can replace the cross stitch rows with other openwork patterns as long as stitch counts and row heights remain compatible.

Common Mistakes & How to Fix Them

βœ— Not counting starting chains and turning chains accurately; recount your chains and the first row immediately to ensure the foundation has the correct number of stitches. βœ— Skipping stitch markers when working spiral single crochet rows; place a marker in the first stitch of each spiral row to keep your rounds aligned and avoid drift. βœ— Changing yarn color without securing ends neatly; carry or weave in ends at color changes and tidy them as you go to avoid bulky seams later. βœ— Making handle holes too small or uneven; measure and mark 7cm from each side as instructed, use stitch markers and double-check spacing before skipping stitches.

Market Bag Pattern

Make a stylish, lightweight crochet market bag perfect for errands, farmers markets, or everyday use. This pattern walks you through the rectangular base, textured body rows, handle construction, and finishing so you can recreate the sample bag step-by-step. With clear photos and practical tips, you can customize colors, handle length, and optional shoulder pads to suit your style. Ideal for makers who enjoy a photo-supported written pattern.

Intermediate 5-7 Hours

Materials Needed for Market Bag Pattern

β€” Main Fabric

  • 01
    Red Heart Nylon Crochet Yarn (100% Nylon), Light Worsted weight yarn, 654 yards or 600 meters in length

β€” Tools Required

  • 01
    Crochet hook 4/0 (2.5mm) or 5/0 (3.0mm)
  • 02
    Scissors
  • 03
    Matches
  • 04
    Meter (measuring tape)
  • 05
    Stitch Marker
  • 06
    Tapestry needle for sewing handles
  • 07
    Optional: stitch markers to mark handle hole locations

Progress Tracker

0% Complete

β€” Preliminary :

Info :

Greetings from us Tutorial Rajut.Id... Thank you for purchasing this Crochet Market bag pattern. I am so proud to be walking down my usual route around the market with a handmade crochet market bag happily swinging on my shoulder. It gets lots of smiles and turns a few heads. Our hope is that this pattern can be understood and practiced easily. Happy Crocheting... ===================== Thank you =====================

Info :

Definition: Crochet market bag is a big need to slung over your shoulders while shopping or on a picnic trip, and crochet market bags also become crucial to stroll through the farmer's market, grocery stores, and local produce shops. The resulting of Crochet Market bag is approximately: Bag Bottom Width 21x6 cm / 8.27"x2.36". Height 24 cm / 9.45".

β€” Tools and Materials :

Info :

1) Red Heart Nylon Crochet Yarn (100% Nylon), Light Worsted weight yarn 654 yards or 600 meters in length. 2) Hook 4/0(2.5mm) or 5/0 (3.0mm). 3) Scissors. 4) Matches. 5) Meter. 6) Stitch Marker.

β€” Basic Stitches Used :

Info :

In making this Vinta Waistbag, several basic stitches are used, including: 1) Chain (CH). 2) Single Crochet (SC). 3) Double Crochet (DC). 4) Crossed Double Crochet. 5) Slip Stitch (SL-ST). 6) Turn Chain (TCH). 7) Skip (SK).

β€” To Make a Crossed double Crochet :

Info :

Yarn over, Skip the next stitch and Insert hook into the following stitch. Pull up a loop. Yarn over pull through first two loops, yarn over and pull through last two loops.

Info :

In the stitch you skipped in number one, yarn over, insert hook and pull up a loop. Yarn over pull through first two loops, yarn over and pull through last two loops.

β€” Maintenance :

Info :

Wash by hand using soft detergent and warm water at 40Β°c. If there is a stubborn stain, you can brush it with a soft brush with the help of soap. Don't use bleach product. Drying should not be exposed to direct sunlight, just let it dry.

β€” Pattern :

Round 1 :

12CH. And then, 1TCH + 12SC (12sts)

Round 2-48 :

1TCH + 12SC (12sts)

Round 49 :

SC around. And make Slip Stitch as the last step (120sts)

β€” Body of the bag :

Round 1 :

3CH + 119DC. And slip stitch in 3rd CH for last step (120sts)

Round 2 :

(1 Cross Stitch + 2CH + SK 2sts) 30x. And slip stitch in 3rd CH for last step (120sts)

Round 3 :

3CH + 119DC. And slip stitch in 3rd CH for last step (120sts)

Round 4 :

(1 Cross Stitch + 2CH + SK 2sts) 30x. And slip stitch in 3rd CH for last step (120sts)

Round 5-6 :

Odd Row: 3CH + 119DC. And slip stitch in 3rd CH for last step. Even Row: (1 Cross Stitch + 2CH + SK 2sts) 30x. And slip stitch in 3rd CH for last step (120sts)

Round 7 :

Change Yarn Color: 3CH + 119DC. And slip stitch in 3rd CH for last step (120sts)

Round 8-18 :

Even Row: (1 Cross Stitch + 2CH + SK 2sts) 30x. And slip stitch in 3rd CH for last step. Odd Row: 3CH + 119DC. And slip stitch in 3rd CH for last step. Don't forget for change the yarn color again in row 13th (120sts)

Round 19 :

3CH + 119DC (120sts)

Round 20-21 :

120SC. Make SC with spiral Teqnique, so attach stitch marker in first stitch every row (120sts)

Round 22 :

This Bag is 21cm wide, so I will place 7cm for the right and left sides of the bag to make the handle holes. (Front & Back of Bag). And then continue make SC around, but every Stitch marker for the handle holes, make (3CH + SK 3sts) and make SC around again. See the final result in the photo section βž”βž”βž”

Round 23 :

120SC. Make SC with spiral Teqnique, so attach stitch marker in first stitch every row. Then make a Slip Stitch in the last stitch for end. Next Cut the yarn and tidy up (120sts)

β€” Making the Handles :

Round 1 :

Make Chain 120cm

Round 2 :

Fill 1DC each stitches and make a slip stitch the last stitch. And then cut a bit long for sewing to the other side

Round 3 :

Attach the handle through the 4 holes, and sew the two ends of the handle with tapestry needle. See the final result in the photo section βž”βž”

Info :

Make shoulder crochet for a more comfortable handles when used.

β€” Make shoulder crochet :

Round 1 :

21CH (21sts)

Round 2 :

3TCH + 20DC (21sts)

Round 3-5 :

3TCH + 20DC. And then cut a bit long for sewing to the other side (21sts)

Info :

Make one more shoulder crochet with the same pattern. Sew on the handle of the shoulder bag with tapestry needle. Add tassel or other accessories to make the bag more beautiful.

Info :

NB: This is link Tutorial Video Vinta Bags : https://youtu.be/RlemC-A6XkY. You can use Custom Accessories, like the Final Result like the Image at the end of this PDF. =================== Good Luck ===================

Assembly Instructions

  • Place and mark handle hole positions 7 cm in from each side (front and back), then create handle holes by replacing the stitches with (3CH + SK 3sts) as instructed in Round 22.
  • Attach the long chain handle by passing each end through the 4 handle holes and secure by sewing the ends to the inside with a tapestry needle, making sure seams are tight and hidden.
  • Make two shoulder crochet pads (21CH foundation, 3TCH + 20DC rows) and sew them onto the handles where they will rest on the shoulder for added comfort.
  • Finish the bag by tidying and cutting yarn tails, making a final slip stitch at the end of Round 23, and adding decorative tassels or accessories where desired.

Important Notes

  • πŸ’‘Use stitch markers to mark the first stitch of each spiral row when working SC in spiral to prevent accidental increases or decreases.
  • πŸ’‘Measure and mark the 7 cm spacing for handle holes before making skipped stitch holes to ensure symmetrical and evenly spaced handles.
  • πŸ’‘Work color changes at the beginning of a row and weave or tidy ends as you go to keep the inside of the bag neat and avoid bulky joins.

This lovely market bag pattern brings practicality and pretty stitch detail together to brighten your everyday errands. Try color gradients or bold solids to create a bag that's uniquely yours. Add a tassel or shoulder pad for comfort and style β€” every finished bag is a small handmade celebration. 🧢✨

You ask,

we answer.

FAQs

What size will the finished piece be?

The finished bag measures approximately 21 cm wide by 24 cm tall (base width 21x6 cm) using the recommended light-worsted nylon yarn and hook size.

Can I use different yarn weights for this pattern?

Yes, you can use different yarn weights, but this will change the finished size; use a suitable hook for your chosen yarn and adjust chain counts if needed.

Do I need prior crochet experience for this pattern?

This pattern is rated intermediate; familiarity with chains, single and double crochet, and reading row instructions is recommended for best results.

How long does this project typically take to complete?

Most crocheters complete this project in 5-7 hours, though time may vary based on experience level, yarn choice, and any customizations.