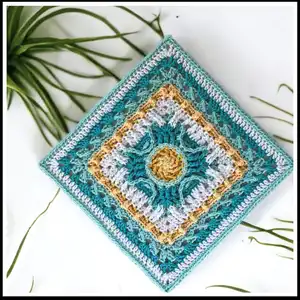
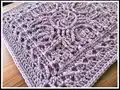
Create a textured, colorful 11" x 11" crochet square designed for blankets or standalone decorative pieces. This intermediate pattern uses front- and back-post stitches, clusters, and third-loop techniques to build depth and interest. Youll get clear round-by-round instructions, stitch definitions, and blocking tips to finish a professional-looking square. Perfect for making a legacy collection of heirloom squares or a vibrant afghan.
Progress Tracker
0% Complete
— Marley Mae Square :
Infos :
Hook/Finished Size: 11" x 11", 4.5 mm hook. Crochet Terms: US terminology throughout. Skill Level: Intermediate. Yarn and Colors Used: I Love This Cotton (Worsted Weight), 100% cotton - Colorway 1: A = Buttercup; B = Banana; C = Curry; D = Mint; E = Aqua; F = Turquoise; G = White. Loops & Threads, Creme Cotton (Worsted Weight), 100% - Colorway 2: A = Pale Orchid. Additional Items Needed: Stitch markers and darning needle.
Info :
STITCHES USED: double magic circle; standing stitch; ch (Chain); invisible join; st(s) (Stitch/stitches); sp (Space); sc (Single crochet); FPsc (Front post single crochet); BPsc (Back post single crochet); hdc (Half double crochet); FPhdc (Front post half double crochet); BPhdc (Back post half double crochet); shallow FPhdc (shallow front post half double crochet); dc (Double crochet); FPdc (Front post double crochet); 2FPdc-cluster (2 front post double crochet-cluster); long dc (Long double crochet); dc2tog (Double crochet 2 together); dc3tog (Double crochet 3 together); FPtr (Front post treble crochet); BL (Back loop); cable st; 3LP of sc, hdc, dc, tr (third loop).
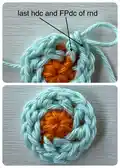
Round 1 :
In a double magic circle, ch 3 (counts as 1st dc of rnd), 7 dc; cut yarn, invisible join to 1st true dc of rnd. Counts: 8 dc (8 total)
Round 2 :
Starting in any dc, *hdc in dc; FPdc around dc immediately before hdc just worked; repeat from * around; cut yarn, invisible join. Counts: 8 hdc, 8 FPdc (16 total)
Round 3 :
Starting in any hdc, *hdc in hdc AND FPdc, FPdc around FPdc immediately before hdc just worked; repeat from * around; cut yarn, invisible join. Counts: 16 hdc, 8 FPdc (24 total)
Round 4 :
NOTE: After completing BPsc, the next st may be partially hidden. Starting in 1st hdc of any group of 2 hdc *shallow BPsc around st, (2 sc) in NEXT st; repeat from * around; cut yarn, invisible join. Counts: 24 sc, 12 BPsc (36 total)
Round 5 :
Note: Work in 3LP of all sts in this rnd. Starting in 1st sc of any (2 sc) group, *dc in 2 sc (place st marker around post of both dc-marker #1, #2), ch 2; use NEXT 7 sts to work dc, hdc, 3 sc, hdc, dc; ch 2; repeat from * around; cut yarn, invisible join. Counts: 12 sc, 8 hdc, 16 dc, 8-ch 2 sp (52 total)
Round 6 :
Starting in ch-2 sp before marker #1. *(3 hdc) place a st marker in 1st hdc – marker #3; BPhdc around NEXT 2 dc; (3 hdc) in NEXT ch-2 sp, place st marker in 3rd hdc – marker #4; [ch 1, sk st; 2FPdc-cluster around NEXT st] 3 times; ch 1, sk dc; repeat from * around; cut yarn, invisible join. Counts: 24 hdc, 12 2FPdc-cluster, 8 BPhdc, 16 ch-1 sp (60 total)
Round 7 :
Starting in marked st #3 of rnd 6, *hdc in hdc-do not remove marker; sc in NEXT 6 sts; hdc in NEXT hdc-do not remove marker; ch 1, sk ch-1 sp; dc in NEXT 2FPdc-cluster; ch 1, sk ch-1 sp; (2 dc, ch 2 as a corner, 2 dc) in NEXT 2FPdc-cluster; ch 1, sk ch-1 sp; dc in NEXT 2FPdc-cluster; ch 1, sk ch-1 sp; repeat from * around; cut yarn, invisible join. Counts: 24 sc, 8 hdc, 24 dc, 16 ch-1 sp, 4 ch-2 corner sp (72 total/18 per side)
Round 8 :
Starting in ch-2 corner sp before marked st #3 of rnd 6, *(2 hdc, ch 2, 2 hdc) in ch-2 corner sp, sk NEXT 2 dc; (2 hdc) in NEXT ch-1 sp; sk dc, (2 hdc) in NEXT ch-1 sp, ch 1; FPsc around NEXT worked and marked hdc of rnd 6 (marker #3), remove marker, ch 1; FPsc around NEXT 2 worked and marked dc of rnd 5 (marker #1 and #2), remove markers, ch 1; FPsc around worked and marked hdc of rnd 6 (marker #4), remove marker, ch 1; sk NEXT (hdc, 6 sc, hdc) of rnd 7; (2 hdc) in NEXT ch-1 sp; sk dc, (2 hdc) in NEXT ch-1 sp, sk NEXT 2 dc; repeat from * around; cut yarn, invisible join. Counts: 48 hdc, 16 FPsc, 16 ch-1 sp, 4 ch-2 corner sp (80 total/20 per side)
Round 9 :
Starting in any ch-2 corner sp, *(2 hdc, ch 2, 2 hdc) in ch-2 corner sp; ch 1, sk NEXT 2 hdc; FPtr around NEXT 2 dc of rnd 7 corner; hdc between (2 hdc) directly behind FPtr and NEXT (2 hdc); ch 1, sk NEXT 2 hdc; hdc between skipped (2 hdc) and NEXT (2 hdc), ch 2; dc2tog, working in 1st and 2nd UNworked sc of rnd 7, ch 1; dc3tog, working in NEXT 3 sc, ch 1; dc2tog, working in NEXT sc and hdc of rnd 7; ch 2, sk NEXT 2 hdc of rnd 8; hdc between previous (2 hdc) and NEXT 2 (hdc); ch 1, sk NEXT 2 hdc; hdc in between skipped (2 hdc) and NEXT (2 hdc); FPtr around NEXT 2 dc of rnd 7 corner, ch 1, sk NEXT 2 hdc; repeat from * around; cut yarn, invisible join. Counts: 32 hdc, 16 FPtr, 8 dc2tog, 4 dc3tog, 24 ch-1 sp, 8 ch-2 sp, 4 ch-2 corner sp (100 total/25 per side)
Round 10 :
Starting in any ch-2 corner sp, *(2 hdc, ch 2, 2 hdc) in ch-2 corner sp; hdc in NEXT 2 hdc, sk ch-1 sp; shallow FPhdc around NEXT 2 FPtr, sk hdc; hdc in NEXT ch-1 sp; FPhdc around NEXT hdc, hdc in NEXT ch-2 sp; FPhdc around NEXT dc2tog, hdc in NEXT ch-1 sp; FPhdc around NEXT dc3tog, hdc in NEXT ch-1 sp; FPhdc around NEXT dc2tog; hdc in NEXT ch-2 sp; FPhdc around NEXT hdc; hdc in NEXT ch-1 sp, sk hdc; shallow FPhdc around NEXT 2 FPtr; sk ch-1 sp, hdc in NEXT 2 sts; repeat from * around; cut yarn, invisible join. Counts: 56 hdc, 16 shallow FPhdc, 20 FPhdc, 4 ch-2 corner sp (92 total/23 per side)
Round 11 :
NOTE: In this rnd, be careful not to make your sts too tight. Starting in any ch-2 corner sp, *(sc, ch 2, sc) in ch-2 corner sp; [ch 1, sk st, sc in NEXT st] 11 times, ch 1; repeat from * around; cut yarn, invisible join. Counts: 52 sc, 48 ch-1 sp, 4 ch-2 corner sp (100 total/25 per side)
Round 12 :
Starting in any ch-2 corner sp, *(sc, ch 2, sc) in ch-2 corner sp; [2FPdc-cluster around NEXT sc, ch 1; sc in NEXT ch-1 sp, sc and ch-1 sp] 6 times; 2FPdc-cluster around NEXT sc, ch 1; repeat from * around; cut yarn, invisible join. Counts: 80 sc, 28 2FPdc-cluster, 28 ch-1 sp, 4 ch-2 corner sp (136 total/34 per side)
Round 13 :
Start in any ch-2 corner sp, *(sc, ch 2, sc) in ch-2 corner sp; working in BL and skipping all ch-1 sps, sc across in each st to NEXT ch-2 corner sp; repeat from * around; cut yarn, invisible join. Counts: 8 sc, 108 BLsc, 4-ch 2 corner sp (116 total/29 per side)
Round 14 :
Starting in any ch-2 corner sp, *(2 dc, ch 2, 2 dc) in ch-2 corner sp; ch 1, sk NEXT sc; [cable st] 7 times, ch 1; repeat from * around; cut yarn, invisible join. Counts: 16 dc, 28 cable st, 8 ch-1 sp, 4-ch 2 corner sp (52 total/13 per side)
Round 15 :
Starting in any ch-2 corner sp, *(2 dc, ch 2, 2 dc) in ch-2 corner sp; ch 1, sk NEXT 2 dc; (2 dc) in NEXT ch-1 sp; sk cable st, [(4 dc) between NEXT 2 cable sts] 6 times; sk cable st, (2 dc) in NEXT ch-1 sp; ch 1, sk NEXT 2 dc; repeat from * around; cut yarn, invisible join. Counts: 128 dc, 8 ch-1 sp, 4 ch-2 corner sp (136 total/34 per side)
Round 16 :
Starting in any ch-2 corner sp, *(2 dc, ch 2, 2 dc) in ch-2 corner sp; dc in NEXT 2 dc and ch-1 sp; dc in NEXT 13 dc; dc2tog in NEXT 2 dc; dc in NEXT 13 dc; dc in NEXT ch-1 sp and 2 dc; repeat from * around; cut yarn, invisible join. Counts: 144 dc, 4 dc2tog, 4 ch-2 corner sp (148 total/37 per side)
Round 17 :
Note: If after rnd 16, your square is running small, replace the sc with hdc. Starting in any ch-2 corner sp, *(sc, ch 2, sc) in ch-2 corner sp; sc across in each st to NEXT ch-2 corner sp; repeat from * around; cut yarn, invisible join and weave in ALL yarn ends. Counts: 156 sc, 4 ch-2 corner sp (156 total/39 per side)
Info :
Blocking: wet block or steam block as desired; be careful when steam blocking acrylic yarn. This pattern and all pictures are copyright protected; you may print a copy for your use and sell items made with the pattern but please credit the designer and link back when sharing.
This Marley Mae Square adds a beautiful textured center and crisp square border to any blanket or project. The mix of post stitches and clusters creates sculpted detail that looks hand-crafted and heirloom quality. Make a single square or a full afghan—each one makes a lovely gift or keepsake. 🧶✨