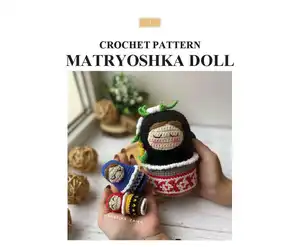
Create a charming set of crochet matryoshka (nesting) dolls with complete step-by-step instructions. This pattern guides you through three sizes — little, medium, and big — with colorwork details and decorative flowers and leaves. You will learn simple jacquard techniques, front/back loop work, and how to assemble and embellish the dolls for a beautiful finished set. Perfect for gifting or displaying as a handmade keepsake.
Progress Tracker
0% Complete
— Little Matryoshka Doll :
Info :
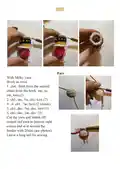
With Brown yarn. Place row marker at the beginning and work in continuous rounds unless otherwise stated.
Round 3 :
(1sc, inc) *6 (18)
Round 5 :
Change color to Black. BLO (2sc, inc) *6 (24)
Round 6 :
Attention! Crochet in jacquard technique from Rnd 6. Yellow stitches are highlighted in yellow. (1sc, 1sc)*12 (24)
Round 7 :
With black yarn 24sc (24)
Round 8 :
Change color to Yellow. BLO 24sc (24)
Info :
Cut out a circle from plastic and put it on the bottom. Stuff with fiberfill in the process.
Round 9-10 :
24sc (2 rounds) (24)
Round 11 :
Change color to Red. BLO (2sc, dec) *6 (18)
Round 12 :
(1sc, dec) *6 (12)
Round 14-18 :
24sc (5 rounds) (24)
Round 19 :
(2sc, dec) *6 (18)
Round 20 :
(1sc, dec) *6 (12)
Info :
Stuff with fiberfill.
Info :
Fasten off, cut the yarn, weave in the yarn ends.
Info :
Return to round 11 and work with White yarn through front loops: ch1, (3sc in one stitch, sc) *12. Cut the yarn and fasten off.
Info :
Return to round 4 and work with White yarn through front loops: ch1, reverse 18sc. Cut the yarn and fasten off.
Section :
Face (little doll): With Milky yarn. Work in rows.
Row 1 :
ch4, Start from the second chain from the hook: inc, sc, inc, turn (5)
Row 2 :
ch1, inc, 3sc, inc, turn (7)
Row 3-4 :
ch1, 7sc, turn (2 rounds)
Row 5 :
ch1, dec, 3sc, dec, turn (5)
Row 6 :
ch1, dec, 1sc, dec (3)
Info :
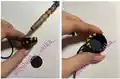
Cut the yarn and fasten off. Attach red yarn to bottom right corner and sl st around the border with 20sl st (see photos). Leave a long tail for sewing.
Info :
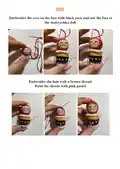
Embroider the eyes on the face with black yarn and sew the face to the matryoshka doll. Embroider the hair with a brown thread. Paint the cheeks with pink pastel.
— Medium Matryoshka Doll :
Section :
Upper part: With Blue yarn. Place row marker here.
Round 3 :
(1sc, inc) *6 (18)
Round 4 :
(2sc, inc) *6 (24)
Round 5 :
(3sc, inc) *6 (30)
Round 6-12 :
30sc (7 rounds) (30)
Round 13 :
(4sc, inc) *6 (36)
Round 14-16 :
36sc (2 rounds) (36)
Round 17 :
Change color to White (3sc in one stitch, sl st) *18. Cut the yarn and fasten off.
Section :
Lower part: Crochet 2 pieces in Black color.
Round 3 :
(1sc, inc) *6 (18)
Round 4 :
(2sc, inc) *6 (24)
Round 5 :
Cut yarn and fasten off piece one. Continue crocheting from second piece. Cut a circle from plastic and place it in between the 2 circles.
Round 6 :
Now crochet both black circles together - 24sc (24). Do not cut the yarn.
Round 8 :
Change color to White. BLO (3sc, inc) *6 (30)
Round 9 :
Attention! Crochet in jacquard technique from Rnd 8 to 9. Blue stitches are highlighted in blue. (1sc, 1sc)*15 (30)
Round 10 :
(1sc, 1sc)*15 (30)
Round 11 :
Continue in white :30sc (30)
Round 12-14 :
Change color to Black. BLO 30sc then 30sc (3 rounds) (30)
Info :
Cut the yarn and fasten off. Return to round 6 attach Blue yarn to front loops: reverse sc 24sc. Cut the yarn and fasten off.
Section :
Face (medium): With Milky yarn. Work in rows.
Row 1 :
ch4, Start from the second chain from the hook: inc, sc, inc, turn (5)
Row 2 :
ch1, inc, 3sc, inc, turn (7)
Row 3 :
ch1, inc, 5sc, inc, turn (9)
Row 4-5 :
ch1, 9sc, turn (2 rounds)
Row 6 :
ch1, dec, 5sc, dec, turn (7)
Row 7 :
ch1, dec, 3sc, dec, turn (5)
Row 8 :
ch1, dec, 1sc, dec (3)
Info :
Cut the yarn and fasten off. Attach Blue yarn and slst around the face: 22sl st. Leave a long tail for sewing.
Info :
Embroider the eyes on the face with black yarn and sew the face to the middle matryoshka. Embroider the hair with a brown thread. Paint the cheeks with pink pastel.
— Big Matryoshka Doll :
Section :
Inner Pocket: With Gray yarn. Place row marker here.
Round 3 :
(1sc, inc) *6 (18)
Round 4 :
(2sc, inc) *6 (24)
Round 5 :
(3sc, inc) *6 (30)
Round 6 :
(4sc, inc) *6 (36)
Round 7 :
(5sc, inc) *6 (42)
Round 8-28 :
42sc (21 rounds) (42)
Round 29 :
BLO (6sc, inc) *6 (48)
Round 30 :
(7sc, inc) *6 (54)
Info :
Turn out the part so that the front side is inside.
Round 32-34 :
54sc (3 rounds) (54)
Round 35 :
Change color to Red. BLO (8sc, inc) *6 (60)
Round 36 :
Change color to White. BLO 60sc (60)
Info :
Insert a small matryoshka doll inside the middle one. Insert the middle matryoshka doll into the inner pocket. Stuff the body with fiberfill gradually.
Round 37 :
Attention! Crochet in jacquard technique from Rnd 37 to 41. Red stitches are highlighted in red.
Round 38 :
BLO (2sc, 1sc) *20 (60)
Round 39 :
1sc, (3sc, 3sc) *9, 3sc, 2sc (60)
Round 40 :
(2sc, sc) *20 (60)
Round 41 :
1sc, (3sc, 3sc) *9, 3sc, 2sc (60)
Round 42 :
With White yarn BLO 60sc (60)
Round 43 :
With Red yarn BLO 60sc (60)
Round 44 :
Change color to Gray. BLO 60sc (60)
Round 45-48 :
60sc (4 rounds) (60)
Round 49 :
Change color to Black. BLO 60sc (60)
Round 50 :
(8sc, dec) *6 (54)
Round 51-52 :
54sc (2 rounds) (54)
Round 53 :
(8sc, inc) *6 (60)
Round 54-66 :
60sc (13 rounds) (60)
Round 67 :
(8sc, dec) *6 (54)
Round 68 :
(7sc, dec) *6 (48)
Round 69 :
(6sc, dec) *6 (42)
Round 70 :
(5sc, dec) *6 (36)
Round 71 :
(4sc, dec) *6 (30)
Round 72 :
(3sc, dec) *6 (24)
Round 73 :
(2sc, dec) *6 (18)
Round 74 :
(1sc, dec) *6 (12)
Info :
Stuff with fiberfill.
Info :
Fasten off, cut the yarn, weave in the ends.
Info :
Return to round 49 attach White yarn in front loops: ch1, (3dc in one stitch, sc) *30, sl st in one stitch. Cut the yarn and fasten off.
Section :
Face (big): With Milky yarn. Work in rows.
Row 1 :
ch9, Start from the second chain from the hook: inc, 6sc, inc, turn (10)
Row 2 :
ch1, inc, 8sc, inc, turn (12)
Row 3 :
ch1, inc, 10sc, inc, turn (14)
Row 4-7 :
ch1, 14sc, turn (4 rounds)
Row 8 :
ch1, dec, 10sc, dec, turn (12)
Row 9 :
ch1, dec, 8sc, dec, turn (10)
Row 10 :
ch1, dec, 6sc, dec (8)
Info :
Cut the yarn and fasten off. Tie a crocheted face in a circle with Black yarn: 38sl st. Leave a long tail for sewing.
Info :
Embroider the eyes on the face with black yarn and sew the face to the matryoshka doll. Embroider the hair with a brown thread. Paint the cheeks with pink pastel.
Section :
Leaves (make 9): With Green yarn.
Leaf 1 :
ch8, Start from the second chain from the hook: sl st, sc, 3dc, 2sc. Leave a long tail for sewing.
Flower 1 :
Crochet 3 white flowers with a yellow center and 2 yellow flowers with a white center. 1. 5sc in MR (5)
Flower 2 :
2. Place row marker here. Change color. 5inc (10)
Flower 3 :
3. (4-tr cluster, ch1, sc) *5. Leave a long tail for sewing.
Info :
First sew the flowers to the matryoshka doll, then sew the leaves to the flowers. Attach any additional decorative elements and weave in all ends.
This Matryoshka Doll amigurumi pattern gives you all the details to crochet a sweet nesting set step by step. Create heirloom-quality dolls with pretty colorwork, embroidered faces, and floral decorations. Share them as thoughtful handmade gifts or keep them as a special decor set 🧶🌸✨