🧢 Beautiful ✨ Detailed πŸ’ Adorable

Mel the Snowman Amigurumi Pattern

Mel the Snowman Amigurumi Pattern
4.0β˜… Rating
2-4 Hours Time Needed
2.4K Made This
βœ‚οΈ

Beginner Friendly Level

Perfect for those just starting their crochet journey, with clear instructions and simple techniques

⏱️

Bite-Sized Project

Finishes in 2-4 hoursβ€”perfect for an afternoon of creative relaxation.

🧸

Cute Companion

An adorable friend to cherish, handcrafted with love to bring comfort and joy for years to come.

About This Mel the Snowman Amigurumi Pattern

This pattern makes a sweet, pocket-sized Mel the Snowman amigurumi with a stitched-on scarf, crocheted hat, twig arms, a carrot nose and two front buttons. The head and body are worked in one continuous piece to create a neat, seamless shape with simple increases and decreases. Accessories are crocheted separately and sewn or attached for a polished finished toy. The pattern is written using US terminology and is easy to follow with clear round-by-round instructions.

Mel the Snowman Amigurumi Pattern crochet pattern - detailed view of completed project

Suitable for crafters new to amigurumi, this design uses basic crochet stitches and simple shaping techniques. Materials are Paintbox Cotton Aran and a 3.5mm hook, giving a firm fabric and a lovely finished size.

Why You'll Love This Mel the Snowman Amigurumi Pattern

I absolutely love this pattern because it turns simple shapes into a charming little character that is quick to make and delightful to gift. I enjoy how the head and body are made in one piece β€” it keeps seams tidy and assembly nice and straightforward. The accessories like the hat, scarf and twig arms let me personalise each snowman I make and add little touches of character. I also appreciate that the pattern uses Cotton Aran for a soft but stable fabric, making Mel durable yet huggable.

Mel the Snowman Amigurumi Pattern step 1 - construction progress Mel the Snowman Amigurumi Pattern step 2 - assembly progress Mel the Snowman Amigurumi Pattern step 3 - details and accessories Mel the Snowman Amigurumi Pattern step 4 - final assembly and finishing

Switch Things Up

I love to customise Mel by swapping scarf and hat colours to match seasons or gift recipients.

I often change the yarn to a chunky weight with a larger hook to make a bigger, cuddlier snowman for a different look.

I sometimes embroider a smiling mouth or freckles to give Mel more personality and expression.

I have replaced the crocheted buttons with small safety eyes or wooden buttons for a shiny or rustic finish.

I make mini versions by using lighter yarn and a 2.5mm hook to create keychain-friendly snowmen.

I occasionally add a tiny felt top hat or a pompom on the scarf for extra festive detail.

I recommend trying different arm placements before sewing them on to change Mel's gesture β€” higher or lower gives different poses.

For a posable option, I add thin craft wire inside the arms, anchoring ends securely so they can be posed safely.

I like to stitch tiny accessories like a little broom, mittens or a holiday tag to personalise gifts further.

When making multiple Mel snowmen, I enjoy mixing and matching facial placements to create a playful family of characters.

Finally, I sometimes use safety eyes for a glossy finish, or embroider eyes for a softer, child-safe toy option.

Common Mistakes & How to Fix Them

βœ— Skipping the recommended yarn weight can alter the finished size and drape; use Cotton Aran with the suggested hook for best results. βœ— Not placing safety eyes at the correct rounds can make the face look misaligned; place safety eyes between rounds 13 and 14 approximately 12 stitches apart as instructed. βœ— Failing to stuff gradually causes lumps or misshapen areas; stuff little by little while shaping the head and body to maintain a smooth contour. βœ— Ignoring stitch counts during increases and decreases leads to uneven shaping; count your stitches at the end of each round, especially after rounds that increase or decrease. βœ— Sewing arms or buttons without pinning first results in asymmetry; use sewing pins to check positions before permanently stitching pieces in place.

Mel the Snowman Amigurumi Pattern

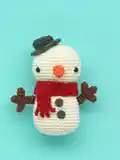
Make a charming Mel the Snowman amigurumi with clear, easy-to-follow instructions perfect for a cosy afternoon project. This pattern creates a cuddly snowman with a removable hat, carrot nose, twig arms, buttons and a knitted-style scarf. Head and body are worked in one piece, with simple accessory pieces sewn on to finish the character. Ideal for gifting or seasonal decor, the pattern uses Paintbox Cotton Aran for a soft, sturdy finish.

Beginner Friendly 2-4 Hours

Materials Needed for Mel the Snowman Amigurumi Pattern

β€” Main Fabric

  • 01
    Paintbox Yarns Cotton Aran - 1 ball Champagne White (A) (50g / 1.8oz)
  • 02
    Paintbox Yarns Cotton Aran - 1 ball Granite Grey (B) (50g / 1.8oz)
  • 03
    Paintbox Yarns Cotton Aran - 1 ball Blood Orange (C) (50g / 1.8oz)
  • 04
    Paintbox Yarns Cotton Aran - 1 ball Coffee Bean (D) (50g / 1.8oz)
  • 05
    Paintbox Yarns Cotton Aran - 1 ball Red Wine (E) (50g / 1.8oz)

β€” Tools Required

  • 01
    Crochet hook US E/4 (3.5mm)
  • 02
    Pair of 3/8in (9mm) safety eyes
  • 03
    Tapestry needle
  • 04
    Pins for positioning pieces
  • 05
    Stitch markers
  • 06
    Scissors
  • 07
    Toy stuffing (polyester fibrefill)

Progress Tracker

0% Complete

β€” Head and Body :

Info :

Using US E/4 (3.5mm) crochet hook and yarn A, make an adjustable ring.

Round 1 :

6 sc (dc) in ring (6 sts)

Round 2 :

Inc in each st around (12 sts)

Round 3 :

[Inc in next st, 1 sc (dc)] 6 times (18 sts)

Round 4 :

[Inc in next st, 2 sc (dc)] 6 times (24 sts)

Round 5 :

[Inc in next st, 3 sc (dc)] 6 times (30 sts)

Round 6 :

[Inc in next st, 4 sc (dc)] 6 times (36 sts)

Round 7 :

[Inc in next st, 5 sc (dc)] 6 times (42 sts)

Round 8 :

[Inc in next st, 6 sc (dc)] 6 times (48 sts)

Round 9-15 :

Sc (dc) around (48 sts)

Round 16 :

[Dec, 6 sc (dc)] 6 times (42 sts)

Round 17 :

[Dec, 5 sc (dc)] 6 times (36 sts)

Round 18 :

[Dec, 1 sc (dc)] 12 times (24 sts)

Info :

Add safety eyes between rounds 13 and 14, approx 12 sts apart. Add toy stuffing to head and continue as you go.

Round 19 :

Sc (dc) around (24 sts)

Round 20 :

[Inc in next st, 7 sc (dc)] 3 times (27 sts)

Round 21 :

[Inc in next st, 8 sc (dc)] 3 times (30 sts)

Round 22 :

[Inc in next st, 9 sc (dc)] 3 times (33 sts)

Round 23 :

[Inc in next st, 10 sc (dc)] 3 times (36 sts)

Round 24 :

[Inc in next st, 11 sc (dc)] 3 times (39 sts)

Round 25 :

[Inc in next st, 12 sc (dc)] 3 times (42 sts)

Round 26-35 :

Sc (dc) around (42 sts)

Round 36 :

[Dec, 5 sc (dc)] 6 times (36 sts)

Round 37 :

Sl st in each st around (36 sts)

Round 38 :

Sc (dc) blo around (36 sts)

Round 39 :

[Dec] 18 times (18 sts)

Round 40 :

[Dec, 1 sc (dc)] 6 times (12 sts)

Round 41 :

Dec 6 times (6 sts)

Info :

Fasten off, leave a tail. Use a tapestry needle to pick up all front loops from the last round and pull tight to close. Weave in end.

β€” Hat :

Info :

Using US E/4 (3.5mm) crochet hook and yarn B, make an adjustable ring.

Round 1 :

6 sc (dc) in ring (6 sts)

Round 2 :

Inc in each st around (12 sts)

Round 3 :

[Inc in next st, 1 sc (dc)] 6 times (18 sts)

Round 4 :

Sc (dc) blo around (18 sts)

Round 5-7 :

Sc (dc) around (18 sts)

Round 8 :

Working in blo, inc in each st around (36 sts)

Round 9 :

Sc (dc) around (36 sts)

Info :

Fasten off, leave a tail for sewing.

β€” Nose :

Info :

Using US E/4 (3.5mm) crochet hook and yarn C, make an adjustable ring.

Round 1 :

4 sc (dc) in ring (4 sts)

Round 2 :

[Inc in next st, 3 sc (dc)] (5 sts)

Round 3 :

[Inc in next st, 4 sc (dc)] (6 sts)

Round 4 :

[Inc in next st, 5 sc (dc)] (7 sts)

Round 5 :

[Inc in next st, 6 sc (dc)] (8 sts)

Info :

Fasten off, leave a tail for sewing. Add a little bit of toy stuffing.

β€” Arms (MAKE 2) :

Info :

Main part (make 2). Using US E/4 (3.5mm) crochet hook and yarn D, make an adjustable ring.

Round 1 :

6 sc (dc) in ring (6 sts)

Round 2-8 :

Sc (dc) around (6 sts)

Info :

Fasten off, leave a tail for sewing.

Item Name (Short pieces P1) :

Short pieces (make 4). Using US E/4 (3.5mm) crochet hook and yarn D, make an adjustable ring.

Round 1 :

6 sc (dc) in ring (6 sts)

Round 2-3 :

Sc (dc) around (6 sts)

Info :

Fasten off, leave a tail for sewing 2 short pieces on to main part of each arm.

β€” Buttons (MAKE 2) :

Info :

Using US E/4 (3.5mm) crochet hook and yarn B, make an adjustable ring.

Round 1 :

5 sc (dc) in ring (5 sts)

Info :

Fasten off, leave a tail for sewing.

β€” Scarf :

Info :

Using US E/4 (3.5mm) crochet hook and yarn E, leave a long tail before starting, that will be used for sewing, ch 6.

1st row :

Skip 2 ch from hook, hdc (htr) in each of next 4 ch, turn (4 sts)

2-28th row :

Ch 2, 4 hdc (htr) blo, turn (4 sts)

Info :

Next row creates fringe.

29th row :

[Ch 4, skip first ch from hook, sl st in each of next 3 ch, sl st in next st of row] 4 times (4 fringes)

Info :

Fasten off and weave in ends.

β€” TO MAKE UP :

Info :

Use sewing pins to check position of all pieces before sewing them in place.

Info :

Sew hat on to head in your preferred position.

Info :

Sew nose between eyes.

Info :

Sew arms to sides of body, across rounds 26 and 27.

Info :

Sew buttons to front of body.

Info :

Wrap scarf around neck and fold the side with the fringe, then stitch in place.

Assembly Instructions

  • Use sewing pins to check position of all pieces before sewing them in place to ensure symmetry and correct placement.
  • Sew the hat onto the head in your preferred position using the long tail left from the hat, securing it with small whipstitches.
  • Sew the nose between the safety eyes on the head, stuffing lightly and using the long tail to secure it neatly.
  • Sew the arms to the sides of the body across rounds 26 and 27, positioning them evenly and anchoring firmly for stability.
  • Sew the two crocheted buttons to the front of the body in line vertically, using the tails to stitch them securely.
  • Wrap the scarf around the neck, fold the side with the fringe as shown and stitch in place using the long tail used when starting the scarf.

Important Notes

  • πŸ’‘Use the recommended Paintbox Cotton Aran and the specified hook size to achieve the correct finished size and tension.
  • πŸ’‘Place safety eyes between rounds 13 and 14 approximately 12 stitches apart before adding stuffing to secure them correctly.
  • πŸ’‘Stuff gradually as you crochetβ€”add stuffing as you work through the head and body to maintain an even, rounded shape.
  • πŸ’‘Pin all parts in place before sewing to ensure correct alignment and symmetry of the finished snowman.
  • πŸ’‘Weave in ends and secure accessory stitches firmly to prevent loosening with handling.

This Mel the Snowman amigurumi is a sweet, quick make that makes a great handmade gift or seasonal decoration. Create a whole family of Mel snowmen by changing scarf colors or adding tiny hats and accessories. Have fun personalising each one and enjoy the smiles your handmade buddy will bring. πŸ§Άβ„οΈ

You ask,

we answer.

FAQs

What size will the finished piece be?

The finished amigurumi measures approximately 6in/15cm tall when using the recommended Paintbox Cotton Aran and a 3.5mm hook.

Can I use different yarn weights for this pattern?

Yes, you can use different yarn weights, but the final size will change; choose an appropriate hook and expect to adjust stitch counts for correct shaping.

Do I need prior crochet experience for this pattern?

This pattern is rated beginner friendly (marked easy) so basic knowledge of amigurumi techniques, single crochet, increases and decreases is recommended.

How long does this project typically take to complete?

Most crocheters complete this project in 2-4 hours, though time may vary based on experience level and working pace.