🧢 Beautiful ✨ Detailed πŸ’ Adorable

Meowth Amigurumi Pattern

Meowth Amigurumi Pattern
4.3β˜… Rating
5-7 Hours Time Needed
3.6K Made This
βœ‚οΈ

Intermediate Level

Ideal for those with basic crochet experience, featuring slightly more advanced stitches and techniques to expand your skills.

⏱️

Weekend Treat

Takes 5-7 hours, making it an enjoyable project to finish over a couple of days.

🧸

Cute Companion

An adorable friend to cherish, handcrafted with love to bring comfort and joy for years to come.

About This Meowth Amigurumi Pattern

This pattern teaches you how to crochet a detailed Meowth amigurumi with a rounded head, oval body, limbs, tail and small gold plate. You will work in rounds and short rows using double crochet (UK) shaping to build the character. Needle felting is used for the eyes and ear details, though alternative methods are suggested if you prefer not to needle felt. The finished toy measures approximately 12cm tall and is lightweight and collectible.

Meowth Amigurumi Pattern crochet pattern - detailed view of completed project

Includes a complete list of materials, abbreviations, and precise round-by-round instructions for every piece. Assembly directions explain positioning, sewing tips, and how to finish features like the tail swirl and gold plate.

Why You'll Love This Meowth Amigurumi Pattern

I absolutely love this pattern because it captures Meowth's personality in a small, well-shaped amigurumi. I enjoy the combination of simple shaping with little details like the gold plate and needle-felted eyes that make the character pop. The pattern is structured clearly so I can follow each round without guessing, and it allows small customizations like color swaps or different eye techniques. Making this design is always rewarding because the finished figure stands nicely and looks great displayed or gifted.

Meowth Amigurumi Pattern step 1 - construction progress Meowth Amigurumi Pattern step 2 - assembly progress Meowth Amigurumi Pattern step 3 - details and accessories Meowth Amigurumi Pattern step 4 - final assembly and finishing

Switch Things Up

I love how easily you can customize this Meowth pattern by changing colours to create a unique character; try pastel tones for a soft look or vibrant colours for a playful twist.

If you prefer a larger or smaller result, change yarn weight and hook size β€” bulky yarn with a larger hook makes a chunky version, while finer yarn and a smaller hook create a mini keychain-sized Meowth.

I often swap the needle-felted eyes for embroidered felt ovals for a different expression; experiment with eye shapes and placement to change personality.

Try substituting the gold embroidery floss with metallic yarn for a shimmery plate, or make it in contrasting colours for a whimsical detail.

For added stability, insert craft wire into the legs and tail so you can pose Meowth; I sometimes add wire to the arms too for posable gestures.

You can make an entire set by adjusting facial features and ear markings to represent different PokΓ©mon or fantasy cats β€” mix and match accessories like tiny scarves or hats.

Consider using safety eyes or small buttons as an alternative to needle felting if you want a more defined glossy eye look.

Embellish the finished piece with tiny embroidered whisker spots or stitch a small tongue for added character; these little details make each amigurumi feel bespoke.

If gifting, present Meowth with a small felted Pokeball or a crocheted accessory to create a themed set that’s extra special.

I enjoy making small wardrobe pieces like a removable collar or crochet bag for display β€” they’re quick additions that broaden the play and display options for this pattern.

Common Mistakes & How to Fix Them

βœ— Skipping stitch counts during the increase rounds can easily throw off shaping; always count stitches at the end of each round and mark your start stitch to stay aligned. βœ— Not stuffing gradually leads to lumps or a misshapen head; add small amounts of polyester filling as you work and shape the piece evenly while closing. βœ— Changing colour without weaving in ends neatly causes untidy joins; carry yarn carefully or weave ends in securely on the inside for a clean finish. βœ— Placing ears and eyes without pinning first can result in asymmetry; pin pieces and check against a photo before sewing to ensure even placement and spacing.

Meowth Amigurumi Pattern

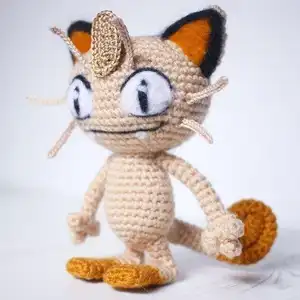
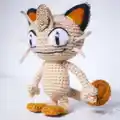
Create a charming Meowth amigurumi with clear, step-by-step crochet rounds and assembly instructions. This pattern combines DK yarn shaping with small details like a gold plate and needle-felted eyes so you can craft a polished collectible. Perfect for gifting or adding to your PokΓ©mon plush collection, the finished piece stands about 12cm tall and is packed with personality.

Intermediate 5-7 Hours

Materials Needed for Meowth Amigurumi Pattern

β€” Main Fabric

  • 01
    Stylecraft Special DK (DK weight yarn) in Stone - small amount for body/head/limbs
  • 02
    Stylecraft Special DK (DK weight yarn) in Gold - small amount for toes, tail swirl and gold plate
  • 03
    Gold embroidery floss - Anchor colour no. 1037 (used for gold plate and details)
  • 04
    Stone coloured embroidery floss - DMC colour no. 842 (used for eye details/whiskers if desired)
  • 05
    Fibres in Black and White and a colour similar to Stylecraft Gold for needle felting the eyes and ear details
  • 06
    Polyester toy filling (fibre fill) for stuffing

β€” Tools Required

  • 01
    Crochet hook size 2mm
  • 02
    Crochet hook size 1.25mm (for embroidery floss/whiskers)
  • 03
    Wire (approx. 25cm long) to stiffen legs (optional)
  • 04
    Pins to place pieces before sewing together
  • 05
    Darning needle for sewing and weaving in ends
  • 06
    Stitch markers (scrap yarn can be used as markers)
  • 07
    Needle felting tool (optional, used for eyes and ear colouring)

Progress Tracker

0% Complete

β€” Head :

Info :

Yarn: Stone. ch4 – we will be working around the chains to make an oval shape.

Round 1 :

inc in second ch from hook, inc in the next two chains. Continue to the other side of the chains: inc in the back of the three chains (12)

Round 2 :

inc, dc 3, inc x 3, dc 3, inc x 2 (18)

Round 3 :

inc x 2, dc 6, inc x 3, dc 6, inc (24)

Round 4 :

(dc, inc) x 2, dc 6, (dc, inc) x 3, dc 6, dc, inc (30)

Round 5 :

(dc 2, inc) x 2, dc 6, (dc 2, inc) x 3, dc 6, dc 2, inc (36)

Round 6 :

(dc 3, inc) x 2, dc 6, (dc 3, inc) x 3, dc 6, dc 3, inc (42)

Round 7 :

dc 42

Round 8 :

(dc 4, inc) x 2, dc 6, (dc 4, inc) x 3, dc 6, dc 4, inc (48)

Round 9 :

dc 48

Round 10 :

(dc 5, inc) x 2, dc 6, (dc 5, inc) x 3, dc 6, dc 5, inc (54)

Round 11-13 :

dc 54

Round 14 :

(dc 5, dec) x 2, dc 6, (dc 5, dec) x 3, dc 6, dc 5, dec (48)

Round 15 :

dc 48

Round 16 :

(dc 4, dec) x 2, dc 6, (dc 4, dec) x 3, dc 6, dc 4, dec (42)

Info :

Start stuffing the head

Round 17 :

(dc 3, dec) x 2, dc 6, (dc 3, dec) x 3, dc 6, dc 3, dec (36)

Round 18 :

(dc 2, dec) x 2, dc 6, (dc 2, dec) x 3, dc 6, dc 2, dec (30)

Round 19 :

(dc, dec) x 2, dc 6, (dc, dec) x 3, dc 6, dc, dec (24)

Round 20 :

dec x 2, dc 6, dec x 3, dc 6, dec (18)

Info :

If you need to stuff the body some more, now's the time to add the bit of stuffing.

Round 21 :

dec x 2, dc 3, dec x 3, dc 3, dec (12)

Round 22 :

dec x 6 (6) Fasten off and sew in loose end.

β€” Body :

Info :

Yarn: Stone

Round 1 :

dc 4 in Magic Ring (4)

Round 2 :

inc in all sts around (8)

Round 3 :

(inc x 2, dc 2) x 2 (12)

Round 4 :

(dc, inc x 3, dc 2) x 2 (18)

Round 5 :

(dc 2, inc x 3, dc 4) x 2 (24)

Round 6-11 :

dc 24

Round 12 :

(dc 4, dec) x 4 (20)

Round 13-14 :

dc 20

Info :

Fasten off and leave a long end to sew the piece onto head. Stuff with fibre fill.

β€” Ears :

Info :

Yarn: Stone

Round 1 :

dc 6 in Magic Ring (6)

Round 2 :

dc 6

Round 3 :

inc in all sts around (12)

Round 4-5 :

dc 12

Round 6 :

(dc, inc) x 6 (18)

Round 7-8 :

dc 18

Info :

Fasten off and leave a long end to sew the piece onto head. Stuff lightly with fibre fill.

β€” Arms :

Info :

Yarn: Stone. Make 2

Round 1 :

dc 6 in Magic Ring (6)

Round 2 :

inc in all sts around (12)

Round 3 :

dec x 6 (6)

Round 4-14 :

dc 6

Info :

Fasten off and leave a long end to sew the piece onto body.

β€” Fingers :

Info :

Yarn: Stone. Make 6 (3 for each hand)

Round 1 :

dc 5 in Magic Ring (5)

Round 2 :

dc 5

Round 3 :

sl st in first dc

Info :

Fasten off and leave a long end to sew the fingers onto hands. Sew one finger to the bottom of the arm, and one finger on either side of this.

β€” Legs & Feet :

Info :

Yarn: Gold & Stone. Make 2. Starting with Gold, ch4 - we will be working around the chains to make an oval shape.

Round 1 :

inc in the second ch from hook, dc and inc in the next two chs. Repeat (inc, dc, inc) on the other side of the chains (10)

Round 2 :

(inc, dc 4) x 2 (12)

Round 3 :

dc 12

Round 4 :

(dec, dc 4) x 2 (10)

Round 5 :

dc 10

Round 6 :

(dec, dc 3) x 2 (8)

Round 7 :

dc 8

Info :

Change colour to Stone

Round 8-10 :

dc 8

Info :

For the next section we will be working in rows to create the heel – no need to fasten off, just continue as follows:

Row 11 (rs) :

dc 1, turn

Row 12 (ws) :

ch1, dc 4, turn

Row 13 (rs) :

ch1, dc 4, – we are now working in rounds again so keep going without turning: – dec in side of row and next dc from previous round, dc 2, dec in next dc and side of next row

Round 14 :

(dc 2, dec) x 2 (6)

Round 15-16 :

dc 6

Info :

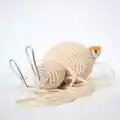
Fasten off and leave a long end to sew the pieces onto body. I used a wire to make the legs a bit sturdier and for Meowth to be able to stand on its own.

β€” Tail :

Info :

Yarn: Gold & Stone. Starting with Gold

Round 1 :

dc 6 in Magic Ring (6)

Round 2 :

(inc, dc 2) x 2 (8)

Round 3-29 :

dc 8

Info :

Change colour to Stone

Round 30-41 :

dc 8

Info :

Fasten off and leave a long end to sew the piece onto body. Roll the Gold part of the tail together into a swirl, and leave the Stone part straight.

β€” Gold Plate :

Info :

Using Gold embroidery floss - I used Anchor colour no. 1037 – ch 6, and working around these chains continue:

Round 1 :

(inc, dc 3, inc) x 2 (14)

Round 2 :

(inc, dc 5, inc) x 2 (18)

Round 3 :

(inc x 2, dc 5, inc x 2) x 2 (26)

Info :

Fasten off and leave a long end to sew the piece onto Meowth's face.
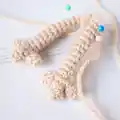
β€” Whiskers :

Info :

Make 6. Using stone coloured embroidery floss and your 1.25mm hook, ch 12 (or your desired length).

Round 1 :

Sl st in second ch from hook and in the remaining ten sts.

Info :

Fasten off and leave a long end to sew the piece onto face. I preferred the look from using embroidery floss but you can also use the same yarn. Note that they will look a bit thicker.
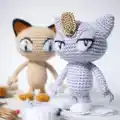
β€” Assembly & Needle Felting :

Info :

Assemble in the same order the pattern is written. I would recommend using a photo of Meowth as reference for best possible outcome. Pin all the pieces in place before sewing to make sure it looks right.

Info :

Once all the pieces were pinned in place I made the eyes using black and white fibre and my Clover Needle Felt Pen tool. I also used the same method to create the black and gold pattern on the ears, and the mouth and teeth.

Info :

Needle felting is still quite new to the pattern writer so instructions are not included; consider alternative ways to create eyes, mouth, teeth and colouring the ears if you prefer.

Assembly Instructions

  • Assemble in the same order the pattern is written, using a photo of Meowth as reference for best placement and proportions.
  • Pin all pieces in place before sewing to ensure correct placement and symmetry, then sew using a yarn needle and matching yarn tails.
  • Sew the body onto the head using the long end left on the body, then attach ears to the top of the head and position the gold plate on the forehead before securing.
  • Attach arms to either side of the body and sew fingers: one finger to the bottom of the arm and one on either side of this for each hand.
  • Sew legs to the base of the body; optionally insert wire inside legs before finishing for added stability so Meowth can stand.
  • Sew the tail onto the back of the body, roll the gold portion into a swirl and leave the stone portion straight, then secure the gold plate and whiskers onto the face.

Important Notes

  • πŸ’‘Use stitch markers to mark the beginning of each round to avoid losing your place during increases and decreases.
  • πŸ’‘Stuff the pieces gradually and evenly to maintain smooth shapes; overstuffing can distort the amigurumi.
  • πŸ’‘Pin all parts before sewing to check positioning and symmetry, especially the eyes, ears and gold plate.

This Meowth amigurumi pattern blends simple shaping with delightful details for a charming collectible. 🧢 Needle-felted eyes and a rolled gold tail make this figure stand out on any shelf. ✨ Whether you gift it or keep it, this tiny Pokemon will bring a smile to any fan. 🐾

You ask,

we answer.

FAQs

What size will the finished piece be?

The finished amigurumi measures approximately 12 cm tall, 7 cm wide, and about 9 cm from front to back including the tail using the recommended yarn and hooks.

Can I use different yarn weights for this pattern?

Yes, you can use different yarn weights but this will affect the final size and stitch tension. If you swap yarn weight, adjust your hook size accordingly and expect a change in finished dimensions.

Do I need needle felting tools to make the eyes and details?

Needle felting is used for the eyes and ear colouring in the sample, but it is optional; you can embroider or sew felt pieces as alternatives if you do not have a needle felting tool.

How long does this project typically take to complete?

Most crocheters finish this project in 5-7 hours, depending on experience and whether you use needle felting for details.