About This Mini Christmas Hat Pattern
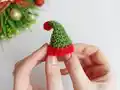
This pattern produces a tiny, adorable Christmas hat approximately 2.76 inches (7 cm) long, great for ornaments or small decorations. It uses basic amigurumi-style single crochet rounds with simple increases and decreases. The instructions include color-change placement and a note for adding a hanging loop so you can display your hats on the tree.

Perfect for quick holiday makes, the pattern is easy to follow with short rounds and clear stitch counts. No advanced techniques are required, making it ideal for beginner crocheters.
Why You'll Love This Mini Christmas Hat Pattern
I absolutely love this pattern because it turns a handful of simple stitches into a charming little holiday decoration that brings instant joy. I enjoy how quickly one hat comes together — you can make several in an evening as gifts or tree decorations. The color changes are a fun, small way to personalize each hat and practice neat join techniques. I also value how versatile the pattern is; it works with scraps of yarn and can be scaled by changing hook or yarn weight.
Switch Things Up
I love using this pattern to experiment with color and texture; try variegated yarn for a fun, festive brim that requires no color changes.
I sometimes make a tiny pompom from leftover yarn and sew it to the tip for a traditional Santa-hat look.
I also scale the hat by changing yarn weight and hook size: use sport weight with a smaller hook for minis or bulky yarn with a larger hook for chunkier ornaments.
I often add beads or small jingle bells to the hanging loop for a whimsical sound when the ornament moves.
I recommend trying an embroidered star or tiny sequin on the brim to make each hat unique and gift-ready.
I occasionally attach the hat to a small toy or amigurumi head to create bundled seasonal characters.
I like to make sets in complementary colors to use as garlands by stringing multiple hats on a ribbon.
I have used ribbon or metallic thread for the hanging loop to add an elegant touch for gift toppers.
I encourage you to personalize the brim height by adding or removing rounds 12-13 for a deeper or shallower brim effect.
I often practice different finishing techniques like invisible join or slip stitch join to achieve a smoother brim edge for display pieces.
Common Mistakes & How to Fix Them
✗ Not using a stitch marker can cause you to lose track of the start of each round; mark the first stitch of every round to maintain correct stitch counts and shaping.
✗ Changing colors without carrying or securing ends causes loose or messy joins; change color at the last yarn-over of the previous stitch and weave in ends neatly on the wrong side.
✗ Forgetting to stuff or overstuff when the pattern requires it can distort shape; stuff sparingly and evenly to keep the hat smooth and avoid bulging stitches.
✗ Ignoring stitch counts during increases or decreases leads to uneven shaping; count stitches after each round, especially after increase/decrease rounds, to ensure the correct number of stitches.
✗ Pulling yarn too tightly during color changes makes edges pucker and the brim uneven; keep a relaxed, consistent tension and block or shape the hat gently after finishing.