About This Lily Bunny Amigurumi Pattern
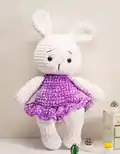
This pattern creates a sweet stuffed bunny crocheted in plush chenille sport yarn with a removable-looking skirt detail. The project uses US terminology and simple amigurumi shaping techniques to form an expressive face and soft body. You will learn shaping for head sculpting, attaching limbs, and making a decorative skirt.

Designed in soft white and purple chenille, the finished toy measures about 35 cm tall using the recommended materials. The pattern is rated easy-to-medium, ideal for makers wanting to level up their amigurumi skills.
Why You'll Love This Lily Bunny Amigurumi Pattern
I absolutely love this pattern because it turns simple stitches into a cuddly character with so much personality. I enjoy how the chenille yarn makes the bunny super soft and snuggly right away. The dress detail is a fun way to add color and playfulness without complex sewing. Sewing the pieces together always feels rewarding—each step brings the bunny to life.
Switch Things Up
I love to change colors when making this bunny; try pastel shades for a soft nursery look or bold contrasting colors for a playful character.
If you want a smaller version, use a lighter weight yarn and a smaller hook—this will produce a tiny pocket-sized bunny perfect for keychains.
For a larger, cuddlier bunny, choose a bulkier chenille and a larger hook; you will also need more stuffing to maintain shape.
I often embroider different facial expressions—move the placement of the eyes and nose slightly to create varied personalities.
Add small crocheted accessories like a bow, scarf, or tiny purse to personalize each bunny for gifts or themed decorations.
Try using safety joints for posable limbs if you want the arms and legs to move; this gives a different play quality to the finished toy.
I sometimes sew a weighted pellet pouch into the bottom of the body for a more grounded, seated toy that stays upright.
Switch up the skirt by adding an extra ruffle round or using a different stitch (shells or picots) for a lacy effect.
Use felt inner-ear inserts or contrasting yarn to define the ear shape and add more character to the face.
If you like mixed media, glue small fabric clothes or add buttons and trims to make each bunny unique and gift-ready.
Common Mistakes & How to Fix Them
✗ Skipping stitch markers at the join between legs and body can cause misalignment; place a marker at the join point and count stitches frequently to ensure correct stitch placement.
✗ Overstuffing the head or neck area makes shaping and head sculpting difficult; stuff gradually and firmly in the neck while leaving room to shape the head properly.
✗ Forgetting to change yarn color cleanly for the dress results in messy joins; change color at the end of a round and weave ends inside the body to hide tails.
✗ Not stuffing limbs as you go can lead to awkward shaping and sewing difficulties; stuff legs and arms during rounds so the shape is even and easy to attach.
✗ Ignoring the instruction to stuff only 2/3 of the arm leads to a bulky look; follow the stuffing guidance and leave the top 1/3 softer to ease sewing and shaping.