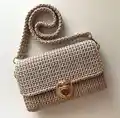
About This Mini Crossbody Bag Pattern
This pattern creates a compact, structured mini crossbody bag crocheted in 2 mm macrame cord using single crochet in the back loop for a textured fabric. It includes full instructions for the main panel, two side pieces, assembly with slip-stitch joining, and an optional crocheted handle. The project results in a professional-looking bag you can finish with metal hardware for a polished look.
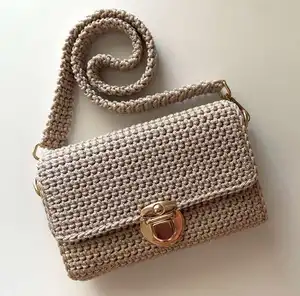
You will learn to make neat edges, attach bag hardware like D-rings and a swivel clasp, and form a sturdy flap and lock placement. The pattern includes measurements and tips for blocking and shaping to achieve the same proportions shown.
Why You'll Love This Mini Crossbody Bag Pattern
I absolutely love this pattern because it turns simple materials into a refined, wearable accessory that still feels handmade. I enjoy how the back-loop single crochet texture gives the bag a clean and contemporary look while remaining easy to crochet. The assembly steps are satisfying — joining the sides with slip stitches quickly transforms the rectangle into a structured bag. I also love that you can choose to add a ready-made strap or crochet your own handle for a completely customized finish.
Switch Things Up
I love experimenting with different cords and colors to change the look completely; try a bright macrame cord for a statement bag or a neutral for everyday wear.
I often replace the metal clasp with a button or magnetic snap for a softer finish and easier installation.
To make the bag larger, I increase the number of foundation chains and work until I reach the desired length — remember to keep the proportions by adjusting side piece rows as well.
I like adding contrast edges by working a round of slip stitch in a different color around the flap and bag opening for a crisp border.
If you want a crossbody mini-me version, I switch to a thinner cord and a smaller hook to create a petite keychain-sized version.
For a more structured bag, I sometimes add a thin lining or lightweight interfacing glued or stitched inside; this helps the bag keep its rectangular shape.
I sometimes chain extra rows for a longer handle or shorten by crocheting fewer rows; swapping yarn weight and hook size will also dramatically change length and bulk.
I recommend swapping metal D-rings for leather tabs if you prefer a mixed-material aesthetic — sew them on securely to handle stress points.
Embellish with a little embroidered motif or a small crocheted flower on the flap for a personalized look that makes the bag special.
Finally, I always test hardware placement with pins and paper templates before sewing anything permanently; it saves time and keeps everything symmetrical.
Common Mistakes & How to Fix Them
✗ Making too few or too many foundation chains changes the finished width of the bag; recount and make a small swatch or match the stated gauge before proceeding.
✗ Working with inconsistent tension will distort the rectangle and sides; keep your tension even and steam/shape the fabric to correct minor variations.
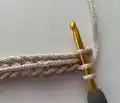
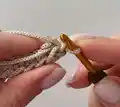
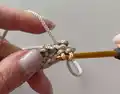
✗ Crocheting into the wrong loops when using the back-loop technique will ruin the textured surface; always insert the hook into the back loop of the current row and the back loop of the previous row as described.
✗ Attaching side pieces without marking corners leads to uneven joins and gaps; mark the bottom and side positions with stitch markers and align pieces carefully before slip-stitch joining.