๐Ÿงถ Beautiful โœจ Detailed ๐Ÿ’ Adorable

Mini Flower Basket Amigurumi Pattern

Mini Flower Basket Amigurumi Pattern
4.2โ˜… Rating
5-7 Hours Time Needed
2.6K Made This
โœ‚๏ธ

Intermediate Level

Ideal for those with basic crochet experience, featuring slightly more advanced stitches and techniques to expand your skills.

โฑ๏ธ

Weekend Treat

Takes 5-7 hours, making it an enjoyable project to finish over a couple of days.

๐Ÿงธ

Cute Companion

An adorable friend to cherish, handcrafted with love to bring comfort and joy for years to come.

About This Mini Flower Basket Amigurumi Pattern

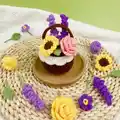
This pattern creates a delightful mini flower basket with a scalloped cover, woven-style body, handle, and a selection of tiny flowers and leaves. You will work with two yarn weights and small hooks to achieve detailed, delicate shapes. The pattern includes optional wire stems so you can arrange the flowers as you like. Clear rounds and step notes make assembly straightforward.

Mini Flower Basket Amigurumi Pattern crochet pattern - detailed view of completed project

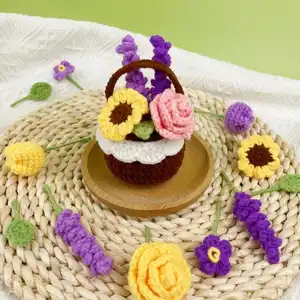
Perfect for gifting, home decor, or as a charming desk accent, the finished basket is full of character. The pattern includes step-by-step instructions for each flower type and assembly tips to help you finish beautifully.

Why You'll Love This Mini Flower Basket Amigurumi Pattern

I absolutely love this pattern because it brings together many small techniques into one cohesive, delightful project. I enjoy the tactile pleasure of making tiny flowers and watching them transform when you arrange them in the basket. The use of optional wire gives each piece a bit of personality and allows creative display options. It is a satisfying weekend project that makes a lovely handmade gift anyone will cherish.

Mini Flower Basket Amigurumi Pattern step 1 - construction progress Mini Flower Basket Amigurumi Pattern step 2 - assembly progress Mini Flower Basket Amigurumi Pattern step 3 - details and accessories Mini Flower Basket Amigurumi Pattern step 4 - final assembly and finishing

Switch Things Up

I love customizing this pattern by swapping colors to match seasons; spring pastels or autumn tones both look wonderful.

I often change yarn weight and hook size to make different sizes โ€” try bulky yarn for a chunky basket or fine yarn for a tiny keepsake.

I sometimes skip the wire for stems if I want a softer, floppy bouquet instead of posed flowers.

I add small embroidered details or beads to flower centers for extra sparkle and texture.

I make matching sets in different colorways to create a coordinated gift collection.

I experiment with different leaf shapes and sizes to change the overall silhouette of the arrangement.

I occasionally make removable mini bouquets by attaching flowers to a small felt base so they can be rearranged or gifted separately.

I recommend trying metallic or variegated yarn for unexpected highlights that catch the eye.

I also adapt the cover shape slightly by adding or subtracting rounds to make a flatter or taller scallop edge.

I encourage you to play with placement and density of flowers โ€” clustered arrangements feel lush while sparse layouts look minimalist and modern.

Common Mistakes & How to Fix Them
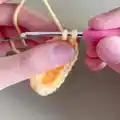
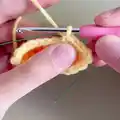
โœ— Skipping stitch markers when working rounds can cause missed increases or decreases; place markers at the start of every round to keep track of your stitch counts. โœ— Not stuffing the basket body gradually will create lumps or an uneven shape; stuff the basket halfway through sewing and adjust as you continue for a smooth finish. โœ— Forgetting to attach the lace before finishing Round 9 can make it difficult to align; sew the basket lace on the edge of Round 8 before starting Round 9 for accurate placement. โœ— Using inconsistent tension when crocheting small flowers will yield mismatched sizes; maintain steady tension and use the recommended hook sizes for uniform petals.

Mini Flower Basket Amigurumi Pattern

Create a charming miniature flower basket complete with tiny crocheted blooms and leaves. This pattern guides you through making a basket, lace cover, handle, and five different mini flowers using simple stitches and optional wire stems. Perfect for gifting, display, or practicing small amigurumi techniques. Follow the clear step-by-step rounds and helpful tips to assemble a beautiful finished piece.

Intermediate 5-7 Hours

Materials Needed for Mini Flower Basket Amigurumi Pattern

โ€” Main Fabric

  • 01
    Basket: #3 light 5ply yarn (pick colors you like) - worsted/light DK style
  • 02
    Flowers: #2 fine 4ply yarn (pick colors you like) - fingering/light fingering style
  • 03
    Green yarn for leaves and stems - #2 fine 4ply yarn

โ€” Tools Required

  • 01
    Crochet hook size 3.0mm/3.5mm (for basket)
  • 02
    Crochet hook size 2.0mm/2.5mm (for flowers and details)
  • 03
    Stitch markers
  • 04
    Tapestry needle
  • 05
    Scissors
  • 06
    Wire (0.3-0.5mm diameter; to be used as flower stems)
  • 07
    Polyester stuffing

Progress Tracker

0% Complete

โ€” Basket Cover :

Info :

3.0mm hook | #3 yarn

Round 1 :

14dc in magic loop (14st)

Round 2 :

14dc inc (28st)

Round 3 :

14[dc, dc inc] (42st)

โ€” Basket Lace :

Info :

3.0mm hook | #3 yarn

Row 1 :

45ch, 44sc, turn (44st)

Row 2 :

11[ch, dc, dc inc, dc, ch, ss] (66st)

โ€” Basket Body :

Info :

3.0mm hook | #3 yarn

Round 1 :

14dc in magic loop (14st)

Round 2 :

14dc inc (28st)

Round 3 :

14[dc, dc inc] (42st)

Round 4 :

42dc blo (42st)

Round 5-8 :

21[dc, dc flo] (42st)

Info :

Sew the basket lace on the edge of Round 8 before starting Round 9.

Round 9 :

42sc (42st)

Infos :

Crochet the basket cover and the body together while crocheting Round 9, or sew them together after you finish Round 9. Stuffing the basket body halfway through sewing.

โ€” Basket Handle :

Info :

3.0mm hook | #3 yarn

Row 1 :

32ch, (put wire on) 31sc (31st)

โ€” Mini Leaf :

Info :

2.0mm hook | #2 Green yarn

Round 1 :

7ch, (put wire on) sc, hdc, 2dc, hdc, (3sc), hdc, 2dc, hdc, sc (13st)

โ€” Mini Lavender :

Info :

2.0mm hook | #2 yarn

Row 1 :

26ch, 10[sc, 3ch, ss-in the 3rd ch], 10[sc, 4ch, ss-in the 4th ch], 5[sc, 5ch, ss-in the 5th ch]

Info :

Wrap the fabric around a wire with the right side facing out.

โ€” Mini Forget-Met-Not :

Info :

2.0mm hook | #2 yarn

Round 1 :

5[3ch, dc, 3ch, ss] in magic loop

Infos :

Make a stamen. 1. Wrap yarn around a wire about 1cm. 2. Bend it into a circle. 3. Insert the wire into the center of the flower.

โ€” Mini Sunflower :

Info :

2.0mm hook | #2 yarn

Round 1 :

6sc in magic loop (6st)

Round 2 :

6inc (12st)

Info :

Make one each with brown and green yarn.

Round 3 :

11[(3ch, dc, 3ch), ss]

Infos :

Make the 2 round pieces' wrong sides facing each other, work into any 2 parallel stitches of them, and crochet Round 3 with yellow yarn. Insert a wire in the center of the flower.

โ€” Mini Rose :

Info :

2.0mm hook | #2 yarn

Row 1 :

28ch, work into the 4th chain-12[(3dc), ch, sk], (3dc), turn (51st)

Row 2 :

13[ch, dc, dc inc, dc, ch, ss] (78st)

Infos :

Roll the fabric into the shape of a rose, and keep it in shape by sewing. Insert a wire in the center of the flower.

โ€” Mini Tulip :

Info :

2.0mm hook | #2 yarn

Round 1 :

6sc in magic loop (6st)

Round 2 :

6inc (12st)

Round 3 :

6[sc, inc] (18st)

Round 4~8 :

18sc (18st)

Infos :

Leave some yarn and sew a cross on the last round. Insert a wire in the center of the flower.

Assembly Instructions

  • Sew the basket lace onto the edge of Round 8 of the basket body before starting Round 9 for accurate alignment and a neat scalloped edge.
  • Either crochet the basket cover and the body together during Round 9 for a seamless join, or finish both pieces separately and sew them together after Round 9.
  • Insert and secure the handle with the wired row: work Row 1 for the handle with wire on, shape it, then attach each end to the basket sides and sew firmly.
  • Insert wires into the center of each flower (sunflower, rose, tulip, lavender, forget-me-not) and arrange stems inside the basket; secure stems with a little stuffing or stitches to keep placement.
  • Stuff the basket body gradually โ€” start stuffing halfway through sewing the cover and body together to maintain shape and avoid lumps.

Important Notes

  • ๐Ÿ’กUse stitch markers to keep track of the beginning of rounds, especially during increases and placement of safety wires.
  • ๐Ÿ’กWhen using wire for stems or handle, temporarily bend extra wire down to avoid discomfort while crocheting.
  • ๐Ÿ’กStuff small pieces lightly for delicate flowers and more firmly for the basket body to keep the basket stable.

This tiny flower basket is a joyful little project that brightens any shelf or desk.๐ŸŒธ It combines basket weaving stitches with petite blooms for a charming handmade accent.๐Ÿงถ Make one in colors you love and gift a smile!๐ŸŒผ

You ask,

we answer.

FAQs

What size will the finished piece be?

The finished amigurumi measures a small, palm-sized basket; exact size will vary with yarn and hook but is intended to be a mini decorative piece.

Can I use different yarn weights for this pattern?

Yes, but yarn weight will alter the final size; use thicker yarn and a larger hook for a chunkier basket, or finer yarn for a smaller, more delicate result.

Do I need prior crochet experience for this pattern?

This pattern is rated intermediate, so basic crochet knowledge and experience with rounds, increases, and basic shaping are recommended.

How long does this project typically take to complete?

Most crocheters complete this project in 5-7 hours, though time may vary based on experience level, number of flowers made, and assembly complexity.