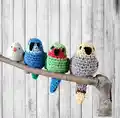
About This Mini Parrot Amigurumi Pattern
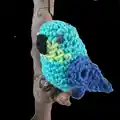
This pattern creates a tiny amigurumi parrot worked top-down with color changes for face and body. It uses lightweight cotton yarn and a small hook for a neat, compact finish. You will embroider a small beak, add 6 mm safety eyes, and sew on wings for character. The finished bird is approximately 7 cm tall and quick to make.

Minimal sewing and clear step-by-step rounds make this a fun project for beginners. The pattern includes wing instructions and tips for customizing the tail and colors.
Why You'll Love This Mini Parrot Amigurumi Pattern
I absolutely love this pattern because it packs so much charm into a very small piece. I enjoy how quickly you can finish one and have a cute handmade gift ready. The color changes let me play with different combinations to create unique little personalities. I also like that the assembly is straightforward, so finishing is satisfying and fast.
Switch Things Up
I love experimenting with colorways, so try pastel shades for a softer, more whimsical parrot or bold, saturated colors for a playful look.
I often change yarn weight and hook size to make different sizes; thicker yarn with a larger hook gives a chunky parrot while finer yarn makes a tiny keychain version.
I like embroidering different beak shapes or mouths to change the bird's expression — a tiny smile or a pronounced triangle beak gives lots of personality.
Try replacing safety eyes with embroidered eyes for a safer toy for little children or for a more handcrafted aesthetic.
For a different texture, use a mercerized cotton like Catona or a bamboo blend to give the feathers a slight sheen and a smooth finish.
Add a loop at the top and a split ring to make a cute keychain, or glue on a small eye pin to attach to bags or zipper pulls.
Experiment with tail length and shape: braid a few strands into the tail, add stripes, or crochet a fan-shaped tail for extra flair.
I sometimes sew felt wings instead of crocheted ones for a flatter, graphic look that’s quick and customizable with fabric paints or embroidery.
Make a flock by creating different color combinations and arranging them on a small branch or mobile — it’s a lovely display piece or gift set.
Don’t be afraid to add tiny accessories like a crocheted hat, scarf, or a tiny embroidered heart to personalize each parrot and make them special gifts.
Common Mistakes & How to Fix Them
✗ Skipping safety eye placement can ruin the face proportions; place the safety eyes between rounds 4 and 5 and mark their position before securing.
✗ Forgetting to change colors at the specified stitch will shift the face colors; always change color in the exact stitch indicated to keep the face neat.
✗ Not stuffing gradually will create lumps or uneven shaping; start stuffing at round 15 and add small amounts as you shape the body for a smooth finish.
✗ Missing decreases or miscounting rounds leads to incorrect stitch counts; count your stitches after each round and use a stitch marker to track the start.
✗ Weaving off the tail incorrectly can leave a gap at the base; weave the thread through the 5 front loops of round 21 securely and fasten off to close neatly.