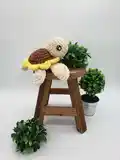
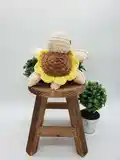
About This Mini Sunflower Turtle Amigurumi Pattern
This pattern creates a mini turtle with a sunflower-style shell using bulky, chenille-style yarn for a plush finish. Youll work separate pieces (head, body, legs, tail) in rounds and attach them as you crochet the body. The sunflower petals are made by a textured round that gives the turtle its distinctive look. Photos and notes in the pattern help with placement and assembly so your turtle looks tidy and balanced.
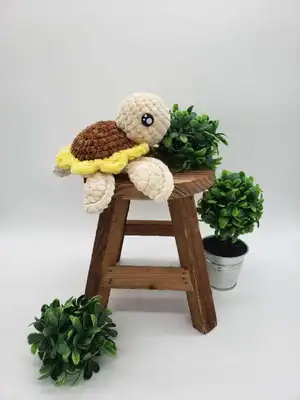
Perfect for makers who enjoy quick, tactile amigurumi projects with visible stitch texture. The pattern uses simple increases, decreases and a triple-crochet petal round to add personality and dimension.
Why You'll Love This Mini Sunflower Turtle Amigurumi Pattern
I absolutely love this pattern because it combines a cuddly, plush yarn with a playful sunflower shell that makes the little turtle pop. I enjoy how quickly the bulky yarn works up — you get a satisfying result in just a few hours. The design is small and gift-friendly, so I always make a few to keep on hand for birthdays and swaps. The assembly is straightforward but rewarding, and the finished piece looks way more detailed than the time it takes to make. I also love that the pattern encourages creativity with color choices so each turtle can feel unique.
Switch Things Up
I love how easy it is to customize this pattern — try swapping the yellow petals for pinks or greens to create a whole collection of floral turtles.
You can make the turtle larger or smaller by changing yarn weight and hook size; bulky yarn and a larger hook make a chunky version, while thinner yarn and a smaller hook create a tiny keychain friend.
I often experiment with eye styles: embroider simple eyes for a baby-safe toy or use smaller safety eyes for a subtler expression.
Try making the shell center a variegated yarn to give a natural seed-like look in the middle of your sunflower shell.
I sometimes add embroidered spots or tiny felt leaves to the shell to give each turtle more personality and texture.
For a posable version, I add thin craft wire into the front legs before stuffing so I can gently pose them on display.
I recommend trying a neutral shell and brightly colored petals for a modern look, or earthy tones for a woodland-themed turtle.
You can also make matching mini accessories like a tiny flower crown or leaf blanket using leftover yarn scraps.
If you like a firmer toy, use slightly denser stuffing and smaller hook to tighten the stitches and increase durability.
I sometimes attach a loop to the top of the shell to turn the turtle into a hanging ornament or bag charm — just add a small chain or crocheted loop when finishing.
Common Mistakes & How to Fix Them
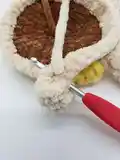
✗ Skipping stitch markers when using fluffy/chenille yarn makes rounds hard to follow; use stitch markers at the start of each round and when instructed to help locate stitches reliably.
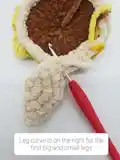
✗ Not folding and crocheting the leg halves evenly leads to lopsided legs; fold the circle carefully and crochet evenly through both layers to create a neat half-circle leg.
✗ Forgetting to leave a long tail for the head makes sewing placement difficult; leave about a foot of yarn when finishing the head so you can stitch it in place securely.
✗ Overstuffing the body or head makes shaping and closing difficult; stuff gradually and check shape frequently, adding small amounts until you reach desired firmness.
✗ Rushing color changes can create loose joins or visible ends; change colors using your preferred method and weave or tuck tails neatly to hide them and secure edges.