About This Minimal Rabbit Amigurumi Pattern
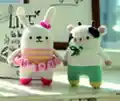
This pattern creates a minimal rabbit amigurumi with a cute ruffled skirt and an optional bow accent. You will work the head, body and legs seamlessly, then add ears, arms, a skirt and a ribbon. The pattern includes stitch counts, color-change guidance and placement diagrams so you can assemble the doll accurately.

Designed for crafters who enjoy small detailed amigurumi with colorwork and simple shaping. Includes clear rounds, skirt and ribbon instructions and helpful photos for finishing and placement.
Why You'll Love This Minimal Rabbit Amigurumi Pattern
I absolutely love this pattern because it captures a lot of personality with very simple shapes and minimal stitches. I enjoy how the ruffled skirt and tiny ribbon make the rabbit feel playful without complicated sewing. The pattern is compact but still allows creative choices with colors and small details. I also love that the legs are worked from the body so assembly is minimal and the finished doll is sturdy and neat.
Switch Things Up
I love how easy it is to customize this rabbit with color swaps; try soft pastels for a nursery version or bold brights for a playful toy.
I often change the skirt color sequence to create stripes that match a child's room or gift theme—mix and match light pink and light yellow or substitute mint for yellow.
To make a mini keychain, use a thinner yarn and a smaller hook and attach a keyring through the top of the head before finishing the tail.
If you want a larger, cuddlier rabbit, use a bulky yarn and a larger hook and increase stuffing to create a plush toy-sized piece.
I sometimes embroider different expressions by changing the nose and mouth placement; a small smile or open mouth can change the personality entirely.
Try using safety eyes in larger sizes for a more whimsical look, or embroider eyes for a baby-safe version that has no hard parts.
I also like to add tiny crocheted accessories—like little cardigans or hats—to create a whole wardrobe of matching amigurumi friends.
For a posable version, consider inserting thin wire into the arms before sewing to allow simple posing and display variations.
You can experiment with textured stitches on the body or skirt edge to add subtle detail—front loop ridges or a picot edge make charming borders.
I recommend practicing the skirt ruffle on a scrap before attaching to the body so you can perfect the tension and ruffle spacing for the look you want.
Common Mistakes & How to Fix Them
✗ Trying to change colors without following the symbol pattern can cause misaligned stripes; always follow the symbol chart and change yarn where indicated for clean color bands.
✗ Skipping stitch markers when dividing the legs leads to incorrect leg placement and uneven spacing; place markers at the division points and count stitches carefully before cutting yarn.
✗ Overstuffing the legs or body will distort the shaping and make sewing the openings more difficult; stuff gradually and stop when the shape feels firm but not overly tight.
✗ Failing to flatten and align the arms or ears before sewing can create lopsided attachments; flatten the pieces and pin them in place to check alignment before you sew.