🧢 Beautiful ✨ Detailed πŸ’ Adorable

Molly Boho Bag Pattern

Molly Boho Bag Pattern
4.4β˜… Rating
5-7 Hours Time Needed
1.2K Made This
βœ‚οΈ

Intermediate Level

Ideal for those with basic crochet experience, featuring slightly more advanced stitches and techniques to expand your skills.

⏱️

Weekend Treat

Takes 5-7 hours, making it an enjoyable project to finish over a couple of days.

✨

Stylish Touch

An elegant detail to elevate any look, combining traditional techniques with contemporary design sensibilities.

About This Molly Boho Bag Pattern

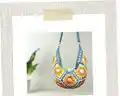
This pattern creates a boho-inspired shoulder bag made from 11 square motifs worked in DK yarn. Each square uses cluster, puff and traditional crochet stitches to build vibrant texture and color. The pattern includes clear step-by-step rows for the motif, instructions for joining, edging, a button flap and a strap using hardware.

Molly Boho Bag Pattern crochet pattern - detailed view of completed project

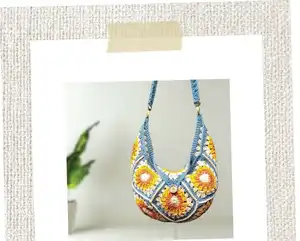
You can use between 1 and 5 colours or scrap yarn for an eclectic look, and the pattern includes guidance for making the strap with bag clips. Perfect for crafters who enjoy colorplay and textured stitches.

Why You'll Love This Molly Boho Bag Pattern

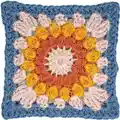
I absolutely love this pattern because it combines simple motifs into a beautifully dimensional bag that feels both vintage and modern. I enjoy playing with different colourways on each square to create unique finished pieces. The cluster and puff stitches give such satisfying texture that really stands out in photos and in real life. I also love that the assembly is creative β€” folding and stitching the squares into a 3D shape feels like magic as the bag takes form. It inspires me to make multiple variations and experiment with different yarns and hardware.

Molly Boho Bag Pattern step 1 - construction progress Molly Boho Bag Pattern step 2 - assembly progress Molly Boho Bag Pattern step 3 - details and accessories Molly Boho Bag Pattern step 4 - final assembly and finishing

Switch Things Up

I love how easy it is to customise the colour palette for each square; try muted autumn tones, bright summer shades, or a monochrome look for different moods.

To make a larger bag, I increase the number of squares β€” you can add extra rows of squares to the base and sides for extra capacity.

I often switch yarn weights to create texture variations; using a chunkier yarn will give you a sturdy, chunky bag while a lighter DK yarn creates a softer drape.

If you prefer a lined finish, I recommend adding a fabric lining sewn in after assembly to protect contents and hide seams.

I sometimes replace the button flap with a magnetic snap for a cleaner closure β€” just sew the snap into the flap and the matching piece on the front panel.

Try adding beads, tassels or pom-poms to the corners or strap ends to give the bag a playful boho vibe.

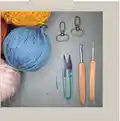
I like to experiment with metallic or wooden bag clips for different looks β€” antique brass gives a vintage feel while bright metal feels modern.

For an eco-friendly version, use recycled or scrap yarns to make each square unique and reduce waste while creating a colourful statement piece.

You can make a crossbody by lengthening the strap or doubling up a thinner strap for more comfort on the shoulder.

If you want a stiffer base, insert a small piece of interfacing or craft felt sewn into the bottom before finishing for improved structure.

Common Mistakes & How to Fix Them

βœ— Skipping the magic ring tension and closing too tightly; keep a loose initial ring so rounds lie flat and close neatly. βœ— Not counting cluster stitches properly during rounds; count clusters after finishing a round to ensure you have 16 clusters when required. βœ— Joining squares without aligning corners and orientation; lay out all squares as pictured and place back-to-back before single crochet joining. βœ— Using inconsistent hook sizes for the motif and strap without adjusting tension; follow the recommended 6mm for squares and 5mm for the foundation strap row to keep neat edges.

Molly Boho Bag Pattern

Create a charming boho-style bag using colorful DK yarn and classic granny-square techniques. This pattern guides you through making 11 decorative squares, joining them into a 3D bag, adding an edging, button flap and a sturdy strap. Youll enjoy mixing colors, practicing cluster and puff stitches, and finishing a wearable accessory you can be proud of.

Intermediate 5-7 Hours

Materials Needed for Molly Boho Bag Pattern

β€” Main Fabric

  • 01
    DK weight yarn (light/#3) - use 1-5 colours as desired (pattern sample uses 4 colours with the cream colour repeated twice)
  • 02
    Scrap yarn (optional) to make each square unique

β€” Tools Required

  • 01
    Crochet hook size 6mm (J)
  • 02
    Crochet hook size 5mm (H)
  • 03
    Needle (for sewing and finishing)
  • 04
    Scissors
  • 05
    Bag hooks / clips (hardware)
  • 06
    Stitch markers

Progress Tracker

0% Complete

β€” Square :

Row 1 :

Using the 6mm J hook. Magic Ring, Chain 3 (counts as first stitch). Double crochet 15 stitches more (16 stitches total).

Row 1 :

Pull magic circle closed, slip stitch into first stitch.

Row 2 :

Change Colour. Chain 2 (counts as first stitch). Cluster stitch into each stitch (16 total). Slip stitch closed.

Info :

Cluster stitch: Start a Double crochet but only pull through the first loop leaving the second loop on the hook, yarn over and double crochet into same stitch and only pull through the first loops ending up with 3 loops on the hook (for the first cluster, the following clusters will have 4 loops on the hook), pull through all 3 loops and chain 1. 3 stitches per cluster, 16 clusters total.

Row 3 :

Change colour, Chain 2. As before cluster stitches but this time its 4 stitches per cluster and chain 2 between each. Slip stitch closed.

Row 4 :

Change Colour. Chain 2 (counts as first Double). 1. Double crochet 3 times into the same stitch. 2. Half Double crochet 3 times into the next stitch. 3. Double crochet 3 times into the next stitch. 4. Treble crochet 3 times into the next stitch. 5. Chain 1, Treble crochet 3 times into the same stitch as the first set of trebles creating a corner. Repeat 1-5 all around to form the square edge.

Row 5 :

Change Colour. Chain 2 (counts as first Double stitch). Double crochet 3 times into each stitch across the side.

Row 5 :

When you reach a corner: Double crochet 3 times, chain 1, Double crochet 3 times into the same corner stitch to form corner. Continue round to complete Row 5. Slip stitch closed as required.

Info :

You need to make 11 of these squares.

β€” Assembly :

Infos :

Start with 8 of the 11 squares and lay them out as shown in the diagram/photo guide to form the base and sides.

Infos :

It is time to start to stitch the squares together. Using Single crochet in the back stitch only of the squares. Placing the squares back to back helps this. A contrasting colour was used in the sample but you can use the same colour if you want joining to be less visible.

Infos :

Fold the joined section in half so the bag begins to take a 3D shape. Stitch the bag along the indicated lines so it starts to form its curved base and sides. The bag will no longer sit flat once stitched.

Infos :

Add the remaining 2 squares at the top corners; these will be folded in half and stitched in place to shape the top of the bag.

Infos :

The last square requires some manipulation to add to the 3D shape of the final bag; stitch it to the back of the bag so it can be folded over the front to form the flap.

Round 1 :

Now all the squares are joined. Single crochet around the whole edge of the bag to neaten the seams and create a continuous edge.

Round 2 :

When you reach the point of the flap chain 8 and slip stitch back into the same stitch to make the flap point. Continue Single crochet around until you reach each marked corner (sample marked with yellow stars). Chain 5 and slip stitch into the same stitch at each corner marker to create decorative points.

Round 3 :

Single crochet around again and add 8 stitches into the chain loop reserved for the button hole, and add 5 stitches into the chain loops at the sides of the bag for reinforcement and decoration.

Info :

Choose your button and pick the best spot to place it on your bag, stitch it on through the square so the flap secures properly.

Strap (P1) :

Using a size 5mm H hook start by making a row of single crochet foundation chain. Make this row as long as you like in multiples of 2; sample uses 100 stitches. Going down a hook size for the foundation row helps to keep it neat and tidy.

Strap (P1) :

Switch to the 6mm J hook, chain 1, turn work. Single crochet along the whole row. Chain 4, turn work to begin decorative rows.

Strap (P1) :

Bead stitch row: Skip 1 stitch and Double crochet. This row is a bead-stitch row: you will create sideways puff/bead stitches onto the Double crochets you have just made.

Strap (P1) :

How to make the bead/puff: Loop over the hook 4 times before pulling the working yarn through and chain 1, Skip 1, Double crochet, Bead stitch, Skip 1 and continue. On the last stitch leave it as a Double crochet.

Strap (P1) :

Chain 1, turn work. Single crochet into each stitch along: one single crochet on top of each bead and one single crochet between beads as shown in the photos.

Strap (P1) :

Single crochet twice into the last stitch space, chain 1 and turn work. Single crochet along every stitch, chain 1 and turn work, repeat for a third time to build strap thickness. Cut and weave in your ends.

Info :

Attach bag clips: Take a needle and length of yarn and sew your bag clips to the ends of your strap securely. Clip the straps to your bag hardware and wear with pride.

Assembly Instructions

  • Lay out 8 of the 11 finished squares in the layout shown in the pattern photos as the base layout for the bag, then join them by single crochet using the back loops only while keeping squares back-to-back for a neat seam.
  • Fold the joined section in half along the center line and stitch the side seams that form the curved bottom of the bag; this will create the 3D bag shape.
  • Add the two remaining corner squares folded in half to form the top corners of the bag, and stitch the last square to the back so it can fold over as a flap.
  • Single crochet around the entire edge of the assembled bag; when you reach the flap point chain 8 and slip stitch back into the same stitch to form the flap tip, then continue edging and make chain loops for corners and buttonhole as instructed.
  • Make the strap separately: work a single crochet foundation on 5mm hook (sample 100 stitches), switch to 6mm hook and work the bead/puff rows and single crochet passes until strap thickness is achieved, then sew metal bag clips to each end.
  • Sew the button to the front in the best position to secure the flap, testing placement before stitching; reinforce the button with multiple passes of yarn for durability.

Important Notes

  • πŸ’‘This bag is made of squares with five rows; you can use from 1-5 colours to create different looks and the sample uses 4 colours with the cream colour repeated twice.
  • πŸ’‘I have included a strap pattern that requires hardware (bag hooks); these can be purchased online and you may alternatively attach a ready-made handle if preferred.
  • πŸ’‘Place squares back-to-back when joining and use single crochet in the back stitch only for a neat edge and strong seam.
  • πŸ’‘Going down a hook size for the foundation row of the strap helps keep the foundation neat and tidy before switching to the larger hook.

Congratulations on completing the Molly Boho Bag β€” you now have a beautiful boho accessory full of texture and colour. Try mixing different colourways or scrap yarn to make each bag totally unique and expressive. Keep experimenting with trims, buttons and hardware to make every bag your own. 🧢✨

You ask,

we answer.

FAQs

What size will the finished bag be?

The finished bag size depends on your yarn and tension; with DK yarn and the given hook sizes the finished bag in the sample measures approximately a small to medium shoulder bag size suitable for everyday carry.

Can I use different yarn weights for this pattern?

Yes, you can use different yarn weights but this will change the final size and drape; choose appropriate hook sizes and make a sample square to check gauge before committing to the full project.

Do I need special hardware for the strap?

No special hardware is required beyond the bag hooks or clips for the strap ends, which can be purchased online; alternatively you can sew on or crochet a strap and attach it directly to the bag without clips.

How long does this project typically take to complete?

Most crocheters complete the bag in about 5-7 hours depending on experience and customization choices, though time will vary based on colour changes and assembly speed.