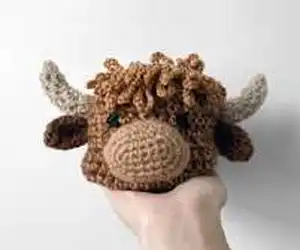
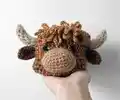
Make a charming Mungo Highland Cow coaster set that includes 4 coasters, a cuddly cow head container, and a decorative loop-stitch mat. This pattern guides you through every piece with photos and helpful tips so you can create a cozy, gift-ready set. Youll love the playful design and practical functionality—perfect for gifting or adding handmade charm to your home.
Progress Tracker
0% Complete
— Measurements :
Info :
Cow head with coasters & mat inside: approximately 10" (L) x 6" (W) x 5.5" (H). Coasters: approximately 6.5" diameter each. Mat: approximately 8" diameter.
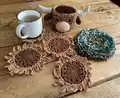
— Coasters (make 4) :
Info :
Use 5 mm hook. Colour WALNUT for base rounds.
Round 1 :
Create MC, 6 sc into MC. Sl st to close round (6).
Round 2 :
2 sc in each st (increase) around (12). Sl st to close round.
Round 3 :
*2 sc in next st (increase), sc in next st* rep around (18). Sl st to close round.
Round 4 :
Ch 1, *2 hdc into next st, hdc in next 2 sts* repeat around (24). Sl st into ch 1 to close round.
Round 5 :
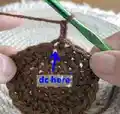
Ch 2 (counts as first dc), dc in same sp. Ch 1, skip next st. *2 dc in next st, ch 1, skip next st* repeat around ending in ch 1 (36). Sl st to top of ch 2 to close.
Round 6 :
Ch 3 (counts as first hdc and ch 1). *3 hdc in next space, ch 1* repeat around ending with 2 hdc in last space. Sl st to top of ch 2 to close round (48). Fasten off.
Round 7 :
Colour HONEY. Join with sl st to round 6 cluster space. *Ch 14, sl st into same sp, sl st into next 2 sts, ch 10, sl st into same sp, sl st into next 2 sts* repeat around. Fasten off.
— Cow Head :
Info :
Use 5.5 mm hook. To make the head, use 2 strands of yarn at the same time.
Round 1 :
MC, ch 2 (counts as hdc). 9 hdc in the MC. Join with sl st into top of ch 2 to close round (10).
Round 2 :
Ch 2 (counts as hdc). Hdc into same st. *2 hdc in next st* repeat around. Join with sl st into top of ch 2 to close round (20).
Round 3 :
Ch 2 (counts as hdc). Hdc into same st. *Hdc in next st, 2 hdc in next st* repeat around. Join with sl st into top of ch 2 to close round (30).
Round 4 :
Ch 2 (counts as hdc). Hdc into same st. *Hdc in next 2 sts, 2 hdc in next st* repeat around. Join with sl st into top of ch 2 to close round (40).
Round 5-12 :
Ch 1. Hdc in each st around. Join with sl st into ch 1 to close off round (40).
Round 13 :
Ch 1. *Hdc together (decrease stitch), hdc in next 2 sts* repeat around. Join with sl st to close off round. Fasten off and weave in any loose ends using a yarn needle.
Info :
Use black embroidery thread or yarn to add eyes to the head. Tip: wait until the nose is complete and sewn onto the head before adding eyes. This will ensure correct eye placement to the nose.
— Horn (make 2) :
Info :
Use 5 mm hook. Working in continuous rounds. Starting at the tip of the horn.
Round 1 :
Create MC, 5 sc into MC, join with sl st (5).
Round 3 :
2 sc (increase), sc, 2 sc (increase), sc. (At this point the piece should start curling, flip it inside out and work the rounds from the outside.)
Round 4 :
Dc in next 6 sts.
Round 5 :
Sc in next 2 sts.
Round 6 :
Dc in next 4 sts.
Round 7 :
Sc in next 3 sts.
Round 9 :
2 dc in next st (increase).
Round 10 :
Dc in next 2 sts.
Round 11 :
Sc in next 4 sts. (All of the sc sts should be lining up in each row and you should start to see the horn curling.)
Round 12 :
Dc in next 2 sts.
Round 13 :
2 dc in next st (increase).
Round 14 :
Dc in next 2 sts.
Round 15 :
Sc in next 3 sts.
Round 16 :
Dc in next 6 sts.
Round 17 :
Sc in next 4 sts.
Round 18 :
Dc in next 9 sts.
Info :
Fasten off leaving long tail. Lightly stuff horns and shape as desired. Sew onto opposite sides of the head near the top.
— Ear (make 2) :
Info :
Use 5 mm hook. Working in continuous rounds.
Round 1 :
Create MC, 6 dc into MC, sl st to close.
Round 2 :
2 dc in each st (increase) (12), sl st to close. (At this point the piece should start curling, flip it inside out and work the rounds from the outside.)
Round 3 :
Dc in each st around (12).
Round 4 :
Dc-together (decrease) in each st around (6).
Info :
Fasten off leaving long tail (approximately 12") to sew onto head. Fold bottom of ear together and sew a few stitches with long tail to keep it pinched. Sew onto each side of the head.
Info :
Sew each ear onto opposite sides of the head just under horn. Make sure both ears are facing the same direction.
— Nose :
Info :
Use 5 mm hook. Note: The nose uses a method in which the starting chain moves along the round so it will shift as you go. We are making an oval shape (not a circle).
Round 1 :
Ch 6. Sc into 2nd ch from hook, sc in next 3 sts, 3 sc into end chain.
Round 1 Continued :
Continue around working in bottom side of ch 6. Sc into next 3 sts, 2 sc (increase) into end ch (12). Sl st into next ch (this will now count as the end of the previous row. The next sc will act as the first st in the next round).
Round 2 :
Sc in next 3 sts (put your marker into the 1st st and this will be the starting ch of the round). 2 sc in the next 3 sts (increase), sc in the next 3 sts, 2 sc in the next 3 sts (18). Sl st into first st to end this row. Next st is the beginning of Round 3.
Round 3 :
Sc in next 4 sts, 2 sc in the next 3 sts (increase), sc into the next 5 sts, 2 sc in the next 3 sts, sc into the last 3 sts (24). Sl st into first st to end this row. Next st is the beginning of Round 4.
Round 4 :
Sc in next 3 sts, 2 sc in the next st (increase), sc into the next 2 sts, 2 sc into next (increase), sc into the next 2 sts, 2 sc into next (increase), sc into the next 5 sts, 2 sc into next (increase), sc into next 2 sts, 2 sc into next (increase), sc into next 2 sts, 2 sc into next (increase), sc into next 2 sts, 2 sc into next (increase), sc into next 2 sts (30). Sl st into first st to end this row. Next st is the beginning of Round 5.
Round 5-6 :
Sc around (30). No need to sl st to beginning first chain, just keep going around.
Round 7 :
Sc in next 4 sts. You should end around one of the corners of the oval (not in the middle). Fasten off leaving long tail (approximately 20"). Stuff lightly and sew onto bottom middle of the head.
— Mat :
Info :
I used a 6.5mm hook for the example mat, but use the size needed for your yarn. The method used to make the mat consists of loop stitches in a round.
Row 1 :
MC, 6 sc into MC, sl st to close (see video link above for how to do this).
Row 2 :
2 sc into each st around (increase), sl st to close (12).
Row 3 :
*sc in next st, 2 sc in next st (increase)* repeat around, sl st (28).
Row 4 :
*sc in next 2 sts, 2 sc in next st (increase)* repeat around, sl st (24).
Row 5 :
*sc in next 3 sts, 2 sc in next st (increase)* repeat around, sl st (30).
Row 6 :
*sc in next 4 sts, 2 sc in next st (increase)* repeat around, sl st (36).
Row 7 :
*sc in next 5 sts, 2 sc in next st (increase)* repeat around, sl st (42).
Row 8 :
*sc in next 6 sts, 2 sc in next st (increase)* repeat around, sl st (48).
Row 9 :
*sc in next 7 sts, 2 sc in next st (increase)* repeat around, sl st (54).
Row 10 :
*sc in next 8 sts, 2 sc in next st (increase)* repeat around, sl st (60).
Row 11 :
*sc in next 9 sts, 2 sc in next st (increase)* repeat around, sl st (66).
Info :
The small flowers on the mat are made using French Knots: Thread a yarn needle with the yarn colour of your choice and fold the yarn in half. Push the needle through the back of the mat to the front making sure to avoid poking through any loops.
Info :
Pull up the needle and do a French Knot (wrap thread around bottom of the needle twice). Push the needle back through the mat making sure not to poke through the same hole you came up on (try to catch at least 1 stitch or else your flowers might pull through the back of the mat). Gently pull the yarn tight to make a French Knot. Scatter flowers throughout the mat adding the occasional cluster of 2-3 together.
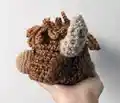
— Final Assembly :
Info :
Fold the mat and place inside the bottom of the head. Fold a coaster over the front and back of the head. Fold the remaining 2 coasters in half, then half again and stuff into the head with the loops hanging out the top.
This playful Highland Cow coaster set adds handcrafted charm to any table and doubles as a cute storage container. It makes a thoughtful handmade gift that is as functional as it is adorable. Whether you keep it for yourself or share it with a friend, this set will brighten coffee breaks and cozy moments. 🧶🐮