🧢 Beautiful ✨ Detailed πŸ’ Adorable

Mystified Square Pattern

Mystified Square Pattern
4.1β˜… Rating
2-4 Hours Time Needed
3.0K Made This
βœ‚οΈ

Advanced Level

Designed for experienced crocheters, these patterns involve intricate designs and complex techniques to challenge and inspire.

⏱️

Bite-Sized Project

Finishes in 2-4 hoursβ€”perfect for an afternoon of creative relaxation.

🏑

Cozy Accent

A warm touch for your space that transforms ordinary corners into inviting nooks filled with handmade charm.

About This Mystified Square Pattern

This striking 11-inch or 12-inch crochet square is designed with an array of beautiful, dimensional stitches. You will work with front and back post stitches, clusters, puffs, and Y-stitches to create a highly textured piece. The layered construction makes it visually stunning from every angle.

Mystified Square Pattern crochet pattern - detailed view of completed project

Perfect as a statement block for an afghan, a decorative throw pillow cover, or a beautiful wall hanging. It's a wonderful way to expand your crochet stitch vocabulary.

Why You'll Love This Mystified Square Pattern

I absolutely love this pattern because it keeps you completely engaged from the very first round. The way the floral center emerges and slowly transitions into a crisp square shape is incredibly satisfying to crochet. I've designed it to use a variety of intermediate and advanced stitches so you'll never get bored. Each round builds upon the last in unexpected ways, creating a truly three-dimensional fabric. The finished square looks like a piece of art, and you'll feel so proud of your beautiful stitchwork.

Mystified Square Pattern step 1 - construction progress Mystified Square Pattern step 2 - assembly progress Mystified Square Pattern step 3 - details and accessories Mystified Square Pattern step 4 - final assembly and finishing

Switch Things Up

I love how versatile this beautiful afghan block is for customization! The most immediate way to make it your own is through color choices. By playing with different palettes, you can completely change the mood of the squareβ€”try a monochromatic gradient for an elegant look, or bold contrasting colors to make the textured stitches pop.

Want to turn this into a larger project? You can seam several of these squares together to create a breathtaking heirloom afghan. Try alternating the Mystified Square with solid, simple squares to let the detailed pattern truly shine without overwhelming the eye.

If you're looking for home decor, this 12-inch square is the absolute perfect size for the front of a decorative throw pillow! Simply crochet a plain solid square for the back and seam them together around a cushion insert for an instant living room upgrade.

You can also experiment with yarn weights. Crocheting this pattern with a fine fingering weight yarn and a smaller hook would create a stunning, delicate doily or wall hanging. Conversely, using bulky yarn would result in a massive, squishy floor cushion!

Don't be afraid to take your time and enjoy the process of learning new stitches. Creating the layered effects by working in front of and behind previous rounds is magical, and the results are truly worth the effort!

Common Mistakes & How to Fix Them

βœ— Losing track of skipped stitches behind layered rounds can cause misalignment; always double-check the stitches skipped in previous rounds before securing your current stitch. βœ— Working post stitches too tightly will cause the square to pucker or cup; ensure you pull up your loops to the correct height to maintain a flat fabric. βœ— Confusing the different cluster and puff stitches can alter the texture; carefully review the stitch guide for the 3dc-cluster, 4dc-cluster, and puff stitch mechanics. βœ— Failing to block the final square leaves the intricate stitches looking cramped; perform a thorough wet or steam block to open up the lacework and define the corners.

Mystified Square Pattern

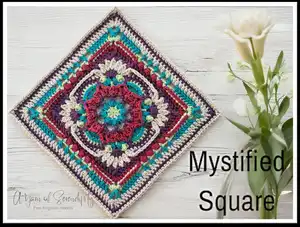
Dive into the mesmerizing texture of the Mystified Square! This beautifully complex afghan block features layers of intricate stitches, from post stitches to puffs and clusters, creating a stunning floral mandala center that blossoms into a geometric border. It's an engaging project that will challenge your skills and result in a breathtaking centerpiece.

Advanced 2-4 Hours

Materials Needed for Mystified Square Pattern

β€” Main Fabric

  • 01
    Worsted Weight Yarn (Size 4), 100% Cotton or Cotton blend
  • 02
    Colorway 1: I Love This Cotton in Pistache (A), Turquoise (B), Mulberry (C), Ivory (D), Rosey II (E)
  • 03
    Colorway 2: I Love This Cotton in Sage (A), Pistache (B), Amethyst (D), Tart Orange (E)
  • 04
    Colorway 2: Loops & Threads Creme Cotton in Pale Orchid (C)

β€” Tools Required

  • 01
    Crochet hook size 4.5 mm (for 11x11 inch square)
  • 02
    Crochet hook size 5.0 mm (for 12x12 inch square)
  • 03
    Scissors
  • 04
    Yarn needle for weaving in ends
  • 05
    Stitch markers

Progress Tracker

0% Complete

β€” Special Notes :

Info :

Instructions for ALL rounds start with a standing stitch and end with an invisible join to 2nd st of rnd, and fasten off. If not changing colors, you can opt to finish the previous rnd with a slst join and use the appropriate ch or chainless starting stitch.

β€” Square Pattern :

Round 1 :

Start in a double magic circle, ch 3 or work a chainless dc (as first dc of rnd), 7 dc; cut yarn, invisible join. (8 dc)

Round 2 :

Start in any dc, *3dc-cluster in dc, ch 3; repeat from * around; cut yarn, invisible join. (8 3dc-cluster, 8 ch-3 sp)

Round 3 :

Start in any ch-3 sp, *4dc-cluster in ch-3 sp, ch 3; FPsc around NEXT 3dc-cluster, ch 3; repeat from * around; cut yarn, invisible join. (8 FPsc, 8 4dc-cluster, 16 ch-3 sp)

Round 4 :

Start around 2nd leg of any 3dc-cluster of rnd 2, *working in rnd 2, FPsc around 2nd leg of 3dc-cluster; ch 5, sk NEXT (ch-3 sp, 4dc-cluster, ch-3 sp, FPsc); repeat from * around; cut yarn, invisible join. (8 FPsc, 8 ch-5 sp)

Round 5 :

Start in any FPsc of rnd 4, *slst in FPsc; working in rnd 3 and behind rnd 4, dc-Y st in NEXT ch-3 sp; working in rnd 4 and in front of rnd 3, Y st in NEXT ch-5 sp-place st marker in ch-2 sp; working in rnd 3 and behind rnd 4, sk 4dc-cluster, dc-Y st in NEXT ch-3 sp; repeat from * around; cut yarn, invisible join. (8 slst, 8 Y st, 16 dc-Y st)

Round 6 :

Work in rnd 3 only and behind rnd 5, start in any 4dc-cluster, *sc in 4dc-cluster, ch 2; sk all sts to NEXT FPsc, sc in NEXT FPsc, ch 2; sk all sts to NEXT 4dc-cluster; repeat from * around; cut yarn, invisible join. (16 sc, 16 ch-2 sp)

Round 7 :

Work in rnd 6 only and behind rnd 5, start in sc worked in any FPsc of rnd 3, *(dc, ch 3, dc) in sc; ch 1, sk ch-2 sp; hdc in NEXT sc; ch 1, sk ch-2 sp; ([dc, ch 2] 2 times, dc) in NEXT sc-place st marker in 1st ch-2 sp; ch 1, sk ch-2 sp; hdc in NEXT sc; ch 1, sk ch-2 sp; repeat from * around; cut yarn, invisible join. (8 hdc, 20 dc, 16 ch-1 sp, 8 ch-2 sp, 4 ch-3 sp)

Round 8 :

Start in marked sp of rnd 7; *(puff, ch 1, puff) in ch-2 marked sp-remove marker, ch 2, sk dc; (puff, ch 1, puff) in NEXT ch-2 sp; ch 1 to close puff, sk NEXT (dc, ch-1 sp); sc in NEXT hdc, sk NEXT (ch-1 sp, dc); (7 dc) in NEXT ch-3 sp, sk NEXT (dc, ch-1 sp); sc in NEXT hdc, sk NEXT (ch-1 sp, dc); repeat from * around; cut yarn, invisible join. (8 sc, 28 dc, 16 puff, 12 ch-1 sp, 4 ch-2 sp)

Round 9 :

Start in ch-1 sp between 2 puffs before any ch-2 sp, *(sc, tr, sc) in ch-1 sp; ch 3, sk NEXT (puff, ch-2 sp, puff); (sc, tr, sc) in NEXT ch-1 sp; ch 2, sk NEXT (puff, ch-1 sp, sc); shallow BPhdc around NEXT 7 dc; ch 2, sk NEXT (sc, puff); repeat from * around; cut yarn, invisible join. (16 sc, 28 shallow BPhdc, 8 tr, 8 ch-2 sp, 4 ch-3 sp)

Round 10 :

Start in any ch-2 sp of rnd 8, *working in rnd 8 and in front of rnd 9, (5 dc) in ch-2 sp; working in rnd 8 and behind rnd 9, hdc in ch-1 sp that closes NEXT puff; working behind rnd 9, ch 1, sk NEXT (sc, tr, sc); working in rnd 5 and in front of rnds 6, 7, 8 and 9, e-dc in NEXT marked ch-2 sp of Y st-remove marker; working in rnd 9, sk ch-2 sp, hdc in NEXT 7 shallow BPhdc, sk ch-2 sp; working in rnd 5 and in front of rnds 6, 7, 8 and 9, e-dc in NEXT marked ch-2 sp of Y st-remove marker; working behind rnd 9, ch 1, sk NEXT (sc, tr, sc); working in rnd 8 and behind rnd 9, hdc in ch-1 sp that closes puff; repeat from * around; cut yarn, invisible join. (36 hdc, 20 dc, 8 e-dc, 8 ch-1 sp)

Round 11 :

Start in 1st dc of any group of (5 dc), *[2tr-cluster in dc, ch 1] 5 times; 2tr-cluster in NEXT hdc; sk ch-1 sp, dc in NEXT 2 sts; hdc in NEXT 5 hdc; dc in NEXT 2 sts, sk ch-1 sp; 2tr-cluster in NEXT hdc, ch 1; repeat from * around; cut yarn, invisible join. (20 hdc, 16 dc, 28 2tr-cluster, 24 ch-1 sp)

Round 12 :

Start in ch-1 sp between 1st and 2nd 2tr-cluster of 7 2tr-clusters, *[(2 dc) in ch-1 sp, sk 2tr-cluster] 3 times; tr in NEXT ch-1 sp, ch-2 as a corner sp; working from behind previously worked tr, tr in previous ch-1 sp where 2 dc are worked; (2 dc) in NEXT worked ch-1 sp where 1st tr was worked; [sk 2tr-cluster, (2 dc) in NEXT ch-1 sp] 2 times; sk 2tr-cluster, BPhdc around NEXT 9 sts, sk 2tr-cluster; repeat from * around; cut yarn, invisible join. (36 BPhdc, 48 dc, 8 tr, 4 ch-2 corner sp)

Round 13 :

Start in any corner sp, *(2 dc, ch 2, 2 dc) in corner sp; dc in NEXT 6 sts, hdc in NEXT dc; [ch 1, sk BPhdc, HPS in NEXT BPhdc] 4 times, ch 1 to close HPS just worked; sk BPhdc, hdc in dc, dc in NEXT 6 sts; repeat from * around; cut yarn, invisible join. (8 hdc, 64 dc, 16 HPS, 20 ch-1 sp, 4 ch-2 corner sp)

Round 14 :

Start in any corner sp, *(5 hdc) in corner sp; BPhdc around NEXT 8 dc, ch 1, sk hdc; [sc in NEXT ch-1 sp; ch 2, sk HPS] 4 times, sc in NEXT ch-1 sp; ch 1, sk hdc; BPhdc around NEXT 8 dc; repeat from * around; cut yarn, invisible join. (20 sc, 20 hdc, 64 BPhdc, 8 ch-1 sp, 16 ch-2 sp)

Round 15 :

Start in 1st BPhdc after any group of 5 hdc, *dc in 7 BPhdc; ch 2, sk NEXT (BPhdc, ch-1 sp); [hdc in NEXT sc, ch 2, sk ch-2 sp] 4 times; hdc in NEXT sc, ch 2, sk NEXT (ch-1 sp, BPhdc); dc in NEXT 7 BPhdc; ch 1, sk 2 hdc; (FPtr, ch 2 as the new corner, FPtr) around NEXT hdc; ch 1, sk 2 hdc; repeat from * around; cut yarn, invisible join. (20 hdc, 56 dc, 8 FPtr, 8 ch-1 sp, 24 ch-2 sp, 4 ch-2 corner sp)

Round 16 :

Start in any corner sp, *(2 dc, ch 2, 2 dc) in corner sp; dc in NEXT FPtr, ch-1 sp and 7 dc; (2 dc) in NEXT ch-2 sp; [dc in NEXT hdc and ch-2 sp] 4 times; dc in NEXT hdc; (2 dc) in NEXT ch 2-sp; dc in NEXT 7 dc, ch-1 sp and FPtr; repeat from * around; cut yarn, invisible join. (140 dc, 4 ch-2 corner sp)

Round 17 :

Start in any corner sp, *(sc, ch 2, sc) in corner sp; sc in 35 dc; repeat from * around; cut yarn, invisible join. (148 sc, 4 ch-2 corner sp)

Round 18 :

Start in any corner sp, *(sc, ch 2, sc) in corner sp; sc in 37 sc; repeat from * around; cut yarn, invisible join and weave in ends. (156 sc, 4 ch-2 corner sp)

Assembly Instructions

  • Once you have completed all 18 rounds, weave in all yarn ends securely on the wrong side of the square.
  • To achieve a professional appearance, you must block your finished square.
  • Pin the square to your blocking mats, ensuring the piece measures exactly 11x11 inches (with 4.5mm hook) or 12x12 inches (with 5.0mm hook).
  • Use a wet block or steam block method to set the stitches, opening up the lacework and defining the corners.
  • Allow the square to dry completely before unpinning or attaching it to other crochet motifs.

Important Notes

  • πŸ’‘Keep in mind that if you choose to slip stitch to end rounds instead of an invisible join, the initial chain will replace the first standing stitch.
  • πŸ’‘Total chain spaces are included in the stitch count, but corner chain spaces are not included in the total.
  • πŸ’‘Parentheses () indicate a group of stitches worked together in or around the same stitch, or indicate skipped stitches.
  • πŸ’‘Brackets [] indicate repeating the instructions within them as directed.
  • πŸ’‘Pay close attention to instructions specifying whether to work 'in front of' or 'behind' previous rounds.

This intricate Mystified Square is a true masterpiece of texture and color! By mastering these advanced stitches, you'll create a breathtaking block perfect for heirloom afghans or decorative cushions. Take it one round at a time and watch the magic unfold! βœ¨πŸ§ΆπŸ’–

You ask,

we answer.

FAQs

What size will the finished square be?

The finished square measures approximately 11x11 inches when using a 4.5 mm hook, or 12x12 inches when using a 5 mm hook and worsted weight yarn.

Can I use different colors for this pattern?

Absolutely! The pattern provides two beautiful colorway examples, but you can customize it with any colors to match your home decor. Using contrasting colors helps the intricate stitches pop.

What is an invisible join?

An invisible join is a technique used to finish a round seamlessly. You cut the yarn, pull the tail through, and use a needle to thread it from back-to-front through the 2nd stitch of the round, creating a mock stitch top.

Is blocking necessary for this square?

Yes, blocking is highly recommended. It opens up your stitches, making them even and more defined, and ensures your square lays perfectly flat for assembly into larger projects.