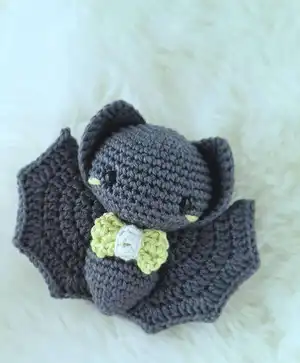
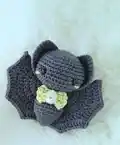
Create your own adorable baby bat with this charming crochet pattern! This cute companion features detailed wings, sweet little ears, and an optional bow tie accessory. Perfect for Halloween decor or year-round cuddles, this pattern guides you through every step with clear instructions and helpful assembly tips. Whether you're making it as a gift or adding to your own collection, this baby bat is sure to steal hearts with its precious personality.
Progress Tracker
0% Complete
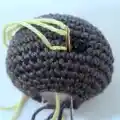
— Head :
Info :
In your main color, make 6 SC in magic ring
Round 2 :
(SC, INC) x 6 (18)
Round 3 :
(SC 2, INC) x 6 (24)
Round 4 :
(SC 3, INC) x 6 (30)
Round 5 :
(SC 4, INC) x 6 (36)
Round 6-7 :
SC in each stitch - 2 rounds (36)
Round 8 :
(SC 5, INC) x 6 (42)
Info :
Insert safety eyes as shown. Do not add the backs yet, as it may be difficult to crochet the next round
Round 9-12 :
SC in each stitch - 4 rounds (42)
Round 13 :
(SC 4, DEC) x 7 (35)
Info :
Stuffing Step 1 - Place the backs on your safety eyes and begin to stuff. Tuck plenty of stuffing above the eye area. This helps to keep the eyes looking straight and forward later
Round 14 :
(SC 3, DEC) x 7 (28)
Info :
Stuffing Step 2 - Stuff rounds 12 and above. Gently pad out the area between and around the eyes. Don't stuff too firmly just yet
Round 15 :
(SC 2, DEC) x 7 (21)
Round 16 :
(SC, DEC) x 7 (14)
Info :
Stuffing Step 3 - Add stuffing a little at a time until you have a nice rounded shape. Take care to not dislodge the eyes, and don't overstuff your decrease rounds. Take your time stuffing and shaping the head. It really is worth it for that cute face! When you are happy with the shape, move on to embroider the blush
Info :
Slipstitch, fasten off, and weave in tail
— Embroider Blush :
Step 1 :
Insert your needle through the opening and bring out two stitches back from the eye, between rounds 11 and 12
Step 2 :
Embroider those two stitches once, then bring your needle back in next to the eye, then out through the opening
Step 3 :
Repeat for the other side
Step 4 :
Tie your ends together securely and trim off the excess
— Body :
Info :
Continue with your main color and make 6 SC in magic ring
Round 1 :
(INC, SC) x 3 (9)
Round 2 :
(INC, SC 2) x 3 (12)
Round 3 :
(INC, SC 3) x 3 (15)
Round 4 :
(INC, SC 4) x 3 (18)
Round 5 :
(INC, SC 2) x 6 (24)
Round 6-8 :
SC in each stitch - 3 rounds (24)
Info :
Begin to stuff the body. From here, stuff as you go
Round 9 :
(DEC, SC 6) x 3 (21)
Round 10 :
SC in each stitch (21)
Round 11 :
(DEC, SC 5) x 3 (18)
Round 12 :
(SC 3, DEC, SC 2, DEC) x 2 (14)
Info :
SC in the next 3 stitches, slipstitch in the next. Cut yarn, leaving a long tail for sewing, and pull through. Ensure the body is stuffed firm to maintain the shape. Line up the slipstitch on the body with the slipstitch on the head. Stitch the head and body together through the front loops only
— Ears :
Info :
Start with 6 SC in magic ring. Make 2
Round 1 :
(3SC, SC) x 3 (12)
Round 2 :
SC, (3SC, SC 3) x 2, 3SC, SC 2 (18)
Round 3 :
SC 2, (3SC, SC 5) x 2, 3SC, SC 3 (24)
Round 4 :
SC 3, (3SC, SC 7) x 2, 3SC, SC 4 (30)
Round 5 :
SC 4, (2SC, SC 9) x 2, 2SC, SC 4, slipstitch (33)
Info :
Cut yarn and pull through, leaving approximately 40cm tail. Make the second ear
— Wings :
Info :
Into magic ring. Chain 3 counts as 1 DC. DC-INC means make 2 DC in the same stitch. 2DC CH2 2DC means make 2 DC in the next stitch, chain 2, then make another 2 DC in the same stitch. Make 2
Round 1 :
CH 3, DC 15, slipstitch into chain 2 (16)
Round 2 :
CH 3, DC in same chain 2 space, (DC, DC-INC) x 7, DC, slipstitch in chain 2 (24)
Round 3 :
CH 3, DC in same chain 2 space, (DC 2, DC-INC) x 7, DC 2, slipstitch in chain 2 (32)
Round 4 :
CH 3, DC in same chain 2 space, (DC 3, DC-INC) x 7, DC 3, slipstitch in chain 2 (40)
Round 5 :
CH 3, DC in same chain 2 space, CH 2, 2DC in the same space, then (DC 4, 2DC CH2 2DC) x 7, DC 4, slipstitch in chain 2 (80)
Info :
Cut approximately 60cm of yarn and pull through. Fold your work in half to create the wing shape. Be sure that the chain 2 points match the opposite side. Stitch together through the back loops only. Once you reach the end, thread your needle back through the wing to your starting point
— Bow Tie :
Info :
In your accent color. The bow tie should look slightly oversized. As a guide, it should fall roughly the same width as the eyes. You can add/remove chains or use a different hook to achieve the right size if you need to
Round 1 :
CH 8, HDC in 3rd chain from hook, HDC in each space (6)
Round 2-4 :
CH 2, turn, HDC in each stitch (6) - 3 rows, 4 rows in total
Info :
Fasten off and weave in ends
Bow Tie Knot :
In white, CH 7 with a 10cm tail. DC in 3rd chain from hook, DC in each space (4). Slipstitch into chain 1, cut 10cm and pull through
Assembly Step 1 :
Thread your chain tail through the middle of the opposite end, creating a loop at the back
Assembly Step 2 :
Pinch the colored piece, place face down inside the loop and pull gently
Assembly Step 3 :
Thread your ends through the middle loops on the opposite side. Pull tight and knot. Weave and trim one loose end, leaving the other for sewing
— Assembly :
Ear Assembly :
Point A - The front corner of the ear should be placed in the second stitch back from the blush, one row down, between rounds 12 and 13. Point B - The back corner should go between rounds 8 and 9, approximately 3 stitches apart. Point C - Gently pinch the top tip of the ear, then flatten against the head. Pin between rounds 3 and 4. Always check how the ears look from the front before sewing. You may need to adjust the positioning slightly. If you need to adjust, first check point C - pinning/unpinning an extra stitch or two may fix it. If that doesn't help, recommend leaving point A the same and adjusting points B and C to achieve the desired look. To attach, pick up both loops on the ear and go directly under the corresponding stitch on the head. Pull tight for a neat finish. Work through each stitch. Then fasten off discretely and weave in the end
Wing Assembly :
Pin the wings to the body, creating a narrow V-shape. The starting rings should be positioned where the body meets the head, 3-4 stitches apart. The head will be in the way at this point. You can bend the wing back slightly to get the correct position. The bottom points of the wing should meet towards the tail. Thread your needle and attach the wing from bottom to top, the same way we attached the ears. One stitch every 2-3 body rows should be enough. Once you've secured the top, bring your needle through to the side of the body, roughly in line with the ear. Pick up a stitch from the wing and attach to the body. Pull tight. Work your needle towards the bottom part of his body, pick up another stitch from the wing and attach, pull tight. Fasten off discretely and weave in the end
Bow Tie Assembly :
Attach the bow tie between the 2nd and 3rd rows beneath the head
Final Step :
He's probably a little squashed from all that sewing! Gently squish him back into shape with your fingers and you're all done
This adorable Baby Bat pattern was designed to create the cutest little flying companion with personality and charm! The detailed wings, perky ears, and sweet embroidered blush come together to make a truly enchanting finished piece. Whether you're making it for Halloween decor, as a gift for a bat lover, or just because it's impossibly cute, this little guy is sure to bring smiles. The optional bow tie adds extra character! 🦇 Happy crocheting! 🧶✨