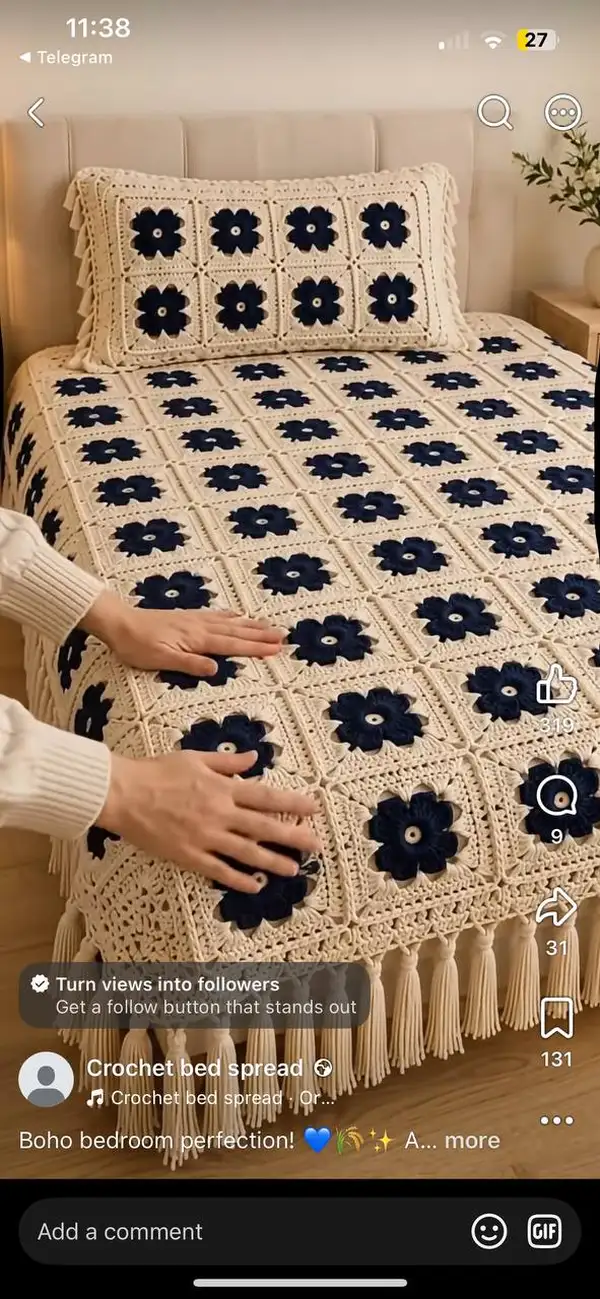
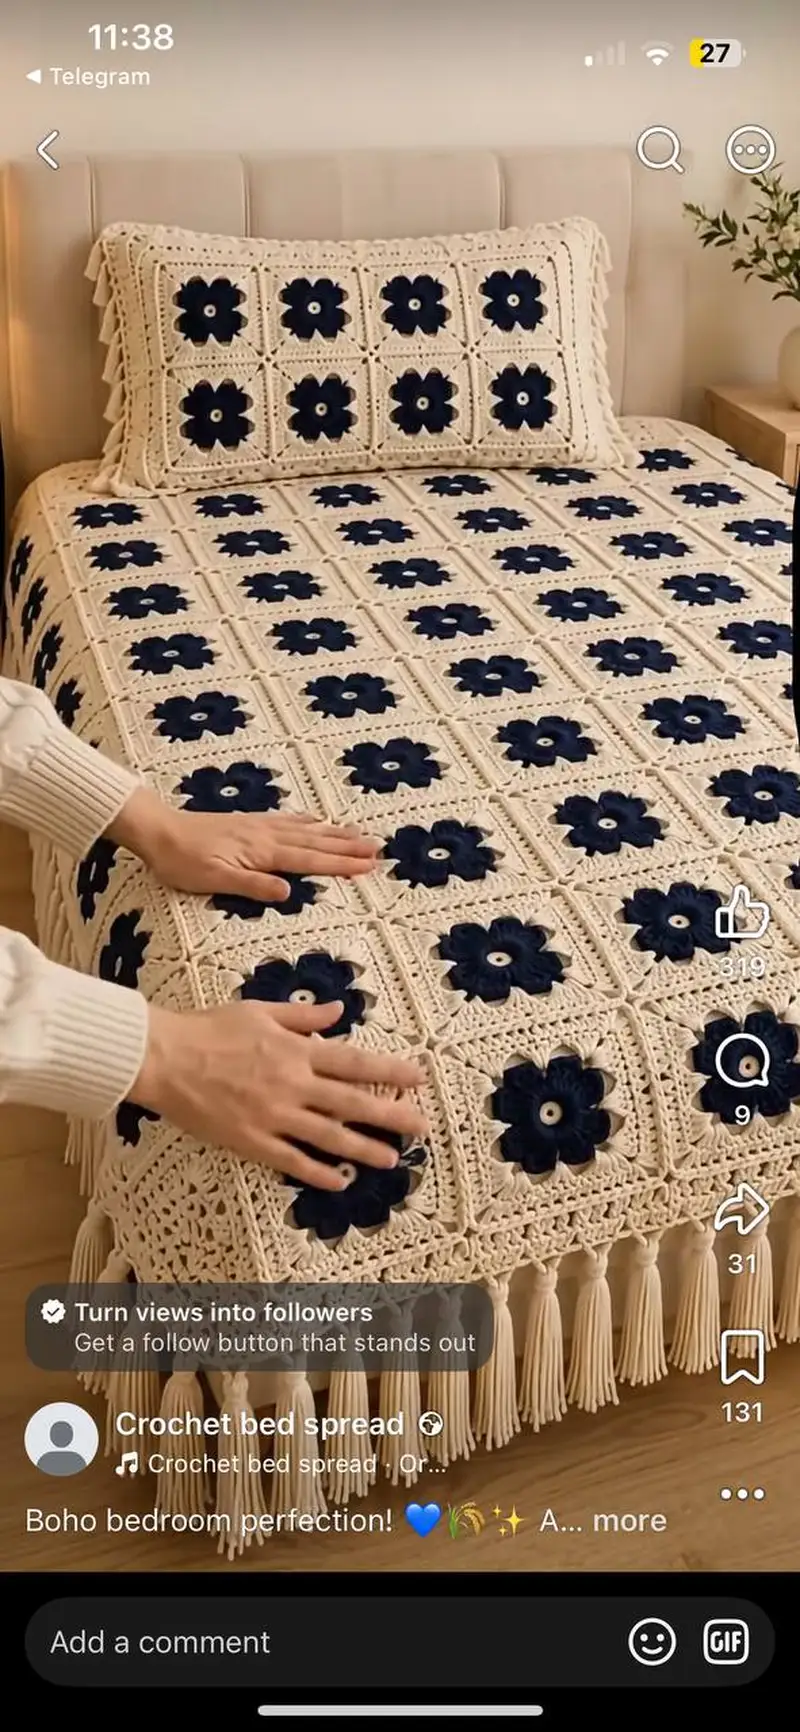
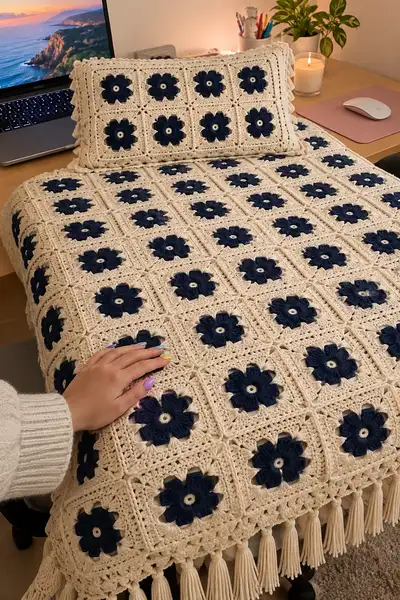
— Flower Square Motif (make 70 for suggested size of 7 x 10 grid) :
Round 1 :
With cream yarn, make a magic ring. Ch1, work 8 sc into the ring. Pull ring closed and join with sl st to first sc. (8)
Info :
Keep the center tight and neat — this cream center will show around the navy petals. Weave tail to wrong side or leave for joining later.
Round 2 :
Change to navy. Join navy with sl st behind any sc; ch2 (counts as first dc for tension), *yo, insert hook in same base st, pull up loop, yo, pull through two loops, repeat 3 times to make a 5-loop gather, yo and pull through all loops to form a puff-like petal. Ch2, sl st into next sc. Rep from * around to make 8 petals total. After final sl st, fasten off navy and change back to cream with a sl st into the base behind a petal. (8 petal anchors)
Info :
The petal described above is a compact puff; use consistent tension to keep petals even. Each petal is anchored to one of the 8 base sc from round 1.
Round 3 :
With cream, join with a sl st to the space between first and second petal (or pick up a stitch base). Ch1, work 2 sc in each petal anchor space around, placing 2 sc where petals are anchored (work into the small gap at the base of the petal). (16)
Round 4 :
(1 sc, inc) x 8 — work 1 sc into first sc, then 2 sc into next sc; repeat overall (24)
Round 5 :
(2 sc, inc) x 8 — (32)
Round 6 :
(3 sc, inc) x 8 — (40)
Info :
At this point the motif is circular. We will convert to a square by controlled increases and chain-corner construction creating four corners positioned evenly around the motif.
Round 7 :
(4 sc, inc) x 8 — (48)
Round 8 :
Switch to 3rd round shaping in cream. Ch3 (counts as first dc), dc in next 11 sts, {corner: (3 dc, ch2, 3 dc) in next st}, dc in next 11 sts, {corner}, dc in next 11 sts, {corner}, dc in next 11 sts, {corner}, join with sl st to top of ch3. This round forms four distinct corners. Count depends on dc clusters but main structure creates four corner blocks. (Approx 52–56 dc clusters depending on spacing)
Info :
Evenly space corners so each side receives nearly equal numbers of dc between corners. If you find one side longer, shift a few dc between adjacent sides — symmetrical spacing is most important.
Round 9 :
Ch1, sc into same st and into each dc along the side until you reach ch-2 corner; in ch-2 corner work (sc, ch2, sc) to mark corner; continue sc along next side and repeat at each corner. Join with sl st to first sc. This round square-up the motif by giving crisp corner points.
Round 10 :
Ch3, dc in same st and across each sc along side to next corner; in each corner work (3 dc, ch2, 3 dc). Continue for all four sides. Join with sl st to top of ch3. This builds up the sides for a true square. (Work should now measure around 12–14cm depending on tension.)
Info :
Work evenly and check that corners align squarely. If needed, add or subtract a dc on sides to keep edges flat. Use stitch markers to mark each corner point so you can count stitches per side consistently.
Round 11 :
Ch1, sc in each st across till corner; in corner work (sc, ch2, sc). Repeat around and join. This forms a tidy edge row for later joining.
Round 12 :
Switch to BLO for texture: With cream, join and work 1 sc in BLO in each st around and in (sc, ch2, sc) corners work (1 sc, ch2, 1 sc). Join with sl st. (Stitch count same as previous round)
Info :
Working in BLO on this round creates a frame ridge that helps the lattice structure between squares to read clearly when joined. This ridge is visible on the finished bedspread as subtle texture lines.
Round 13 :
Ch3 (counts as dc), dc in each BLO sc across to corner. In corner work (3 dc, ch2, 3 dc). Repeat for each side and join. (This round begins to square up the sides evenly; total dc depends on side counts but maintain symmetry.)
Round 14 :
Ch1, sc evenly around working 1 sc in top of each dc and 1 sc in corner ch-2 space. Join. This evens out edges for joining and gives a neat square border. (Stitch count equal to previous sc round.)
Info :
Measure your square after round 14 — target 14cm/5.5in. If your square is smaller, add another round of dc/corner increases (rounds 15–16 below) until desired size. If larger, reduce hook size or skip further growth rounds.
Round 15 :
Optional expand: Ch3, dc around placing dc to keep even sides and corners (3 dc, ch2, 3 dc). Join. This increases sides again and is useful to scale squares larger. (Count grows by approximately 16 dc overall.)
Round 16 :
Ch1, sc in each st and (sc, ch2, sc) in corners. Join. Fasten off and weave in ends neatly. Block square flat to square up sides and flatten petals if needed.
Info :
Repeat the Flower Square Motif to make the full number of squares needed for your desired bedspread. Suggested layout in images: 7 squares across and 10 squares down = 70 squares. Make extra squares for pillow or sample testing.
— Alternate Motif Variation (Optional) :
Round 17 :
To add depth alternate squares, after round 3 (16 sc), work an extra round of puff clusters between petals: *ch3, (puff in next petal base), ch3, sl st in next sc. This adds a ring of texture around petals before square framing.
Info :
Use this variation every other square or in a checkerboard pattern for visual interest. Maintain same outer square rounds so all squares remain the same size.
— Joining Squares (Join-As-You-Go or whip/flat seam) :
Round 18 :
Lay out squares in desired grid — suggested 7 x 10. Block each square for flatness before joining. Decide whether to join using join-as-you-go (JAYG) in the outer rounds or assemble with whip stitch/mattress stitch for a cleaner wrong side.
Info :
Join-as-you-go is recommended for a tidy continuous cream join. If you prefer to sew, use a mattress stitch for nearly invisible seams. Always pin squares in place to ensure consistent spacing.
Round 19 :
Join-as-you-go method (recommended): On the final edge round of each new square, work the round until you reach a side that will meet an already-placed square. Instead of working into those stitches, sl st into the corresponding stitch on the placed square and then continue the round on your working square. At each side you will make 1 sl st join per stitch to secure edges. In corners join with sl st into corner ch-2 on placed square, then continue your corner (sc, ch2, sc) to maintain corners.
Info :
When joining, keep tension slightly looser to avoid drawing squares in. Use a single crochet or slip-stitch join depending on the look you want: sl st join sits flatter; sc join creates a visible ridge.
Round 20 :
Sewn seam method: Position squares right sides together and mattress stitch along side edges, working through the BLO ridge so the seam sits nearly invisible on the right side. For corners, secure well with extra passes. After sewing row strips, join row strips to each other using the same mattress stitch approach across the full bedspread width.
Info :
As you assemble rows, press or pin joined rows to keep them straight. Joining in full strips first then joining strips is often easier for large projects.
— Border: Edge Rounds to Finish (work around full assembled bedspread) :
Round 21 :
With cream, join anywhere on the assembled spread. Ch1, sc evenly around the outside edge working 1 sc in each edge st and (sc, ch2, sc) in each outer corner. Join with sl st. This evens the raw edges and prepares for the scalloped border.
Info :
When working around many squares, count approximate stitches per side and divide evenly so scallops land symmetrically between corners. Use stitch markers to mark every 10th-20th stitch to help spacing.
Round 22 :
Ch3 (counts as dc), dc in next 2 sts. *Skip one st, (5 dc shell) in next st, skip one st, dc in next 3 sts; rep from * around. In corners substitute shell into corner ch-2 space. Join with sl st to top of ch3. This round creates initial scallop shells spaced along the edge.
Round 23 :
Ch1, sc in each dc and each shell top; in shell tops work (sc, ch2, sc) in center top to make a petite picot-corner feel. Join and fasten off. This tidies shells and gives a decorative scallop base for tassels.
Info :
Try the shell spacing on a short sample edge to confirm scallop placement. You can adjust the number of dc between shells to make larger or smaller scallops.
— Wide Decorative Border (Optional extra weight) :
Round 24 :
For a wider border, continue in rounds: Ch3, dc evenly around working shells into each previous shell top and (3 dc, ch2, 3 dc) into corners. Work 4 repeats of shell rounds (alternate dc rows and shell rows) until border measures desired width (suggest 6–10 rounds). Join and weave in ends neatly.
Info :
A wider border adds weight and a more finished boho look. Stop when the border visually balances the spread and tassel length.
— Tassel Fringe (make tassels and attach across two sides or all around) :
Round 25 :
Cut cream yarn into lengths for tassels. For suggested look cut doubled lengths of 30–40cm (final tassel 15–20cm). Use a small piece of cardboard to wrap yarn 10–12 times for consistent tassel thickness.
Round 26 :
Fold bundle in half, insert fold through a space at the base of a shell or between outer stitches and pull through to make a lark's head knot. Pull ends through the loop and cinch tight. Make tassels at regular intervals along the scalloped border — for a 7-square width place tassels between each square seam and at both ends to create a uniform fringe.
Info :
Attach tassels to two long sides for a classic throw, or all around for a heavily tasseled bedspread. Trim tassels to even length and comb for soft drape.
— Weaving in Ends & Finishing Touches :
Round 27 :
Weave all loose ends to the wrong side using a yarn needle. For joins, weave in tails along seams to lock them in place. Trim ends to avoid lumps under the squares.
Round 28 :
Block the finished spread: wet or steam-block lying flat, ensuring corners are square and fringe hangs straight. Allow to dry fully before use to set shape and drape.
Info :
Blocking is essential for a project of this size — it evens out squares, flattens petals and evens notchy joins. Use pins and a large flat surface or professional blocking board for best results.
— Troubleshooting & Adjustments :
Round 29 :
If squares vary slightly in size, trim or add one extra outer round on smaller squares before assembly to match larger squares. Always block squares after final round before joining.
Round 30 :
To scale pattern for larger bed sizes, increase number of squares per row or add extra outer border rounds. For smaller throws, reduce the number of squares in the grid and shorten border rounds and tassel spacing accordingly.
Info :
Keep notes while making squares: track the number of rounds used for each square and which squares used the optional variation so your layout is balanced when assembling.
Assembly Instructions
- Block all squares flat and pin them in a layout matching your chosen grid (suggested 7 x 10) before joining to ensure edge alignment and consistent spacing.
- Join squares using join-as-you-go: work the final outer round of a new square and sl st into the adjacent placed square at each stitch to create continuous cream joins. Use sl st for a flat front.
- If sewing squares instead of JAYG, place squares right sides together and mattress stitch through the BLO ridge for nearly invisible seams on the front; work row-by-row and then join rows to rows.
- Work the border around the entire assembled bedspread in rounds, keeping corners square by working (3 dc, ch2, 3 dc) in each outer corner ch-2 space.
- Attach tassels evenly spaced along the long sides (or all sides if preferred) using lark's head knots through the border scallop base; trim tassels evenly after making them all.
- Weave in all tail ends on the wrong side, then block the entire finished spread flat to set shape and ensure a neat, even lattice between flowers.
- For extra stability at seams, add a few extra securing stitches through adjacent square backs and the border before weaving in remaining tails.
- If adding a matching pillow cover, make a smaller rectangle of squares and finish with the same scallop border and small tassels to coordinate.
Important Notes
- 💡Use stitch markers consistently at the beginning of each round to avoid counting errors and maintain proper shaping.
- 💡Stuff body parts gradually as you work rather than waiting until the end, especially for narrow openings like arms and legs
- 💡For safety eyes, position and secure before stuffing head fully - they cannot be repositioned once locked in place
- 💡Maintain consistent tension throughout the project; too tight creates stiff, small pieces, too loose creates floppy, holey fabric
- 💡When sewing pieces together, use yarn slightly thinner than working yarn for neater, less visible seams
- 💡Pin all pieces in position before final sewing to ensure proper placement and symmetry
- 💡For large projects like bedspreads, work in daylight and take breaks to avoid uneven tension due to fatigue
- 💡Label and keep squares in piles by rows to speed assembly and keep track of optional pattern variations
Finishing this floral bedspread is such a treat — watching the dark navy flowers pop against the warm cream lattice is endlessly satisfying! Each square feels like a small victory, and when you join them the pattern truly blooms across your bed. The scalloped edge and tassel fringe give it a polished boho look that makes any bedroom feel cozy and curated. 🧶✨ Wrap up a mug of tea, block everything flat, and enjoy the slow, rewarding process of handmade home decor. 🌙
What is the finished size of this bedspread?
Based on the suggested 7 x 10 grid of 14cm squares worked in worsted yarn with a 4.0mm hook, the finished bedspread will measure approximately 98cm x 140cm (38.5in x 55in) before blocking and tassels. Adjust grids and square size to fit your desired dimensions.
Can I use different yarn weights for this pattern?
Yes! You can use any yarn weight, but remember to adjust your hook size accordingly (generally 1-2 sizes smaller than yarn recommendation for a denser fabric). Different weights and hooks will change the final square size and overall spread dimensions.
Do I need to use join-as-you-go or can I sew squares together?
Both methods work. Join-as-you-go gives a continuous seamless look and saves sewing time. Sewing allows more control and near-invisible seams; block squares first and use mattress stitch for the neatest result.
How many tassels will I need?
Tassel count depends on spacing and bedspread perimeter. For suggested spacing (one tassel at each square seam and between), estimate 2 tassels per square across a side. For a 7 x 10 grid attached on long sides only, plan ~16–20 tassels per long side. Make extra tassels and trim to even length.
How should I care for the finished bedspread?
Hand wash gently in cool water or use a delicate machine wash in a mesh bag. Lay flat to dry. Re-block when damp to reshape. Avoid tumble drying to protect tassels and the join structure.
Can I make the petals stand out more?
Work petals with a slightly smaller hook or make the puff stitch with a little tighter tension. Add a short round of back-loop-only sc around the square to set off the petal ring more distinctly.
What if my stitch count is off when building squares?
If counts drift, unravel to the last round where counts were correct and rework. Use stitch markers at corner points and mark the first stitch of each round to prevent counting errors.
Can I customize colors and layout?
Definitely! Try alternating colored squares, creating a checkerboard arrangement, or using gradient yarns for varied effects. Keep outer framing rounds uniform to simplify joining and maintain a consistent final size.
Stay in the Loop!
Get notified when we release new free crochet patterns and join our crafting community!