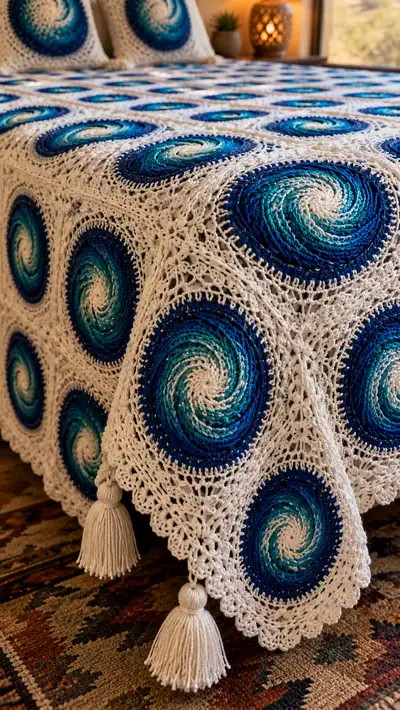
Create a stunning Ocean Spiral Granny Square Bedspread inspired by swirling sea tones and delicate lace joins. This pattern teaches you to crochet spiral-centered granny motifs in gradient blues, join them with an openwork white lace, and finish with a scalloped border and large tassels. Perfect for a statement bedspread or cozy throw, the design combines textured spirals, crisp white framing, and decorative tassels for a coastal, handmade look.
Progress Tracker
0% Complete
— Overview :
Info :
This pattern constructs a bedspread entirely from identical spiral-centered granny square motifs joined into a full bed cover. The instructions below describe a single motif (Rounds 1-36) with gradient color changes, a square framing section (Rounds 37-56), join-as-you-go lace join rounds (Rounds 57-84), an outer scalloped border (Rounds 85-102), and tassel finishing. Follow gauge notes, block each motif, and assemble in your chosen layout (example shown: 9 motifs x 12 motifs for a queen-size bedspread).
Info :
Gauge (recommended swatch): Spiral center round 12 measures approx 5.5 cm across when using 4.0mm hook and worsted cotton. Adjust hook size to meet shapes and make motifs uniform. Each completed motif (after square framing) should measure approx 11-12 inches (28-30 cm) across; motif size will vary with yarn and hook.
— Spiral Motif (Center, Rounds 1-36) :
Round 1 :
6 sc in magic ring (6)
Round 3 :
(1 sc, inc) x 6 (18)
Round 4 :
(2 sc, inc) x 6 (24)
Round 5 :
(3 sc, inc) x 6 (30)
Info :
Change to second gradient color now (slightly darker shade). Carry the unused yarn tail to the back and weave in later, or fasten off and join new color with sl st. To maintain a neat spiral, place a removable marker at the first stitch of the round; do not join rounds with sl st — work in continuous spiral where indicated for a smooth swirl.
Round 6 :
(4 sc, inc) x 6 (36)
Round 7 :
(5 sc, inc) x 6 (42)
Round 8 :
(6 sc, inc) x 6 (48)
Round 9 :
(7 sc, inc) x 6 (54)
Info :
Change to next gradient color (mid teal). To emphasize the spiral shape, offset the increases slightly on alternate rounds: when directed (see rounds 6-12), place each increase one stitch later than the previous round's increase. This slight rotation helps the spiral effect develop.
Round 10 :
(8 sc, inc) x 6 (60)
Round 11 :
(9 sc, inc) x 6 (66)
Round 12 :
(10 sc, inc) x 6 (72)
Info :
At this point the circle has reached a stable diameter. For a pronounced spiral, work the next rounds using half-double crochets and front-post stitches to build texture. Continue color changes every 2 rounds or as desired to preserve the gradient. When changing colors, carry the yarn along the back or fasten off neatly and join.
Round 13 :
1 hdc in each st around (72)
Round 14 :
1 hdc in next 4 sts, fpdc around next st (texture), rep to end (72)
Round 15 :
Change to darker gradient color. 1 dc in each st around (72)
Round 16 :
(2 dc, 1 inc) x 24 (96)
Info :
Round 16 increases to 96 stitches — this is a planned expansion to create enough real estate for the later square framing. Verify count. If your motif is growing faster than expected, switch to a slightly smaller hook for the next round to tighten fabric.
Round 17 :
1 dc in each st around (96)
Round 18 :
Work a spiral ridge: *ch 1, skip 1, 1 sc in next; rep around* (96) — this creates a slight textured line that will read as part of the spiral
Round 19 :
Change to deep navy. 1 sc in each st around (96)
Info :
From Round 16 onward we maintain a larger, flatter circle to allow for later conversion to a square. The idea is to keep stitch count stable then convert groups into 4 corner points when beginning the square frame. Keep rounds flat by blocking if necessary before framing.
Round 20 :
1 sc in next 11 sts, (2 sc in next st) repeat 8 times then 1 sc to end — rearrange so increases are grouped into four even quadrants; work total increases = 8 (104)
Round 21 :
1 hdc in each st around (104)
Round 22 :
1 dc in each st for 2 rounds (104)
Round 23 :
Into next 104 sts: *[ch 3, skip 2, sc in next] rep* — this begins an openwork ring that eases into square shaping (104)
Info :
Check that total rounds of spiral have created a flat, even disk approximately 6.5-7 inches across (depending on yarn). If too small, add one more dc round and another openwork round before starting square conversions.
Round 24 :
Now we will prepare for the square frame: Work *ch 4, skip next 3 sts, sc in next* around (creating 26 ch-spaces) — place a marker at every 1/4 point so you have four groups to form corners (104)
Round 25 :
Align markers and at each marker work (sc, ch 4, sc) into same chain-space to create the first corner. Between corners: ch 6, sc into next ch-space. Repeat around producing 4 corners and long chain-sides. Count: corners = 4 sets, side ch-spaces approx 6 per side.
Info :
When converting circle to square, maintain symmetry. The corners are what make the motif sit squarely — ensure they are placed every 1/4 circumference. If your marker positions are off, adjust by shifting a stitch or two before you create the corners.
Round 26 :
Work into chain-sides: in each side segment (between corner scs) work: *(sc, ch3, tr, ch3, sc)* — this lengthens the sides and adds mesh for the frame. Corner groups remain (sc, ch4, sc). Repeat for 4 sides (approx 104-112 sts by shaped spaces)
Round 27 :
Change to main white/cream now. Join white yarn with sl st into any corner sc. Ch1, sc in same st. Work 3 sc in each ch-3 space along sides, and work (sc, ch4, sc) in each corner to form a sturdy white frame. This begins the square border (stitch count variable by spaces).
Round 28 :
1 sc around in each st and into chain-spaces (remember corner ch4s remain corners). Maintain even tension; motif should start to look distinctly square.
Info :
Switching to white for the frame gives a striking contrast. Carry the gradient yarn tails to the back and weave into the last spiral rounds later or fasten off and weave. Block each motif flat to true square at this stage to make joining easier.
Round 29 :
Work a lacy shell round in white: in each side ch-3 space work (sc, ch2, 3 dc, ch2, sc). In corners work (sc, ch4, 3 dc, ch4, sc). This creates decorative shells in each side and corner (count shells: 4 corners + approx 8 shells per side).
Round 30 :
Between shells, work 1 sc in each st; in shell ch-2 spaces work 1 sc to anchor. This evens the round and stabilizes the shell work.
Round 31 :
Begin openwork mesh: *ch 6, sl st into anchor point between shells* around; at corners ch 8 and sl st into corner sc. This forms elongated chain-spaces used for later join-as-you-go connections (approx 32 long chain-spaces plus corners).
Info :
At this stage, the motif should measure approximately 10-12 inches across after blocking. If you want a larger motif, work an extra mesh round where you repeat Round 31 to lengthen sides before final edging. Always count spaces so joins align between motifs later.
Round 32 :
Work a delicate picot round: *sc into next long chain space, ch 3, sl st into 3rd ch (picot), sc into next anchor* around, and at corners make picot-ch more substantial (ch 4, sl st). This adds texture to the white frame.
Round 33 :
Finalize motif edge with one round of sc: 1 sc in each st around including picots (this tames excess elasticity). Fasten off leaving long tail for weaving/blocking if needed.
Info :
Block each motif square: pin to measured dimensions (example: 30 cm square) and spritz lightly or wet block according to yarn manufacturer guidelines. Allow to dry completely before joining to ensure consistent motif sizes across the spread.
— Join-As-You-Go Lace Join (Rounds 34-66 for joining larger grid) :
Info :
The join-as-you-go method used here creates a breathable lace mesh between motifs. Each motif will be joined to adjacent completed motifs while working a specified join round. Work joins after at least one motif in the adjacent row/column is blocked and ready. For clarity, the join round numbers continue the overall pattern numbering but are worked on motifs as you assemble the bedspread.
Round 34 :
With the motif placed right side up, rejoin white at any side anchor point. Ch1, sc in same point; *ch 6, skip 6, sc in next anchor* across one side until you reach the corner. Repeat for all sides to prepare join points. Do not fasten off.
Round 35 :
Join to adjacent motif: when you encounter a chain-6 space that aligns with a finished motif, insert hook into corresponding chain-6 of adjacent motif and sl st to join, ch 1, then continue ch 6 to next. For non-adjacent edges, simply ch 6 and sc into anchor. Repeat for all sides joining where motifs meet. This creates an open chain-lattice between motifs.
Round 36 :
After joining sides, reinforce corners: at corner ch-8 spaces, join to corner chain of neighbor motifs with (sl st, ch2, sl st) to form a small bridging loop. Repeat at all corners to stabilize grid junctions.
Info :
When joining, work slowly and pin both motifs together to ensure chains align without twisting. Use blocking pins during join to maintain a flat seam. Keep joins consistent to create an even lattice over the whole bedspread.
Round 37 :
Work an additional lace stabilization round: *in each long ch-6 space work (sc, ch2, sc) anchored into middle of chain; in joins where motifs meet, work (sc, slst into neighbor, sc)*. This reduces stretchiness in the lattice and improves drape.
Round 38 :
Edge reinforcement: 1 sc around entire motif edge (working through both adjacent motif and joined chains where needed) to create a stable finishing side ready for subsequent joins. This also tidies stray ends.
Info :
For large covers, assemble motifs in strips (rows) first. Join motifs along the width into strips, then join strips together. This approach simplifies handling and keeps the working piece manageable and evenly tensioned.
Round 39 :
If you prefer a more closed join, work one round of *dc into chain spaces and sl st into outer frames* around — this tightens the open mesh slightly for warmer coverage. Otherwise continue with open lace described in Rounds 34-38 for airy drape.
Round 40 :
Repeat reinforcement pattern on all assembled edges. At all joins work an extra sl st every 6 chains to avoid sagging when the bedspread is used, ensuring even tension across the grid.
Info :
As you assemble the spread, count motifs frequently to ensure you reach the intended layout. Example shown in images: a twelve-by-nine or nine-by-twelve layout depending on bed size. Adjust motif count for mattress dimensions and desired drape over sides.
Round 41 :
Once the entire grid is assembled, work a continuous perimeter anchoring round: 1 sc around the outside edge of the entire spread, working through both edge motifs and the mesh join to create a consistent edge foundation.
Round 42 :
Work a shell stabilization round around the entire perimeter: *(sc, ch3, 5 dc, ch3, sc) in each corner point and every 6 sc along side* to create a gentle scallop foundation for the final border.
Info :
This foundation is critical for the outer scalloped border so the scallops are even and drape nicely over mattress edges. Use pins to preview scallop placement before committing to final stitches.
— Outer Scalloped Border (Rounds 43-66 overall; border rounds 43-66) :
Round 43 :
Change to white if not already in white. Work a double-scalloped shell along entire perimeter: *in each shell foundation work (sc, ch2, 7 dc, ch2, sc). In side spaces between shells work 1 sc.* This will create a dramatic scalloped edge.
Round 44 :
Stabilize shells by working 1 sc into each dc and 1 sc into each ch-2 space around, smoothing the scallops so they lay flat (no more than 1 sc per stitch to avoid bunching).
Round 45 :
Work a decorative picot and arch round: *in each shell peak work (sc, ch5, sc) to create points; between peaks work 3 sc to form arches.* This gives a delicate lace line just inside the final scallops.
Info :
Try laying the bedspread on a flat surface to see how scallops fall at corners — you may want to reduce or expand counts by 1-2 shells at corners to prevent puckering. Work slowly and adjust shell sizes if needed to keep symmetry.
Round 46 :
For extra stability, work one round of reverse single crochet (crab stitch) along the outermost edge: work reverse sc around entire perimeter to create a corded finish that resists stretching and looks professional.
Round 47 :
Optional decorative overlay: Work chains and linked picots between scallop peaks for a lacy filet effect: *sl st to scallop peak, ch 9, sl st back to next peak*. Repeat to create decorative lines across scallops if desired.
Round 48 :
Work a finishing clean-up round of single crochet around edge, working 3 sc into each scallop trough to even the shape and produce a neat border line. Fasten off and weave ends securely on the wrong side.
Info :
If you plan to add tassels, leave long tails at the four corners when finishing the final scallop round; tassels will be affixed over those tails for secure attachments.
— Alternate Border Option (Lacy Fan Border Rounds 49-66) :
Round 49 :
For a lacy fan instead: with white and after perimeter sc, work *(ch 3, skip 1, (5 dc in next) - fan, skip1, ch 3, sl st into next)* around to create fans between shells. Adjust fans so they align with scallop peaks.
Round 50 :
Secure fans by anchoring with sc in the following round: *sc in top of each fan and in intervening spaces* creating a stable but airy edge.
Info :
These alternate fans produce a more open and airy edge, which emphasizes the white lace aesthetic seen in images. Choose the scalloped or fan border according to your preference for drape and appearance.
Round 51 :
Continue with 1 more decorative refinement round: *ch 2, sc into each top, picot every 4 sc across* — this adds a crisp finishing touch and prepares for tassel placement.
Round 52 :
Fasten off carefully, leaving approximately 20-30 cm tails at all 4 exterior corners for tassel attachment if making tassels. Weave in all other ends securely with darning needle.
Info :
Now block the entire assembled spread flat, using the scallops as guides. Block with gentle steam or wet-block method per yarn care instructions to set scallops and lace. Proper blocking dramatically improves drape and uniformity across the bedspread.
— Tassels & Finishing (Rounds 53-66 overall; tassels steps) :
Info :
The pictured bedspread uses large tassels at each corner — about 3.5-4 inches long, made from the same off-white yarn. Make four or as many as desired for each outer corner, plus optional tassels along edges spaced every 4 motifs.
Step 1 :
Wind white yarn around a 7 cm cardboard rectangle 40-50 times for a full, dense tassel. Tie a small piece of yarn tightly around the top to secure and slide off the cardboard. Fold in half to form the tassel.
Step 2 :
Use a 30 cm length of yarn to wrap around the top of the tassel several times to create a 'neck' and trim excess to make a neat finish. Attach a small yarn cap by wrapping extra yarn around the top to look similar to image 'ball' before the tassel fringe.
Step 3 :
Sew tassels to each corner using the long tail left when finishing the corner stitch. Attach securely by threading tail through the wrapped neck and around the corner mesh, then tie and weave ends through wrong side for security.
Info :
For extra durability, add a small dab of fabric glue inside the wrapped neck of the tassel before sewing down. If bedspread will be laundered frequently, consider stitching through the tassel base multiple times to prevent loosening.
Step 4 :
Trim tassels to even length and brush gently with a soft comb to fluff fibers. Place tassels on bedspread corners and tie extra tail around the corner join under the scallop for extra reinforcement. Weave in any remaining loose ends.
— Finishing Touches & Care :
Info :
After assembly and tassel placement, give the entire spread a final blocking and steaming to set edges. Hand wash or machine wash on gentle cycle in cold water if yarn care allows; lay flat to dry to protect tassels and lacework. Store folded rather than hanging to prevent stretching.
Info :
When making multiple motifs, keep an assembly log: note color cake start and end, motif number, and yarn batch to avoid color variation across the spread. If you run out of gradient yarn mid-motif, try to start a new motif at the same starting color position for continuity.
Info :
Variations: Use thinner yarn and smaller hook to produce more delicate, lace-like motifs for a lighter bedspread. Use chunkier yarn and larger hooks for a heavier, cozier cover. Scale motif count to mattress size - the math is linear (motif side count x motif side count = total motifs).
Completing this Ocean Spiral Granny Square Bedspread is a joyful blend of patience and artistry. Each spiral motif adds rhythm and life to the overall design, while the lacy white joins provide a delicate, airy balance. Finishing with oversized tassels gives the spread a charming, handmade flourish that feels like a coastal dream. 🧶 Enjoy the satisfying process of making something beautiful that will be admired and used for years to come. 🌊✨