🧢 Beautiful ✨ Detailed πŸ’ Adorable

Nemo Clown Fish Amigurumi Pattern

Nemo Clown Fish Amigurumi Pattern
4.0β˜… Rating
2-3 Hours Time Needed
1.6K Made This
βœ‚οΈ

Beginner Friendly Level

Perfect for those just starting their crochet journey, with clear instructions and simple techniques

⏱️

Bite-Sized Project

Finishes in 2-4 hoursβ€”perfect for an afternoon of creative relaxation.

🧸

Cute Companion

An adorable friend to cherish, handcrafted with love to bring comfort and joy for years to come.

About This Nemo Clown Fish Amigurumi Pattern

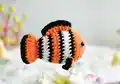
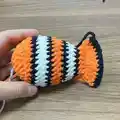
This charming pattern creates a lovely, no-sew (for the main body) amigurumi clownfish reminiscent of everyone's favorite animated ocean friend. It features seamless color changes between orange, black, and white to perfectly capture that iconic clownfish look. The use of super bulky yarn makes it wonderfully squishy and satisfyingly quick to work up.

Nemo Clown Fish Amigurumi Pattern crochet pattern - detailed view of completed project

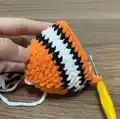
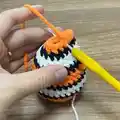
You will learn how to crochet the body right up to the tail in one piece, making assembly a breeze. The added dorsal fins give it that perfect finishing touch!

Why You'll Love This Nemo Clown Fish Amigurumi Pattern

I absolutely love this pattern because it takes a beloved ocean creature and turns it into a perfectly plush, huggable friend in no time at all. The super bulky yarn makes the stitches pop beautifully while ensuring the project works up quickly enough for a weekend craft session. I find the color-changing process incredibly satisfying as you watch the iconic stripes emerge row by row. It is also fantastic that the main body and tail are practically no-sew, which is always a huge bonus for amigurumi makers! You will feel such a sense of accomplishment when you attach those little fins and give your clownfish its sweet, wide-eyed expression.

Nemo Clown Fish Amigurumi Pattern step 1 - construction progress Nemo Clown Fish Amigurumi Pattern step 2 - assembly progress Nemo Clown Fish Amigurumi Pattern step 3 - details and accessories Nemo Clown Fish Amigurumi Pattern step 4 - final assembly and finishing

Switch Things Up

I love how versatile this clownfish pattern is for trying out different color combinations! While the classic orange, black, and white is iconic, you could easily crochet this in vibrant blues, pinks, or greens to create a whole reef of colorful fantasy fish.

If you want to make a tiny version for a keychain or baby mobile, simply switch out the super bulky yarn for a standard worsted weight cotton and drop your hook size down to a 2.5mm or 3.0mm. It will turn out perfectly petite and just as adorable!

For those who love to add extra texture, you could try working the white stripes in a fluffy velvet yarn or blanket yarn for a cool mixed-media effect. It makes the fish feel incredibly soft and tactile to hold.

Instead of safety eyes, you can easily embroider little sleepy eyes using black embroidery floss if you're making this as a snuggly toy for a baby or toddler. It's safer and gives the fish a sweet, resting expression.

You could even add a little crocheted coral or an anemone base to display your finished fish on a shelf. The possibilities for customizing your underwater friend are truly endless!

Common Mistakes & How to Fix Them

βœ— Skipping stitch markers at color changes can lead to misaligned stripes; place a marker at the start of every round to keep the pattern straight. βœ— Not stuffing the body firmly enough before closing the tail causes a flat fish; stuff gradually and firmly as you work the decreases. βœ— Pulling yarn too tight during color changes creates a puckered body; maintain consistent, moderate tension when switching from orange to black to white. βœ— Misplacing the safety eyes can change the whole expression; be sure to attach them exactly between rows 5 and 6, about 8 stitches apart as instructed.

Nemo Clown Fish Amigurumi Pattern

Dive into the enchanting world of amigurumi with this delightful Nemo Clown Fish pattern! Perfect for bringing a splash of the ocean into your home, this pattern guides you step-by-step to create your very own little swimmer. You will love how quickly this cute companion comes together using super bulky yarn. Whether you are crafting a gift for an ocean lover or adding to your own collection, this adorable clownfish is sure to make waves of joy.

Beginner Friendly 2-3 Hours

Materials Needed for Nemo Clown Fish Amigurumi Pattern

β€” Main Fabric

  • 01
    Super Bulky / Category 6 yarn - Orange
  • 02
    Super Bulky / Category 6 yarn - Black
  • 03
    Super Bulky / Category 6 yarn - White
  • 04
    Fiberfill for stuffing

β€” Tools Required

  • 01
    3.5mm (E) Hook
  • 02
    Stitch maker
  • 03
    Sewing needle
  • 04
    Scissors
  • 05
    Plastic safety eyes (8mm)
  • 06
    Hot gun glue

Progress Tracker

0% Complete

β€” Body to Tail :

Info :

CROCHET FROM THE BODY UP TO THE TAIL (NO SEW). Begin with Orange yarn.

Row 1 :

6 SC in an MR (6)

Row 2 :

6 INC (12)

Row 3 :

(SC, INC) 6 times (18)

Row 4 :

(2 SC, INC) 6 times (24)

Row 5 :

(3 SC, INC) 6 times (30)

Row 6 :

30SC (30)

Info :

Change to Black yarn

Row 7 :

30SC (30)

Info :

Change to White yarn

Row 8-9 :

30SC (30)

Info :

Change to Black yarn

Row 10 :

30SC (30)

Info :

Change to Orange yarn

Row 11 :

30SC (30)

Row 12 :

(3SC, DEC) 6 times (24)

Info :

Change to Black yarn

Row 13 :

24SC (24)

Info :

Change to White yarn

Row 14 :

24SC (24)

Row 15 :

(2SC, DEC) 6 times (18)

Info :

Change to Black yarn

Row 16 :

18SC (18)

Info :

Change to Orange yarn

Row 17 :

(SC, DEC) 6 times (12)

Info :

Stuffing

Row 18 :

Crochet 2 side together with 6SC

Row 19 :

Turn, 2CH, DC-INC 6 times (12)

Info :

Change to Black yarn

Row 20 :

Turn, CH, 12SC (12)

Info :

Weave in the yarn end and cut

β€” Dorsal Fins :

Info :

Part 1: Begin with Orange yarn (Make 2). Pick up the yarn from row 8, apart 8 stitch.

Row 1 :

(Chains 1, HDC, 3DC, HDC) in one stitch (5)

Info :

Change to Black yarn

Row 2 :

Turn, CH, 5SC (5)

Info :

Weave in the yarn end and cut

Info :

Part 2: Begin with Orange yarn. Pick up the yarn from R7 to R16, in the vertical line from head to tail.

Row 1 :

(Chains 1, SC, 7DC, SC) in one stitch (9)

Info :

Change to Black yarn

Row 2 :

Turn, CH, 9SC (9)

Info :

Weave in the yarn end and cut

β€” Assembly :

Info :

Attach the eyes at R5-R6, apart 8 stitch.

Assembly Instructions

  • Insert the 8mm safety eyes between rows 5 and 6, spacing them about 8 stitches apart, and secure the backings firmly.
  • Stuff the body of the clownfish firmly with fiberfill before crocheting the back end closed at row 18.
  • For the small dorsal fins (Part 1), pick up yarn directly on row 8, spacing the two fins 8 stitches apart, and crochet in place.
  • For the top dorsal fin (Part 2), pick up yarn directly along the vertical line from row 7 to row 16 to crochet the main fin.
  • Weave in all remaining yarn ends cleanly into the body of the amigurumi and trim any excess.

Important Notes

  • πŸ’‘Ensure you stuff the body evenly before sealing it closed at row 18, as you won't be able to add more filling later.
  • πŸ’‘When changing colors between stripes, pick up the new color on the last pull-through of the previous stitch for clean lines.
  • πŸ’‘Pay close attention to the placement instructions for the fins, as attaching them directly to the body creates a seamless look.
  • πŸ’‘Keep your tension tight, especially when working with super bulky yarn, to prevent the stuffing from showing through.

This delightfully chunky clownfish pattern is such a joy to crochet and perfect for sea life enthusiasts of all ages! 🐠 The bold orange, black, and white stripes recreate that classic look we all know and love, while the bulky yarn ensures it's extra cuddly. I hope you have an ocean of fun making your very own little Nemo! 🌊✨

You ask,

we answer.

FAQs

Do I need to sew the body pieces together?

No, this pattern is designed to be worked from the body up to the tail in one piece, making it a great no-sew project for the main shape!

What kind of yarn is best for this clownfish?

The pattern recommends Super Bulky (Category 6) yarn in orange, black, and white to achieve the correct size and squishy texture.

How do I attach the fins?

The fins are crocheted directly onto the body! You will pick up loops directly from the specified rows and crochet the fins right in place, eliminating the need to sew them on later.

Where exactly should the eyes go?

The 8mm safety eyes should be attached between rows 5 and 6 of the body, spaced approximately 8 stitches apart from each other.

What size hook should I use?

A 3.5mm (E) crochet hook is recommended, which helps keep the stitches tight when using the bulky yarn so the stuffing doesn't show.