🧢 Beautiful ✨ Detailed πŸ’ Adorable

Nemo the Clown Fish Amigurumi Pattern

Nemo the Clown Fish Amigurumi Pattern
4.6β˜… Rating
5-7 Hours Time Needed
1.7K Made This
βœ‚οΈ

Intermediate Level

Ideal for those with basic crochet experience, featuring slightly more advanced stitches and techniques to expand your skills.

⏱️

Weekend Treat

Takes 5-7 hours, making it an enjoyable project to finish over a couple of days.

🧸

Cute Companion

An adorable friend to cherish, handcrafted with love to bring comfort and joy for years to come.

About This Nemo the Clown Fish Amigurumi Pattern

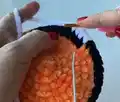
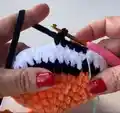
This pattern creates a squishy, plush Nemo-style clown fish using Himalaya Velvet yarn for a soft, tactile finish. Youll crochet the body in continuous rounds, then add side fins, an upper fin and tail before finishing with embroidery. The step-by-step rounds and photos make assembly straightforward and enjoyable. Ideal for gifting or brightening a shelf with handmade charm.

Nemo the Clown Fish Amigurumi Pattern crochet pattern - detailed view of completed project

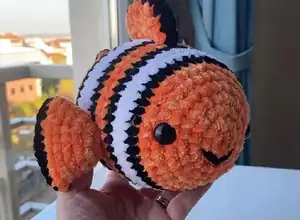
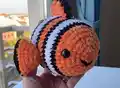
Worked in a continuous spiral, the fish finishes approximately 20-24 cm tall with the recommended yarn and hook. Materials include orange, white and black velvet yarn plus 16 mm safety eyes for a friendly look.

Why You'll Love This Nemo the Clown Fish Amigurumi Pattern

I absolutely love this pattern because it combines simple amigurumi techniques with plush velvet yarn to create a wonderfully tactile toy. The striped body and smiling face add personality that always makes me smile when I finish one. I enjoy the clear round-by-round shaping β€” it helps me focus on each little step and see progress quickly. It is satisfying to sew the fins and tail in place and watch the fish come to life as a complete piece.

Nemo the Clown Fish Amigurumi Pattern step 1 - construction progress Nemo the Clown Fish Amigurumi Pattern step 2 - assembly progress Nemo the Clown Fish Amigurumi Pattern step 3 - details and accessories Nemo the Clown Fish Amigurumi Pattern step 4 - final assembly and finishing

Switch Things Up

I love using different yarns to change the feel of this Nemo pattern; try a bulky chenille for a giant cuddly fish or a DK cotton for a firmer mini version.

I often swap the color palette to create unique fish personalities β€” pastel shades make a soft baby toy while neon colors create a playful, modern look.

If you want a smaller keychain version use thinner yarn and a smaller hook and reduce eye size to 8 mm or sew on tiny felt circles instead of safety eyes.

I sometimes embroider freckles or add tiny felt fins and accessories like a bow or scarf to personalize each fish for gifts.

For more structure try adding a small plastic canvas disk inside the tail or fins before sewing to keep them upright and crisp.

I recommend experimenting with eye placement; moving the eyes slightly changes the expression from curious to cheeky or calm depending on the look you want.

Try making a school of fish by varying yarn textures and sizes for a striking display β€” group them on a shelf or hang them as a mobile.

I also like to add a bit of wire in the upper fin for posability, but keep it covered well and use only for decorative adult items not toys for small children.

If you prefer hand-sewn details, create the mouth with embroidery floss instead of bulky thread for a subtler smile.

Finally I often combine this pattern with small crocheted bubbles or seaweed to make a complete little aquatic scene for gifting or photography.

Common Mistakes & How to Fix Them

βœ— Skipping the stitch marker during continuous rounds can make counting rounds confusing; use a marker at the first stitch of each round and move it after completing each round. βœ— Overstuffing the body causes bulging stripes and distorts shape; stuff gradually with small amounts to maintain the spherical profile. βœ— Changing colors without securing tails neatly can leave loose ends showing; weave in color-change ends as you go or leave tails to hide inside seams when sewing. βœ— Not checking stitch counts after increases/decreases leads to incorrect shaping later; count your stitches after each increase or decrease round to keep the totals exact. βœ— Crocheting too tightly with velvet yarn can make pieces stiff and hard to join; relax your tension slightly and use slow, even stitches for a softer result.

Nemo the Clown Fish Amigurumi Pattern

Make a delightful Nemo the Clown Fish amigurumi using plush velvet yarn and a 4 mm hook. This pattern walks you through creating a charming stuffed fish with clear rounds, fins, tail and a smiling embroidered face. Perfect as a gift or a playful home accent, the finished toy is plush, tactile and full of personality. Youll enjoy step-by-step instructions and photo guidance to assemble each part with confidence.

Intermediate 5-7 Hours

Materials Needed for Nemo the Clown Fish Amigurumi Pattern

β€” Main Fabric

  • 01
    Himalaya Velvet Yarn Orange 90016 (main color) - quantity: approximately 100-150g
  • 02
    Himalaya Velvet Yarn White 90001 (accent color) - quantity: approximately 25-50g
  • 03
    Himalaya Velvet Yarn Black 90011 (accent color) - quantity: approximately 25-50g
  • 04
    Small amount of black amigurumi thread for smiling face embroidery (approx 5-10g)
  • 05
    Polyester stuffing (filling) - enough to firmly stuff body and fins

β€” Tools Required

  • 01
    Crochet hook size 4 mm
  • 02
    Safety eyes 16 mm (2 pieces)
  • 03
    Small amount of black amigurumi thread for embroidery
  • 04
    Tapestry needle for sewing parts and weaving ends
  • 05
    Scissors
  • 06
    Stitch markers (useful for continuous rounds)
  • 07
    Polyester stuffing

Progress Tracker

0% Complete

β€” Body :

Info :

Start with orange

Round 1 :

6 sc into the magic ring (6)

Round 2 :

(inc) * 6 (12)

Round 3 :

(sc, inc) * 6 (18)

Round 4 :

sc, inc, (2 sc, inc)* 5, sc (24)

Round 5 :

(3 sc, inc)* 6 (30)

Round 6 :

2 sc, inc, (4 sc, inc) * 5, 2 sc (36)

Round 7 :

sc, inc, (3 sc, inc) * 8, 2 sc (45)

Round 8 :

45 sc (B) (45)

Round 9-10 :

45 sc (W) 2 rows (45)

Round 11 :

45 sc (B) (45)

Round 12-13 :

45 sc (O) 2 rows (45)

Round 14 :

45 sc (B) (45)

Round 15-17 :

45 sc (W) 3 rows (45)

Round 18 :

45 sc (B) (45)

Round 19-20 :

45 sc (O) 2 rows (45)

Round 21 :

sc, dec, (3 sc, dec)* 8, 2 sc (O) (36)

Round 22 :

2 sc, dec, (4 sc, dec)* 5, 2 sc (B) (30)

Round 23 :

(3 sc, dec)* 6 (W) (24)

Round 24 :

(2 sc, dec)* 6 (B) (18)

Round 25 :

(sc, dec)* 6 (O) (12)

Round 26 :

(dec)* 6 (O) (6)

Info :

1 Slst to next empty stitch, pull 1 chain. F.O. Stuff. Cut the yarn short and hide.

Info :

Safety eyes will be attached between the 5th and 6th row.

β€” Side Fin (x2) :

Info :

With orange thread

Round 1 :

6 sc into the magic ring (6)

Round 2 :

(inc)* 6 (12)

Round 3 :

(3 sc, inc)* 3 (15)

Round 4 :

(4 sc, inc)* 3 (18)

Round 5 :

(5 sc, inc)* 3 (21)

Round 6 :

(6 sc, inc)* 3 (24)

Info :

Leave the orange thread long for sewing and cut.

Info :

With black thread: Take opposite stitches and crochet 12 sc as you can see in the pics.

Info :

1 Slst to next empty stitch, pull 1 chain. F.O. Cut the yarn short and hide.

β€” Upper Fin (x2) :

Info :

With orange thread. Pull 4 chains. Start to crochet in second chain. All rows will be HDC.

Round 1 :

3 HDC, turn and Ch1 (3)

Round 2 :

2 HDC, inc HDC, turn and Ch1 (4)

Round 3 :

4 HDC, turn and Ch1 (4)

Round 4 :

4 HDC, turn and Ch1 (4)

Round 5 :

Dec HDC, 2 HDC, turn and Ch1 (3)

Round 6 :

HDC, Dec HDC (2)

Info :

1 Slst to next empty stitch. Leave the thread long for sew.

Info :

Place the second piece you knit on top of the first piece.

Info :

As I mentioned in the figure above, the edges will be crochetted 1 row.

β€” Tail :

Info :

With orange thread

Round 1 :

6 sc into the magic ring (6)

Round 2 :

(inc)* 6 (12)

Round 3 :

(3 sc, inc)* 3 (15)

Round 4 :

(4 sc, inc)* 3 (18)

Round 5 :

(5 sc, inc)* 3 (21)

Round 6 :

(6 sc, inc)* 3 (24)

Round 7 :

(7 sc, inc)* 3 (27)

Round 8 :

(8 sc, inc)* 3 (30)

Info :

Leave the orange thread long for sewing and cut.

Info :

With black thread: Take opposite stitches and crochet 15 sc as you can see in the pics.

Info :

1 Slst to next empty stitch, pull 1 chain. F.O. Cut the yarn short and hide.

β€” Assembly & Finishing :

Item Name (P1) :

Sewing the tail: The tail will be sewn last 2 rows of the body.

Item Name (P2) :

Sewing the side fins: The upper fin will be sewn between the 12th and 15th rows of the body.

Item Name (P3) :

Sewing the upper fin: The upper fin will be sewn between the 11th and 20th rows of the body.

Info :

Smiling face embroidery: Use black amigurumi thread and follow photos to embroider a smiling mouth under the right eye area.

Info :

Links to training videos: Part 1: https://youtu.be/mamLjWcQb-Q Part 2: https://youtu.be/KLwZrJqqYho

Assembly Instructions

  • Attach the tail to the last 2 rows of the body and sew securely, matching the central seam to the body opening for a neat finish.
  • Sew the side fins (x2) to the sides of the body between rounds 12 and 15, spacing them evenly and using the long orange tail to anchor them securely.
  • Position and sew the upper fin between rows 11 and 20 on top of the body, centering it and securing with small whipstitches so it sits upright.
  • Insert safety eyes between the 5th and 6th rows before closing the head area, then secure safety backs and continue stuffing to shape the face.
  • Embroider the smiling mouth using black amigurumi thread, following the photo guide to place and shape the smile for a friendly expression.

Important Notes

  • πŸ’‘All rounds are worked in a continuous spiral; do not join rounds with a slip stitch unless instructed otherwise.
  • πŸ’‘Use stitch markers to keep track of the start of each round, especially during increases and decreases for accurate shaping.
  • πŸ’‘Stuff the pieces gradually and evenly to avoid lumps and ensure a smooth, round body shape; avoid overstuffing which can distort the toy.
  • πŸ’‘Keep a long tail on fins and tail pieces for sewing so you can attach them securely to the body without adding extra yarn ends later.

Create a lovable Nemo the Clown Fish to brighten any shelf or make a thoughtful handmade gift. This plush amigurumi uses velvet yarn for that squishy, tactile finish that children and adults adore. Follow the clear rounds, color changes and sewing instructions to bring this cheerful fish to life. 🧢🐟✨

You ask,

we answer.

FAQs

What size will the finished piece be?

Using the recommended Himalaya Velvet yarn and 4 mm hook the finished Nemo measures approximately 20-24 cm (7.87-9.45 inches) long.

Can I use different yarn weights for this pattern?

Yes, you can use different yarn weights but the finished size will change; choose an appropriate hook for your yarn and expect a different plushness and scale.

Do I need prior crochet experience for this pattern?

This pattern is rated intermediate so basic knowledge of single crochet increases decreases and working in the round is recommended for best results.

How long does this project typically take to complete?

Most crocheters complete this project in about 5-7 hours depending on experience and how much time you spend on sewing and embroidery details.