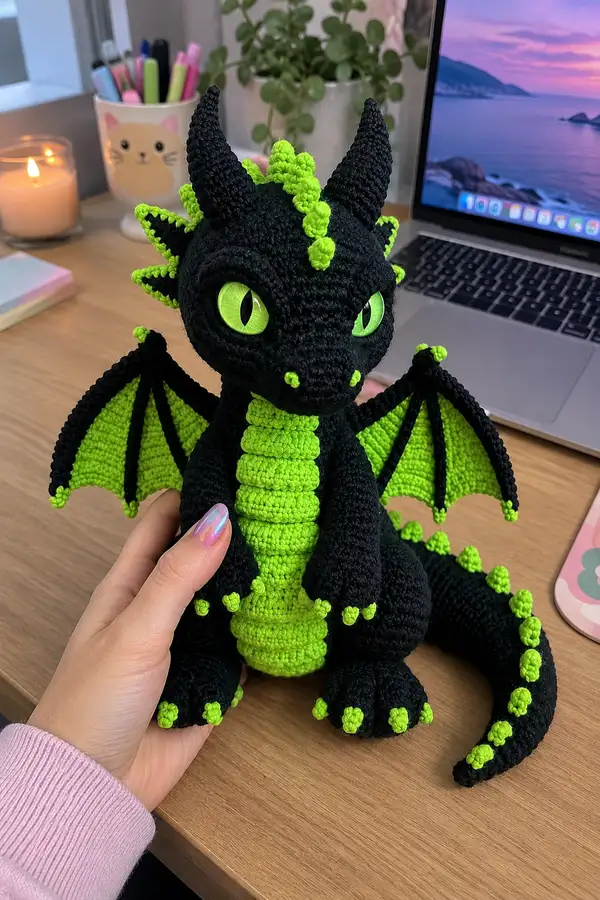
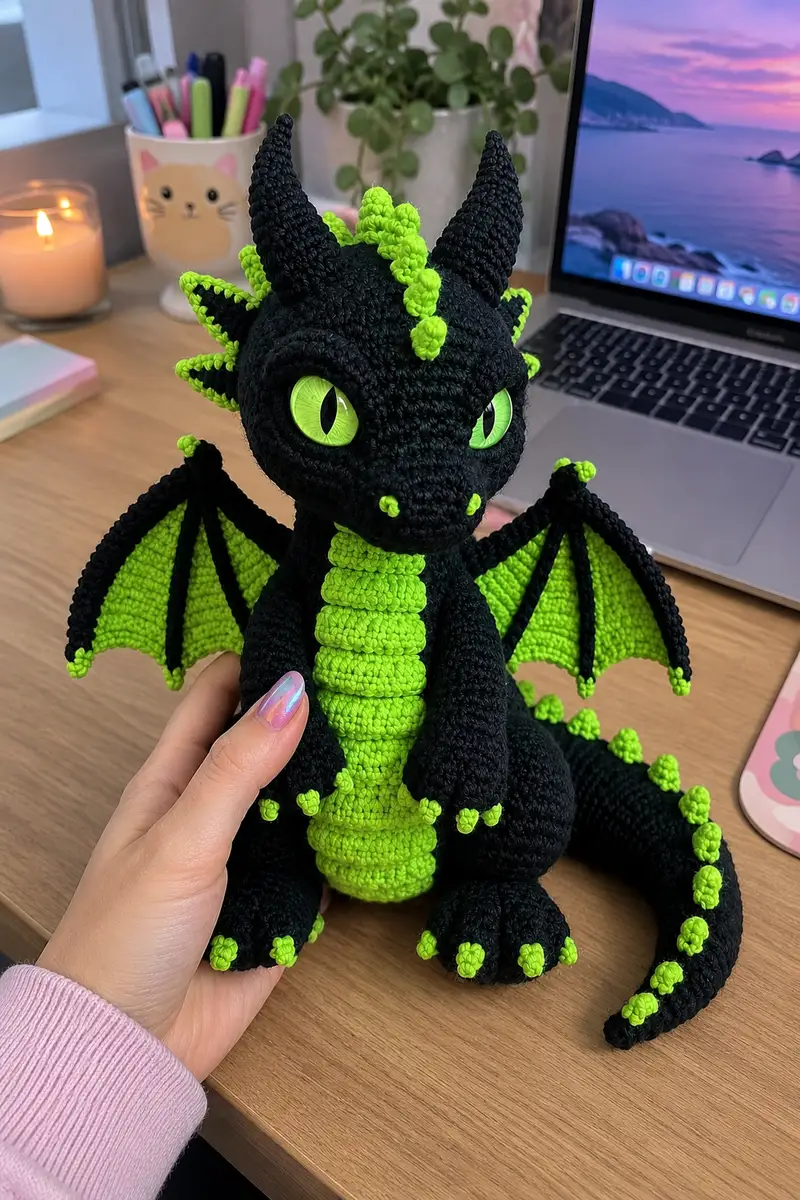
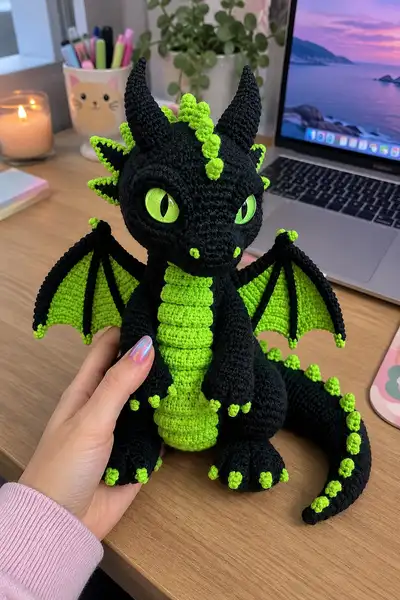
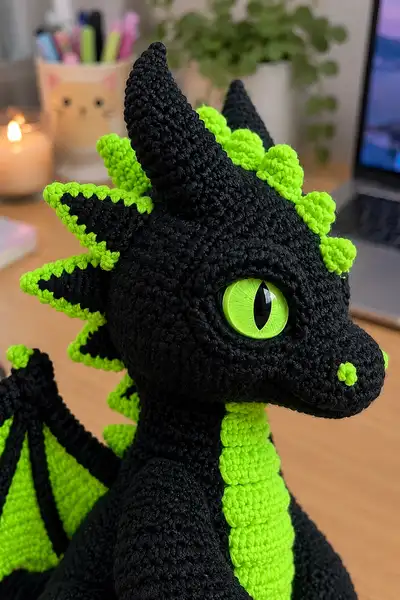
Create a striking black-and-neon-green dragon with expressive slitted eyes, sculpted snout, layered belly scales and articulated wings. This plush amigurumi features textured ridges, bobble spikes down the spine, cone horns, and bright neon accents for dramatic contrast. Designed to sit upright, it has sturdy legs and a long curled tail with decorative spikes. Perfect for collectors or as an eye-catching handmade gift.
Progress Tracker
0% Complete
— Head :
Round 1 :
6 sc in magic ring (6) - start with MC (black)
Round 3 :
(1 sc, inc) x 6 (18)
Round 4 :
(2 sc, inc) x 6 (24)
Round 5 :
(3 sc, inc) x 6 (30)
Round 6 :
(4 sc, inc) x 6 (36)
Round 7 :
(5 sc, inc) x 6 (42)
Round 8 :
(6 sc, inc) x 6 (48)
Round 9-12 :
1 sc in each st (48) - build spherical crown of head
Info :
Place safety eyes between rounds 13-14 and about 10-12 stitches apart center-to-center for a wide expressive look. If using 20mm eyes, test placement now by pinning eyes then close a short row to check position.
Round 13 :
1 sc in each st (48)
Round 14 :
1 sc in each st (48) - mark the center front of the head (point between the eyes) with a removable marker; this helps later for snout placement
Round 15 :
(6 sc, inc) x 6 (54) - increase to start forming the cheeks / snout foundation
Round 16 :
(7 sc, inc) x 6 (60) - extend snout length; counts enlarge symmetrical face
Round 17-19 :
1 sc in each st (60) - work even to elongate head forward for jaw shaping
Info :
Insert and secure safety eyes at rounds 13-15. If eyes have washers, attach now before stuffing. Eyes should sit inside a shallow recessed eye socket; to create a slight eye ridge, work 1-2 rounds of 1 sc BLO around the eye area after the eyes are secured.
Round 20 :
(8 sc, inc) x 6 (66) - add a touch more length if you prefer a longer snout; if you prefer shorter, skip this increase and continue to shaping rounds
Round 21 :
1 sc in each st (66)
Info :
Begin forming the snout: count forward from center front to place two small neon nostril bobbles at the tip later. Prepare a length of AC for tiny bobble details or make bobbles later by crocheting small 4-5 stitch bobbles and sewing on.
Round 22 :
(8 sc, dec) x 6 (60)
Round 23 :
(7 sc, dec) x 6 (54)
Round 24 :
(6 sc, dec) x 6 (48)
Info :
Start stuffing the head moderately and evenly. Stuff the crown first, then add fiber to the cheeks and front snout so the face has structure. Keep stuffing fairly firm but not rock-hard to retain a soft, plush look.
Round 25 :
1 sc in each st (48) - work an even round to maintain shape and prepare for neck forming
Round 26-28 :
1 sc in each st (48) - these rounds form the lower jaw; add extra stuffing into jaw area to keep snout defined
Round 29 :
(6 sc, dec) x 6 (42)
Round 30 :
(5 sc, dec) x 6 (36)
Info :
If you plan to sew the head to a body opening, stop decreasing early to leave a larger opening; here we create a neck tube for a neat join. Fold and shape the lower rounds to determine how deep the neck will insert into the body later.
Round 31-34 :
1 sc in each st (36) - work a short neck tube; these rounds act as the neck insert and allow secure sewing to the body
Round 35 :
(4 sc, dec) x 6 (30) - optional slight taper before finishing
Round 36 :
1 sc in each st (30)
Round 37 :
(2 sc, dec) x 6 (18) - if you prefer a smaller neck hole, continue decreases; otherwise stop and fasten off leaving a long tail for sewing
Info :
Fasten off leaving a long tail for attaching head to body if you will sew; finish stuffing completely and shape nose. Add two small neon bobble nostrils by making two small 4-5 single crochet clusters in AC and sewing to the snout tip. Alternatively, embroider nostrils with yarn needle and AC.
— Eye Socket & Facial Details :
Round 1 :
With MC create eye ring: 6 sc in mr (6)
Round 3 :
(1 sc, inc) x 6 (18) - flatten slightly to create the raised eye pad
Round 4 :
1 sc in each st (18) - place around safety eye and whip stitch to head to create a defined eye ridge
Info :
Work two eye pads (one for each eye). Sew them to head at rounds 12-14, centering the safety eyes within the pads to create deep-set, expressive eyes. Use small tight stitches for a neat finish.
— Horns (Make 2) :
Round 1 :
6 sc in mr (6) - start with MC for outer cone
Round 2 :
(1 sc, inc) x 3 (9)
Round 3 :
(2 sc, inc) x 3 (12)
Round 4 :
(3 sc, inc) x 3 (15)
Round 5-8 :
1 sc in each st (15) - work even to build height
Round 9 :
(3 sc, dec) x 3 (12)
Round 10 :
(2 sc, dec) x 3 (9)
Round 11-14 :
1 sc in each st (9) - elongate cone shape; stuff lightly as you go
Round 15 :
(1 sc, dec) x 3 (6)
Round 16 :
6 sc (6) - finish tip stuffing firmly then fasten off leaving long tail for sewing
Info :
Sew horns to the head on top, slightly behind the eye line and angled outward. Use the long tail to stitch through the base rounds of the head for a secure, flush seam. Add a few surface slip stitches at the base if needed to secure orientation.
— Neck Collar / Frill :
Round 1 :
Join AC at lower front of head where head meets neck. Ch1, work 1 sc in each around across 10-12 stitches centered on front (10-12)
Round 2 :
1 sc in each st (10-12)
Round 3 :
*ch2, 3 dc in next st, sl st in next st* repeat across to create small scallops (makes frill)
Info :
This small neon frill at the front softens the neck transition and echoes the body spikes. Sew ends neatly and weave in tails.
— Body :
Round 1 :
6 sc in magic ring (6) - start with MC
Round 3 :
(1 sc, inc) x 6 (18)
Round 4 :
(2 sc, inc) x 6 (24)
Round 5 :
(3 sc, inc) x 6 (30)
Round 6 :
(4 sc, inc) x 6 (36)
Round 7 :
(5 sc, inc) x 6 (42)
Round 8 :
1 sc in each st (42)
Info :
If you want the dragon to have a chunky body, work rounds 9-12 even (42) to add height. For a slimmer body, skip to shaping rounds. We will include a ribbed belly panel in AC shortly.
Round 9-12 :
1 sc in each st (42)
Info :
Prepare the belly panel: using AC (neon), we will create a long ribbed scale strip that is sewn to the front of the body. Make the strip separately (see 'Belly Scales' section) and attach later. Stuff body as you progress but leave top opening large for head insertion.
Round 13 :
(6 sc, inc) x 6 (48) - widen base slightly to make room for hips
Round 14-18 :
1 sc in each st (48) - work even to build torso length
Round 19 :
(6 sc, dec) x 6 (42)
Round 20 :
(5 sc, dec) x 6 (36)
Info :
Begin stuffing body moderately now. Leave the bottom opening for legs insertion; stuff around the sides and back firmly so the dragon can sit upright. The front will receive the belly strip which adds both structure and decoration.
Round 21 :
1 sc in each st (36)
Round 22 :
(4 sc, dec) x 6 (30)
Round 23 :
(3 sc, dec) x 6 (24)
Round 24 :
(2 sc, dec) x 6 (18)
Round 25 :
1 sc in each st (18) - keep opening large for sewing legs; fasten off leaving long tail
Info :
Fasten off leaving a long tail for attaching head later. Keep the filling moderately firm in the torso so the piece holds structure, but leave some loft so it remains squeezable and plush.
— Belly Scales (Make 1 panel) :
Round 1 :
With AC ch13, sc in 2nd ch from hook and across (12)
Round 2-24 :
Turn, ch1, 1 sc in each st across (12) - continue to desired length to reach from upper chest to crotch (~23 rows for pictured proportion)
Round 25 :
Work 1 row in BLO: ch1, 1 sc BLO across (12) to create a defined ridge
Round 26 :
Switch between a row of sc and a row of sc BLO every 1-2 rows to form ribbed look until panel length fits body opening. Fasten off leaving long tail for sewing.
Info :
Attach belly strip centered on the front torso from the chest to the lower abdomen with ladder stitch. The ribbed texture creates the layered scale appearance; tack the edges every 4-6 stitches to keep it flat against the body.
— Arms (Make 2) :
Round 1 :
6 sc in mr (6) - start with MC for hand base
Round 3 :
(1 sc, inc) x 6 (18)
Round 4-5 :
1 sc in each st (18) - form palm
Round 6 :
(1 sc, dec) x 6 (12) - start wrist taper
Round 7-10 :
1 sc in each st (12) - create forearm tube length
Info :
Stuff hand/palm firmly but leave the arm hollow to allow for medium stuffing later. If using wire for poseable arms, insert a single strand of floral wire now before stuffing completely, folding ends into stuffing so they are not sharp.
Round 11 :
(2 sc, inc) x 4 (16) - widen into upper arm
Round 12-16 :
1 sc in each st (16) - lengthen upper arm
Round 17 :
(2 sc, dec) x 4 (12)
Round 18 :
1 sc in each st (12) - leave opening for sewing; fasten off with long tail
Info :
Sew arms to the body at rounds 12-14 on the sides, spacing them to sit naturally with the belly panel centered. Add small neon AC bobble claws: make three tiny bobbles for each paw and sew them to the front of each hand tip.
— Legs (Make 2) :
Round 1 :
6 sc in magic ring (6) - start with MC for foot base
Round 3 :
(1 sc, inc) x 6 (18)
Round 4 :
(2 sc, inc) x 6 (24)
Round 5-6 :
1 sc in each st (24) - shape foot
Round 7 :
(3 sc, dec) x 6 (18) - toe separation and slight taper
Round 8 :
1 sc in each st (18)
Round 9 :
(2 sc, inc) x 6 (24) - ankle flare
Round 10-14 :
1 sc in each st (24) - build lower leg height
Info :
Stuff feet very firmly to make a stable base for the dragon to sit. Use extra stuffing in heel and toes. For a sitting posture, flatten sole slightly by shaping stuffing and working subsequent rounds evenly to keep a flat bottom.
Round 15 :
(3 sc, dec) x 6 (18)
Round 16-20 :
1 sc in each st (18) - lengthen thigh portion
Round 21 :
(2 sc, dec) x 6 (12)
Round 22 :
1 sc in each st (12) - leave opening for sewing; fasten off leaving long tail
Info :
Sew legs to the bottom opening of the body, spacing them evenly to allow a seated position (approx between body rounds 1-6). Flatten lower attachment so the dragon sits flush; use extra stitches around the base to anchor securely.
— Tail :
Round 1 :
6 sc in mr (6) - start with MC
Round 2 :
(1 sc, inc) x 3 (9)
Round 3 :
(2 sc, inc) x 3 (12)
Round 4-8 :
1 sc in each st (12) - lengthen tail base
Round 9 :
(2 sc, dec) x 3 (9)
Round 10-16 :
1 sc in each st (9) - tapering tail; stuff lightly as you go to give a natural curl
Round 17 :
(1 sc, dec) x 3 (6)
Round 18-26 :
1 sc in each st (6) - continue tail tip lengthening to desired curve
Round 27 :
(inc, 2 sc) x 2 (8) - create tail knob base for spikes
Round 28-30 :
1 sc in each st (8) - finish and fasten off leaving long tail for sewing
Info :
Sew tail to lower back center of body at round 9-12 for a balanced look. Shape curl by stuffing unevenly—more stuffing near the base and moderate near the tip—and arrange tail to curve around one side of the body as pictured. Add neon bobble spikes along top of tail (see Spike instructions).
— Spikes / Dorsal Bobbles (Make 12 or add as desired) :
Round 1 :
With AC ch2, 3 sc in 2nd ch (3) - or alternative: 3 sc in mr (3)
Round 3 :
(1 sc, inc) x 2 (8)
Round 4 :
Sl st to create a small bobble, fasten off leaving tail for sewing
Info :
Sew spikes in a row from upper forehead between horns, down the neck, along the spine, and finishing along the tail. Space them roughly 6-10 stitches apart depending on body size. For the pictured look, make 10-12 spikes: 3 on head/neck, 4 on back, 3 on tail and 2 smaller at tips.
— Wing (Make 2) :
Round 1 :
With AC ch21, sc in 2nd ch from hook and across (20)
Round 2 :
Turn, ch1, sc across (20)
Round 3 :
Turn, ch1, 1 sc in first 2 sts, (inc, 4 sc) across to create curved triangle base (24)
Round 4-10 :
Work even rows increasing 2-4 sts in outermost row to reach a triangular membrane shape. Suggested counts per row: 24, 26, 28, 30, 30, 30, 30 for a gradually widening wing membrane
Round 11 :
Fold wing so outer edge is single loop; sc around edge in MC to create black rim (work 1 sc in each edge st - approximate 60 sc around entire wing)
Round 12 :
Work 1 sc in each st BLO on rim to create thickness (60)
Round 13 :
Using MC create 3-4 wing 'bones' with surface slip stitch or sewn cords: mark three lines from base to outer edge: start at inner base and sl st or sew narrow cords to outer rim; secure both ends
Round 14-16 :
Reinforce rim by working additional 1-2 rounds of sc in MC if desired; fasten off leaving long tail for sewing
Info :
If you want poseable wings, thread a piece of floral wire along each 'bone' before securing rim and cover with sc to hide wire. Sew wings to body at rounds 10-12 on each side slightly behind arm placements so wings sit slightly back and can be spread or folded.
— Wing Membrane Option (Alternative method) :
Round 1 :
Create membrane by working modular increases: ch15, sc to end, then add rows increasing 1-2 stitches per row until desired width; attach rim in MC as above
Info :
This alternative yields a slightly smoother membrane and makes the black wing-bones more prominent when stitched on top in MC.
— Claws & Toe Bobbles (Make 10 small claws) :
Round 1 :
With AC or MC, 3 sc in mr (3)
Round 3 :
Sl st around and fasten off leaving tail for sewing onto toes and fingertips
Info :
Sew three small claws onto each foot and two small claws onto each hand. Place claws at round tips of foot pieces; tack each claw down with a few stitches for security.
— Sewing & Assembly Prep :
Info :
Before sewing pieces together, weave in loose tails inside pieces where possible to keep seams neat. Use pins to position limbs and wings. For symmetry, count stitches from the front center of the body to mark left/right attach points: legs usually attach in front bottom area (space about 8-10 sts apart depending on body circumference), arms attach at sides at an even height above legs, wings attach slightly behind arms.
Info :
Use ladder stitch or whip stitch to sew parts. For the head, insert the neck tube into the body opening; stitch through several rounds of the neck tube into the body to create a strong join. Weave ends back through the body for a clean finish.
Info :
Add safety eye washers behind eye pads and pad area further with small felt discs or a row of yarn if you want deeper-set eyes. For toddlers, consider embroidering or securing eyes with fabric glue in addition to washers to reduce risk.
— Final Embellishments :
Info :
Use a length of AC to embroider the vertical slit in each safety eye if it is not pre-slit, or add a small stitch of black on the surface to suggest a pupil. Add a few invisible stitches as nostril highlights. To create the raised belly ridges, if additional texture is desired, stitch 1-2 rows of sc across the belly panel edges to make it appear tucked into the body.
Info :
Check all seams for security. Weave in ends at least 5cm deep into the nearest piece and trim close. Optionally add a small bit of craft glue at attachment points for extra hold if the toy will be handled heavily.
This neon-spined dragon is a showstopper — dramatic contrast, sculpted features and clever texturing combine into a charming, sturdy amigurumi you will love displaying. Each stitch builds character: the ribbed belly adds texture, the bobble spikes provide playful detail, and the expressive slitted eyes bring it to life. Enjoy the meditative process of creating this bold little dragon and take pride in every perfectly placed stitch. 🧶🐉✨