๐Ÿงถ Beautiful โœจ Detailed ๐Ÿ’ Adorable

Niahs Balloon Dog Amigurumi Pattern

Niahs Balloon Dog Amigurumi Pattern
4.3โ˜… Rating
5-7 Hours Time Needed
2.2K Made This
โœ‚๏ธ

Intermediate Level

Ideal for those with basic crochet experience, featuring slightly more advanced stitches and techniques to expand your skills.

โฑ๏ธ

Weekend Treat

Takes 5-7 hours, making it an enjoyable project to finish over a couple of days.

๐Ÿงธ

Cute Companion

An adorable friend to cherish, handcrafted with love to bring comfort and joy for years to come.

About This Niahs Balloon Dog Amigurumi Pattern

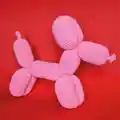
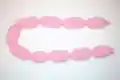
This pattern creates a charming balloon dog amigurumi crocheted from a single long balloon-shaped tube that is later shaped into legs, body, neck, head, ears and nose. The construction uses single crochet in spirals with simple increases and decreases. It includes step-by-step photos and a clear guide for sewing the numbered joints to shape the dog.

Niahs Balloon Dog Amigurumi Pattern crochet pattern - detailed view of completed project

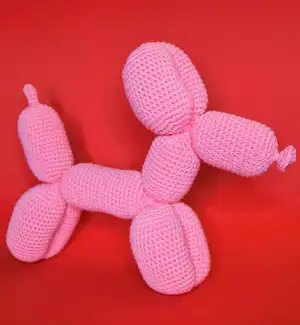
Worked in cotton yarn with a small hook, the finished dog measures about 20 cm tall and 23 cm from tail to nose. You will learn how to make the bumps and sew the parts together to get a true balloon-dog look.

Why You'll Love This Niahs Balloon Dog Amigurumi Pattern

I absolutely love this pattern because it turns a simple tube of crochet into a whimsical balloon-dog sculpture that feels playful and modern. I love how the shaping is all about sewing the joints together โ€” it reminds me of real balloon animals and brings an element of surprise to crochet. The techniques are straightforward so I can relax and enjoy the rhythm of single crochet while still creating something with personality. Making a whole dog from one crocheted tube is so satisfying and perfect for gifting or displaying.

Niahs Balloon Dog Amigurumi Pattern step 1 - construction progress Niahs Balloon Dog Amigurumi Pattern step 2 - assembly progress Niahs Balloon Dog Amigurumi Pattern step 3 - details and accessories Niahs Balloon Dog Amigurumi Pattern step 4 - final assembly and finishing

Switch Things Up

I love how easily you can customize this pattern by changing the yarn color to match your decor or party theme.

I sometimes use two contrasting colors for alternating bumps to give a striped balloon-dog effect that looks playful and modern.

If you want a larger or smaller dog, I change the yarn weight and hook size; bulky yarn and a larger hook gives a chunky version, while thinner yarn makes a cute mini.

I often adjust stuffing โ€” firmer stuffing keeps the bumps very round while softer stuffing gives a more squishy toy feel; try both to see what you prefer.

I like to add a small loop of yarn at the tail if I want to hang the dog as a playful ornament or keychain.

For a posable look, I sometimes insert a short length of wire inside the neck or legs before stuffing to hold a pose.

Try embroidered eyes or tiny felt features for a more characterful face, or leave the face plain for a minimalist sculpture look.

If youre making these as gifts, I make a set in graduated sizes using different yarns to create a family of balloon dogs.

I also enjoy adding little accessories like a tiny crochet collar, bow, or a felt heart glued or sewn onto the body for extra charm.

Dont be afraid to experiment with different stitch tensions and stuffing amounts; each variation creates a unique finished piece that is entirely your own.

Common Mistakes & How to Fix Them

โœ— Not checking the gauge before starting can make the finished dog much bigger or smaller than intended; measure 10 cm = 24 sc and adjust hook size accordingly to match the gauge. โœ— Forgetting to stuff between shaping points will make the bumps collapse or look flat; add stuffing gradually at each bump and before closing sections so they hold their shape. โœ— Skipping stitch counts during increases and decreases leads to incorrect bump sizes and misaligned joints; always count stitches at the end of each round to ensure accuracy. โœ— Tying knots or closing the nose hole too early can distort the head shape; leave ends until after sewing and shaping, then close the nose neatly by sewing or tying a tight knot on the outside.

Niahs Balloon Dog Amigurumi Pattern

Make a playful balloon dog amigurumi with this clear, photo-guided crochet pattern. You will crochet a long balloon-shaped tube and shape it into a dog by sewing the joints together. The pattern uses simple single crochet rounds and basic increases/decreases so you can focus on the fun shaping. Perfect for a unique handmade gift or cheerful home decor.

Intermediate 5-7 Hours

Materials Needed for Niahs Balloon Dog Amigurumi Pattern

โ€” Main Fabric

  • 01
    Cotton yarn 8/4 (standard cotton) - 50 g skein = approx. 170 m; about 60 g needed (any color)
  • 02
    Any brand of yarn matching the hook size can be used; choose cotton 8/4 for best result

โ€” Tools Required

  • 01
    Crochet hook 2.0-2.5 mm (US size B-1)
  • 02
    Needle
  • 03
    Scissors
  • 04
    Stuffing

Progress Tracker

0% Complete

โ€” The balloon :

Info :

The balloon itself is made with bumps. It should end up looking like the picture on the right. It is crocheted from the tail to the nose. It is worked in spirals. Start off with a ml.

Round 1 :

6 sc in ml (6)

Round 2-6 :

sc all the way around (6)  (6) - 5 rounds (tip of the tail)

Round 7 :

*sc inc* x6 (12)

Round 8 :

*1 sc, sc inc* x6 (18)

Round 9 :

*2 sc, sc inc* x6 (24)

Round 10 :

*3 sc, sc inc* x6 (30)

Round 11-25 :

sc all the way around (30) - 15 rounds (tail)

Round 26 :

*3 sc, sc dec* x6 (24)

Round 27 :

*2 sc, sc dec* x6 (18)

Info :

Put some stuffing in it.

Round 28 :

*1 sc, sc dec* x6 (12)

Round 29 :

*sc dec* x6 (6)

Round 30 :

sc all the way around (6)

Round 31 :

*sc inc* x6 (12)

Round 32 :

*1 sc, sc inc* x6 (18)

Round 33 :

*2 sc, sc inc* x6 (24)

Round 34 :

*3 sc, sc inc* x6 (30)

Round 35-51 :

sc all the way around (30) - 17 rounds (leg 1)

Round 52-60 :

repeat round 26-34 (30)

Round 61-77 :

sc all the way around (30) - 17 rounds (leg 2)

Round 78-86 :

repeat round 26-34 (30)

Round 87-106 :

sc all the way around (30) - 20 rounds (body)

Round 107-115 :

repeat round 26-34 (30)

Round 116-132 :

sc all the way around (30) - 17 rounds (leg 3)

Round 133-141 :

repeat round 26-34 (30)

Round 142-158 :

sc all the way around (30) - 17 rounds (leg 3)

Round 159-167 :

repeat round 26-34 (30)

Round 168-179 :

sc all the way around (30) - 12 rounds (neck)

Round 180-188 :

repeat round 26-34 (30)

Round 189-203 :

sc all the way around (30) - 15 rounds (ear 1)

Round 204-212 :

repeat round 26-34 (30)

Round 213-227 :

sc all the way around (30) - 15 rounds (ear 2)

Round 228-236 :

repeat round 26-34 (30)

Round 237-249 :

sc all the way around (30) - 13 rounds (nose)

Round 250 :

*3 sc, sc dec* x6 (24)

Round 251 :

*2 sc, sc dec* x6 (18)

Info :

Put some stuffing in it.

Round 252 :

*1 sc, sc dec* x6 (12)

Round 253 :

*sc dec* x6 (6)

Round 254 :

sc all the way around (6)

Round 255 :

*sc inc* x6 (12)

Round 256 :

*1 sc, sc inc* x6 (18)

Info :

Slip st in the next stitch, cut the yarn pull it through and weave in the ends.

Info :

It should now look like the piece on the picture.

โ€” Shaping the balloon :

Step 1 :

Throughout the picture guide I have given all the joints numbers, like on the picture above.

Step 2 :

For the first pair of legs, you will need to sew joint no 1 and 3 together, as shown on the pictures above.

Step 3 :

When they have been sewn together, it should look like the picture above.

Step 4 :

For the second pair of legs, you will need to sew joint no 4 and 6 together, as shown on the pictures above.

Step 5 :

When they have been sewn together, it should look like the picture above.

Step 6 :

For the ears, you will need to sew joint no 7 and 9 together, as shown on the pictures above.

Step 7 :

When they have been sewn together it should look like the picture above.

Step 8 :

The last thing to do is to close the hole at the tip of the nose. You can either sew it together, or you can tie a tight knot about the outside.

Info :

You balloon dog is now done!

Assembly Instructions

  • Sew joint number 1 and joint number 3 together to form the first pair of legs, following the photo guide to align the bumps accurately.
  • Sew joint number 4 and joint number 6 together to form the second pair of legs, matching the orientation shown in the pictures.
  • Sew joint number 7 and joint number 9 together to create the ears and attach them to the head area as indicated in the photo sequence.
  • Close the hole at the tip of the nose by sewing it together neatly, or tie a tight knot on the outside; weave in all ends afterward.
  • Stuff each bump as you go and before closing each shaping section so the legs and head keep their rounded balloon shape.

Important Notes

  • ๐Ÿ’กCheck your gauge: 10 cm = 24 sc in single crochet; adjust hook size if your stitch count differs to maintain intended size.
  • ๐Ÿ’กStuff gradually between shaping points to keep the bumps even and avoid overstuffing which can distort the shape.
  • ๐Ÿ’กPin or hold joints in position before sewing to ensure correct alignment and symmetry when joining the bumps.
  • ๐Ÿ’กWeave in ends after finishing and closing the nose, and use a tight knot or neat sewing to close small holes securely.

This playful balloon dog pattern brings a smile to any room with its bright, sculptural look and soft cotton texture. Its perfect as a handmade gift or a fun decoration for a nursery or living space. Make one in your favorite color and enjoy the quirky charm it adds to your home. ๐ŸŽˆ๐Ÿงถ

You ask,

we answer.

FAQs

What size will the finished piece be?

The balloon dog is about 20 cm tall and approximately 23 cm from tail to nose when using the recommended cotton 8/4 yarn and the suggested hook size.

Can I use different yarn weights for this pattern?

Yes, you can use different yarn weights, but the final size will change; if you choose a different weight, adjust your hook size and check the gauge to maintain the intended proportions.

Do I need prior crochet experience for this pattern?

This pattern is rated intermediate because it requires working in spirals, counting rounds, increases/decreases, and shaping by sewing joints together; basic crochet knowledge is recommended.

How long does this project typically take to complete?

Most crocheters complete this project in 5-7 hours, though time will vary based on experience, yarn choice, and how carefully you shape and sew the joints.