๐Ÿงถ Beautiful โœจ Detailed ๐Ÿ’ Adorable

Ninja Turtle Amigurumi Pattern

Ninja Turtle Amigurumi Pattern
4.2โ˜… Rating
5-7 Hours Time Needed
1.4K Made This
โœ‚๏ธ

Intermediate Level

Ideal for those with basic crochet experience, featuring slightly more advanced stitches and techniques to expand your skills.

โฑ๏ธ

Weekend Treat

Takes 5-7 hours, making it an enjoyable project to finish over a couple of days.

๐Ÿงธ

Cute Companion

An adorable friend to cherish, handcrafted with love to bring comfort and joy for years to come.

About This Ninja Turtle Amigurumi Pattern

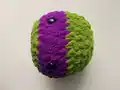
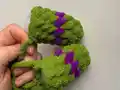
This delightful pattern walks you through creating a chunky, 28cm tall Ninja Turtle plush. You'll learn how to seamlessly change colors for their iconic masks and construct their detailed shells and belly pieces. It's a wonderful project that results in a wonderfully squishy and nostalgic toy.

Ninja Turtle Amigurumi Pattern crochet pattern - detailed view of completed project

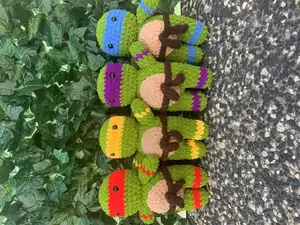
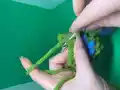
The use of thick chenille yarn means this turtle works up quickly while remaining incredibly soft. You can easily customize the mask and arm bands to represent your favorite turtle brother.

Why You'll Love This Ninja Turtle Amigurumi Pattern

I absolutely love this pattern because it perfectly captures the fun and nostalgia of the classic Ninja Turtles while keeping the design simple and enjoyable to crochet. Working with the chunky chenille yarn is so satisfying, as you can see the character taking shape so quickly in your hands. I love how the pattern allows you to easily switch out the mask colors, meaning you can crochet the entire team using just one base pattern. The construction of the shell and belly gives the plush such a fantastic 3D shape that makes it incredibly huggable. It's truly a joyous make that brings a smile to my face every time I finish one.

Ninja Turtle Amigurumi Pattern step 1 - construction progress Ninja Turtle Amigurumi Pattern step 2 - assembly progress Ninja Turtle Amigurumi Pattern step 3 - details and accessories Ninja Turtle Amigurumi Pattern step 4 - final assembly and finishing

Switch Things Up

I love how versatile this pattern is for customization! You can easily adjust the colors to create your own unique character - try pastel shades for a softer look, or bold brights for maximum impact.

Want to make it bigger or smaller? Simply change your yarn weight and hook size. Using bulky yarn with a larger hook will give you a chunky, cuddly version, while thin yarn creates an adorable mini version perfect for keychains.

I often add my own creative touches like embroidered details, felt accessories, or even tiny crocheted props like a pizza slice or tiny weapons. These personal additions make each piece truly one-of-a-kind and special.

Don't be afraid to experiment with different facial expressions too! The placement of eyes and mouth can completely change the personality of your creation. Try different positions before securing them permanently.

For an extra special touch, consider adding wire to the limbs for posability, or create a whole set of outfits and accessories. You could even crochet all four brothers and stage an epic battle. The possibilities are endless, and that's what makes this pattern so much fun!

Common Mistakes & How to Fix Them

โœ— Skipping stitch markers at color changes can lead to misaligned rounds; place a marker at the start of every round to stay on track. โœ— Not stuffing evenly causes lumpy heads or limbs; stuff gradually while shaping, adding small amounts at a time. โœ— Pulling yarn too tight creates stiff, inflexible pieces; maintain consistent, moderate tension throughout your work. โœ— Crocheting the belly piece too tightly can make it curve; use light motions and stretch it out slightly so it lays flat for sewing.

Ninja Turtle Amigurumi Pattern

Create your very own heroes in a half-shell with this fantastic Ninja Turtle amigurumi pattern! You'll love bringing Leonardo, Raphael, Donatello, or Michelangelo to life with their signature colored masks. This plush, huggable turtle is crafted using soft blanket chenille yarn, making it the perfect cuddly companion for fans of all ages.

Intermediate 5-7 Hours

Materials Needed for Ninja Turtle Amigurumi Pattern

โ€” Main Fabric

  • 01
    Blanket Chenille Yarn (Brand: Porta craft)
  • 02
    Forest green - 1 80m skein
  • 03
    Chocolate Brown yarn for shell and strap
  • 04
    Beige yarn for belly
  • 05
    Mask color yarn (Red, Purple, Orange, or Blue)

โ€” Tools Required

  • 01
    Crochet hook size 7mm
  • 02
    Safety eyes 15mm (1 pair)
  • 03
    Fiberfill/Hobbyfill stuffing
  • 04
    Yarn needle
  • 05
    Scissors
  • 06
    Stitch markers
  • 07
    4mm knitting needles (optional, for holding pieces during assembly)

Progress Tracker

0% Complete

โ€” Head :

Round 1 :

Starting in Green, 6 sc in MC (6)

Round 2 :

inc x6 (12)

Round 3 :

sc, inc x6 (18)

Round 4 :

2 sc, inc x6 (24)

Round 5 :

3 sc, inc x6 (30)

Info :

This is where you choose your Ninga turtle mask colour

Round 6-9 :

CC sc around (30) (4 rounds)

Round 10-11 :

CC sc around (30) (2 rounds)

Info :

Attach safety eyes in between rounds 7-8, 5 stitches apart.

Round 12 :

3 sc, dec x6 (24)

Round 13 :

sc around (24)

Info :

STUFF AS YOU GO!

Round 14 :

2 sc, dec x6 (18)

Round 15 :

sc, dec x6 (12)

Info :

Use your needle now to weave in and out the FLO to close the circle and fasten off.

โ€” Arms make 2 :

Round 1 :

In Green, 6 sc in MC (6)

Round 2 :

sc, inc x6 (9)

Round 3 :

sc around (9)

Round 4 :

CC sc around (9)

Round 5-7 :

CC sc around (9) (3 rounds)

Info :

Lightly stuff the arm. 2 ARM OPTIONS: READ CAREFULLY!

Round 8 (Option 1) :

Fold the top in half a SC closed (4)

Round 8 (Option 2) :

Do NOT sc closed if you would like your arms to stick out of the body.

Info :

Fasten off and leave tail for sewing

โ€” Legs make 2 :

Round 1 :

In Green, sc 6 in MC (6)

Round 2 :

inc x6 (12)

Round 3 :

sc around (12)

Info :

Changing colour to same as mask colour

Round 4-5 :

CC sc around (12) (2 rounds)

Round 6-7 :

CC sc around (12) (2 rounds)

Info :

Fasten off first leg. CH 2 after finishing second leg but DO NOT cut the yarn. Insert you crochet hook into any stitch on first leg and continue with BODY instructions.

โ€” BODY :

Round 7 :

In Green, sc around (12 in first leg, 2 sc in the ch, 12 sc second leg, 2 sc in ch) (28)

Round 8 :

6 sc, inc x3, 6 sc (30)

Round 9-15 :

sc around (30) (7 rounds)

Info :

Stuff firmly

Round 16 :

3 sc, dec x6 (24)

Round 17 :

sc around (24)

Round 18 :

2 sc, dec x6 (18)

Round 19 :

sc around (18)

Round 20 :

sc, dec x6 (12)

Info :

Slst and leave a tail for sewing. DO NOT close circle

โ€” Belly :

Round 1 :

In Beige, 6 sc in MC (6)

Round 2 :

inc x6 (12)

Round 3 :

sc, inc x6 (18)

Round 4 :

2 sc, inc x6 (24)

Round 5 :

sc around (24)

Info :

Slst and leave a long tail for sewing. If you crochet tightly: using light motions loosen up the belly by stretching it out, this will help it lay flat against your turtle when it comes to sewing.

โ€” Shell :

Round 1 :

In Brown, sc 8 in MC (8)

Round 2 :

inc x8 (16)

Round 3 :

sc, inc x8 (24)

Round 4 :

3 sc, inc x8 (30)

Round 5-6 :

sc around (30) (2 rounds)

Round 7 :

FLO hdc around (30)

Info :

Slst and leave a long tail for sewing. Roll up the last row of HDC to create a lip of the shell.

โ€” Waist Strap :

Round 1 :

In Brown, ch 46

Round 2 :

turn chain and sc into 2nd stitch from hook, all the way down.

Info :

Fasten off and weave in ends.

Assembly Instructions

  • Head to the body: Using the tail from the body, attach the head of the ninja turtle to the body. Tip: use 4mm knitting needles to help keep attachments in place whilst sewing them on. Sew all around the head until secured.
  • Arms to the body (Option 1): Position arms in place on ROW 2 under the neck and sew the top half of the arms until secured.
  • Arms to the body (Option 2): Position arms on ROW 2 under the neck and sew all the way around the arm until secured.
  • Shell to the body: Secure your shell onto the body with a knitting needle. Using the back loops of the last row, sew half way around the shell. Stuff lightly and continue sewing around until secured.
  • Belly to the body: Using knitting needles to hold into place, sew the belly onto the body of the turtle until secured. Then tie your waist band around the turtle.

Important Notes

  • ๐Ÿ’กMeasurements of plush will be different depending on the size hook and yarn used.
  • ๐Ÿ’กStitch count is located at the end of the row in parentheses.
  • ๐Ÿ’กRemember to stuff your pieces gradually as you go to ensure a firm, even shape.
  • ๐Ÿ’กIf you crochet tightly, remember to loosen up the belly piece by stretching it out lightly so it lays flat against the turtle during assembly.

This fantastic Ninja Turtle amigurumi pattern is the perfect weekend project for fans of all ages! With its customizable mask colors and chunky, huggable design, you'll want to make the entire team. Grab your favorite chenille yarn and bring these nostalgic heroes to life! ๐Ÿข๐Ÿ•โœจ

You ask,

we answer.

FAQs

What size will the finished piece be?

The finished amigurumi measures approximately 28cm (11 inches) tall when using the recommended yarn and a 7mm hook.

Do I have to use Blanket Chenille Yarn?

While the pattern uses blanket chenille yarn for a large, soft plush, you can use any yarn weight! Just remember to use an appropriate hook size and adjust your eye size accordingly.

How do I make the different turtles?

The base pattern is the same for all four turtles! Simply change the 'mask color' yarn used on the head, arms, and legs to red, purple, orange, or blue.

How do I ensure the shell looks right?

When finishing the shell, be sure to roll up the last row of half double crochets to create the distinct lip of the turtle shell before sewing it to the back.