🧢 Beautiful ✨ Detailed πŸ’ Adorable

Pixie pocket Pouch Amigurumi Pattern

Pixie pocket Pouch Amigurumi Pattern
4.9β˜… Rating
1-2 Hours Time Needed
3.5K Made This
βœ‚οΈ

Beginner Friendly Level

Perfect for those just starting their crochet journey, with clear instructions and simple techniques

⏱️

Quick Make

Complete in under 2 hoursβ€”lightning fast fun for instant gratification and quick gifts.

✨

Stylish Touch

An elegant detail to elevate any look, combining traditional techniques with contemporary design sensibilities.

About This Pixie pocket Pouch Amigurumi Pattern

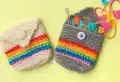
This pattern creates a small pocket pouch worked from the bottom up in joined rounds, finished with a tiny cover flap and button closure. It uses fingering weight yarn with colorful stripes for a playful rainbow effect. The pouch is compact and perfect for storing stitch markers, small notions, or coins.

Pixie pocket Pouch Amigurumi Pattern crochet pattern - detailed view of completed project

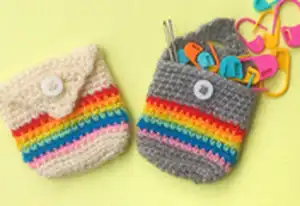
Worked mostly in single crochet with a neat BLO round for texture, the flap is made last in rows. Ideal for using scrap yarns and practicing consistent tension.

Why You'll Love This Pixie pocket Pouch Amigurumi Pattern

I absolutely love this pattern because it makes such a useful little pouch from very little yarn. I enjoy how quickly it comes together so you can make several in an evening. The rainbow stripes let me use up scraps while still creating a polished finished item. I also appreciate that the flap and button closure add a sweet, professional touch to a tiny handmade accessory.

Pixie pocket Pouch Amigurumi Pattern step 1 - construction progress Pixie pocket Pouch Amigurumi Pattern step 2 - assembly progress Pixie pocket Pouch Amigurumi Pattern step 3 - details and accessories Pixie pocket Pouch Amigurumi Pattern step 4 - final assembly and finishing

Switch Things Up

I love to experiment with colours β€” try pastel shades for a soft, muted pouch, or bright neons for a playful statement.

You can make the pouch larger by using a DK or worsted weight yarn and increasing the starting chain; adjust hook size accordingly.

If you want a flatter pouch, block it gently after finishing to smooth the stitches and improve shape.

I often add a small lining with fabric to make the pouch stronger and prevent snagging of small items.

Swap the button for a snap closure or a magnetic clasp if you prefer a sleeker finish.

Embroider initials or a tiny motif on the front to personalize your pouch for gifts or markets.

Use metallic or textured yarns for one stripe to add a little sparkle and visual interest.

Turn the flap into a decorative scallop edge by adding picots along the edge when working the final row.

Add a small wrist strap or loop to hang the pouch on a keyring or hook for easy access when traveling.

I sometimes sew a tiny pocket on the inside or add a felt divider to keep things organized and secure.

Common Mistakes & How to Fix Them

βœ— Skipping the chain one at the beginning of rounds and rows can cause counting issues; remember the pattern states the chain one does not count as a stitch. βœ— Not working Round 3 in the BLO will change the pouch texture and fit; make sure to work Round 3 in the back loops only. βœ— Joining after each round past Round 10 when the pattern asks for a continuous spiral will create a ridge; reattach your main colour and work without joining until measurement is reached. βœ— Sewing the button in the wrong place will prevent the flap from closing correctly; pin the button in position first to check that it fits the hole made in the flap before sewing.

Pixie pocket Pouch Amigurumi Pattern

Make a charming Pixie Pocket Pouch to hold small notions or treasures β€” a quick, colorful crochet pouch you can finish in one sitting. This pattern uses simple single crochet stitches and small color stripes to create a neat, compact pouch. Youll love the tiny flap and button closure that make this pouch both useful and adorable. Perfect for using up scraps and experimenting with bright stripes.

Beginner Friendly 1-2 Hours

Materials Needed for Pixie pocket Pouch Amigurumi Pattern

β€” Main Fabric

  • 01
    Approximately 23 yards (21 m) of fingering weight yarn in your main colour (I used Cream or Grey)
  • 02
    Small scraps of fingering weight yarn in Red (small amount)
  • 03
    Small scraps of fingering weight yarn in Orange (small amount)
  • 04
    Small scraps of fingering weight yarn in Yellow (small amount)
  • 05
    Small scraps of fingering weight yarn in Green (small amount)
  • 06
    Small scraps of fingering weight yarn in Blue (small amount)
  • 07
    Small scraps of fingering weight yarn in Pink (small amount)

β€” Tools Required

  • 01
    Crochet hook size 2.5 mm
  • 02
    1 small button
  • 03
    Darning needle
  • 04
    Measuring tape

Progress Tracker

0% Complete

β€” Pattern Notes :

Infos :

This pattern is written in US terms. This pouch is worked from the bottom up, and worked in joined rounds until round 10, after which you begin working in a continuous spiral. The cover flap is then worked last, in rows. The chain one at the beginning of each row / round does not count as a stitch.

Infos :

Abbreviations: Ch - chain. Sc - single crochet. Sc dec - Single crochet decrease. St - stitch. Sl st - slip stitch. Blo - Back loop only. Sk - skip.

β€” Pattern :

Info :

Beginning with your main colour, ch 8

β€” Base :

Round 1 :

3 sc in second chain from hook, 1 sc in next 5 chains, 5 sc in last chain. Continuing to work on the other side of the chains, sc in the next 5 chains. 2 sc in last chain. Sl st to first sc to join. (20 sc)

Round 2 :

Ch 1 (does not count as a stitch). 2 sc in each of the first 3 sts. Sc 5. 2 sc in each of the next 5 sts. Sc 5. 2 sc in each of the last 2 sts. sl st to join. (30 sc)

β€” Body :

Round 3 :

Ch 1 (does not count as a stitch). Working in the BLO, sc around. (30 sc in blo)

Round 4 :

Ch 1 (does not count as a stitch). Sc in each st around. Fasten off. (30 sc)

Round 5 - 10 :

Repeat round 4, using a new colour on each round. I worked in the sequence - pink, blue, green, yellow, orange, red, but feel free to get as creative with your colours as you wish.

Info :

Reattach your main colour and begin to sc around in a continuous spiral without joining, until your pouch measures 6 cm (2.4 in). End on a stitch at the CORNER of your pouch.

Info :

(Note: The side of the pouch that the flap is worked on will become the back, so I suggest ending on the corner right BEFORE the side you would like to be the front)

β€” Cover Flap :

Info :

Ch 1 and turn

Row 1 :

sc in the next 15 sts. Ch 1 and turn (15 sc)

Row 2 - 3 :

Repeat Row 1

Row 4 :

Sc dec, 11 sc, sc dec. Ch 1 and turn (13 sts)

Row 5 :

Sc dec, 9 sc, sc dec, Ch 1 and turn (11 sts)

Row 6 :

Sc dec, 1 sc, chain 4, sk the next 5 sts, 1 sc, sc dec. Ch 1 and turn (4 sts and 4 chs)

Row 7 :

1 sc in each of the 1st 2 sts. 3 sc around chain. 1 sc in each of the last 2 sts. Ch 1 and turn (7 sts)

Row 8 :

Sc dec, 3 sc, sc dec. Ch 1 and turn (5 sts)

Row 9 :

Sc dec, 1 sc, sc dec. Ch 1 and turn (3 sts)

Row 10 :

3 sc. Fasten off

β€” Finishing :

Info :

Sew on the button on the front of the pouch approximately 1.5 cm (0.6 in) from the top and 3 cm (1.1 in) from the side. (I recommend holding / pinning the button in place first to check that it is in the right position to fit in the hole made in the flap and making any positioning adjustments if needed).

Info :

Weave in your ends and you’re all done!

Info :

I hope you love your finished pouches. Please tag me in your photos on Instagram and Facebook @therookiehooker and use the hashtags #pixiepocketpouch and #therookiehooker so I can see all your wonderful creations.

Info :

You are free to sell items made from this pattern but please give credit to the original designer.

Assembly Instructions

  • End your continuous spiral so that you finish on the corner right BEFORE the side you want to be the front; this ensures the flap will be worked on the desired side.
  • Work the cover flap last in rows starting with Ch 1 and turning; pin the flap to check alignment before fastening off.
  • Sew on the button on the front of the pouch approximately 1.5 cm (0.6 in) from the top and 3 cm (1.1 in) from the side, pinning first to check fit with the flap hole.
  • Weave in all yarn ends neatly and trim; ensure thread from the button is secured with several passes and knot hidden between stitches.

Important Notes

  • πŸ’‘This pattern is written in US terms, so double-check abbreviations before starting to avoid stitch confusion.
  • πŸ’‘The pouch is worked in joined rounds until round 10, then switched to a continuous spiral β€” do not join after round 10.
  • πŸ’‘Round 3 is worked in the BLO (back loop only) to create the textured ridge; make sure to work BLO for that round.
  • πŸ’‘When measuring, make sure your pouch measures 6 cm (2.4 in) before ending the spiral and starting the flap.

This Pixie Pocket Pouch is a delightful tiny project perfect for gift-giving and using up yarn scraps. It combines bright stripe fun with a tidy flap and button closure for a polished finish. Make a set in different colours and keep your notions organized in style! 🧢✨

You ask,

we answer.

FAQs

What size will the finished piece be?

The finished pouch measures approximately 6.5 cm (2.6 in) in length and 6 cm (2.4 in) in width using fingering weight yarn and a 2.5 mm hook.

Can I change the size of the pouch?

Yes, you can change the finished size by using a different yarn weight and corresponding hook; thicker yarn and a larger hook will create a bigger pouch.

Do I need to join rounds throughout the project?

You join rounds while working the base and up to round 10; after round 10 reattach your main colour and work in a continuous spiral without joining.

Can beginners make this pouch?

Yes, this pattern is beginner friendly and uses basic stitches like single crochet and decreases, but you should be comfortable working in rounds and following short shaping rows for the flap.