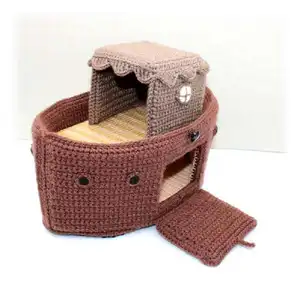
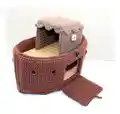
Make a charming Noah's Ark playset complete with an ark, deckhouse, trapdoor, portholes and tiny Noah and animals. This pattern gives step-by-step instructions for crocheting sturdy, cardboard-reinforced parts and assembling them into a delightful heirloom toy. Perfect for gifting or imaginative play, the pattern includes clear building and finishing notes to help you every stitch of the way.
Progress Tracker
0% Complete
— Ark :
Info :
Bottom - make one outside and one inside part
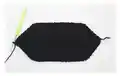
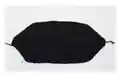
Outside Part (in black) :
Ch5
Round 1 :
from the 2nd ch from hk 4sc, turn (=4)
Round 2 :
ch1, inc, 2sc, inc, turn (=6)
Round 3 :
ch1, inc, 4sc, inc, turn (=8)
Round 4 :
ch1, inc, 6sc, inc, turn (=10)
Round 5 :
ch1, inc, 8sc, inc, turn (=12)
Round 6 :
ch1, inc, 10sc, inc, turn (=14)
Round 7 :
ch1, inc, 12sc, inc, turn (=16)
Round 8 :
ch1, inc, 14sc, inc, turn (=18)
Round 9 :
ch1, inc, 16sc, inc, turn (=20)
Round 10 :
ch1, inc, 18sc, inc, turn (=22)
Round 11 :
ch1, inc, 20sc, inc, turn (=24)
Round 12 :
ch1, inc, 22sc, inc, turn (=26)
Round 13 - 47 :
ch1, 26sc, turn (=26)
Round 48 :
ch1, dec, 22sc, dec, turn (=24)
Round 49 :
ch1, dec, 20sc, dec, turn (=22)
Round 50 :
ch1, dec, 18sc, dec, turn (=20)
Round 51 :
ch1, dec, 16sc, dec, turn (=18)
Round 52 :
ch1, dec, 14sc, dec, turn (=16)
Round 53 :
ch1, dec, 12sc, dec, turn (=14)
Round 54 :
ch1, dec, 10sc, dec, turn (=12)
Round 55 :
ch1, dec, 8sc, dec, turn (=10)
Round 56 :
ch1, dec, 6sc, dec, turn (=8)
Round 57 :
ch1, dec, 4sc, dec, turn (=6)
Round 58 :
ch1, dec, 2sc, dec, turn (=4)
Info :
Make two cardboard pieces of this part. Work sc around this part making increases in the corners. FO with the sl st, cut the yarn.
Inside Part (in cream) :
Same as the outside part
Info :
Put outside and inside pieces together with one cardboard piece between them and using chocolate brown yarn work sc around them. FO with a sl st, cut the yarn, fasten and hide the thread.
Info :
Deck - make one outside and one inside part
Outside Part (Start with the beige yarn) :
Ch5
Round 1 :
from the 2nd ch from hk 4sc, turn (=4)
Round 2 :
ch1, inc, 2sc, inc, turn (=6)
Round 3 :
In light beige: ch1, inc, 4sc, inc, turn (=8)
Round 4 :
In light beige: ch1, inc, 6sc, inc, turn (=10)
Round 5 :
In beige: ch1, inc, 8sc, inc, turn (=12)
Round 6 :
In beige: ch1, inc, 10sc, inc, turn (=14)
Round 7 :
In light beige: ch1, inc, 12sc, inc, turn (=16)
Round 8 :
In light beige: ch1, inc, 14sc, inc, turn (=18)
Round 9 :
In beige: ch1, inc, 16sc, inc, turn (=20)
Round 10 :
In beige: ch1, inc, 18sc, inc, turn (=22)
Round 11 :
In light beige: ch1, inc, 20sc, inc, turn (=24)
Round 12 :
In light beige: ch1, inc, 22sc, inc, turn (=26)
Round 13 - 14 :
In beige: ch1, 26sc, turn (=26)
Round 15 - 16 :
In light beige: ch1, 26sc, turn (=26)
Round 17 - 18 :
In beige: ch1, 26sc, turn (=26)
Round 19 - 20 :
In light beige: ch1, 26sc, turn (=26)
Round 21 - 22 :
In beige: ch1, 26sc, turn (=26)
Round 23 - 24 :
In light beige: ch1, 26sc, turn (=26)
Round 25 - 26 :
In beige: ch1, 26sc, turn (=26)
Round 27 - 28 :
In light beige: ch1, 26sc, turn (=26)
Round 29 - 30 :
In beige: ch1, 26sc, turn (=26)
Round 31 - 32 :
In light beige: ch1, 26sc, turn (=26)
Round 33 - 34 :
In beige: ch1, 26sc, turn (=26)
Round 35 - 36 :
In light beige: ch1, 26sc, turn (=26)
Round 37 - 38 :
In beige: ch1, 26sc, turn (=26)
Round 39 - 40 :
In light beige: ch1, 26sc, turn (=26)
Round 41 - 42 :
In beige: ch1, 26sc, turn (=26)
Round 43 - 44 :
In light beige: ch1, 26sc, turn (=26)
Round 45 - 46 :
In beige: ch1, 26sc, turn (=26)
Round 47 :
In light beige: ch1, 26sc, turn (=26)
Round 48 :
In beige: ch1, dec, 22sc, dec, turn (=24)
Round 49 :
In beige: ch1, dec, 20sc, dec, turn (=22)
Round 50 :
In beige: ch1, dec, 18sc, dec, turn (=20)
Round 51 :
In light beige: ch1, dec, 16sc, dec, turn (=18)
Round 52 :
In light beige: ch1, dec, 14sc, dec, turn (=16)
Round 53 :
In beige: ch1, dec, 12sc, dec, turn (=14)
Round 54 :
In beige: ch1, dec, 10sc, dec, turn (=12)
Round 55 :
In light beige: ch1, dec, 8sc, dec, turn (=10)
Round 56 :
In light beige: ch1, dec, 6sc, dec, turn (=8)
Round 57 :
In beige: ch1, dec, 4sc, dec, turn (=6)
Round 58 :
In beige: ch1, dec, 2sc, dec, turn (=4)
Info :
Work sc around this part making increases in the corners. FO with the sl st, cut the yarn. Put outside and inside pieces together with one cardboard piece between them and using beige yarn work sc around them. FO with a sl st, cut the yarn, fasten and hide the thread.
Info :
Right Side - make one outside and one inside part
Inside Part (in cream and chocolate brown) :
Start with the cream yarn. Ch63
Round 1 :
from the 2nd ch from hk 62sc, turn (=62)
Round 2 - 17 :
ch1, 62sc, turn (=62)
Round 18 :
ch1, 62sc, turn (=62) (continue with chocolate brown yarn)
Round 19 :
(in this row work all stitches in front loop only) ch1, 62sc, turn (=62)
Info :
(Later we will use the back loops for sewing the ship sides to the deck)
Round 20 - 24 :
ch1, 62sc, turn (=62)
Info :
Make two cardboard pieces of this part (the length of the side = half the perimeter of the deck/bottom minus 1cm). Work sc around this part making 3sc in the corners. FO with the sl st, cut the yarn.
Outside Part (in chocolate brown) :
Ch63
Round 1 :
from the 2nd ch from hk 62sc, turn (=62)
Round 2 :
ch1, 21sc, the next 20sc work in back loop only (later we will use the front loops for sewing the trapdoor to the ship wall), 21sc, turn (=62) – mark the 22nd stitch
Round 3 :
ch1, 22sc, turn (=22)
Round 4 - 17 :
ch1, 22sc, turn (=22)
Info :
Cut the yarn. Attach the yarn to the 2nd row 22nd stitch. Row 3: ch1, 22sc, turn (=22). Row 4-17: ch1, 22sc, turn (=22).
Info :
Work sc around this part making 3sc in the corners (around the perimeter and around the hole). Put outside and inside pieces together with the cardboard piece between them and work sc around them making 3sc in the corners. FO with a sl st, cut the yarn leaving a tail of around 12 inches.
Trapdoor (in chocolate brown) :
make two (outside and inside parts are the same)
Round 1 :
Ch19. from the 2nd ch from hk 18sc, turn (=18)
Round 2 - 14 :
ch1, 18sc, turn (=18)
Info :
Make a cardboard piece of this part. Work sc around this part making 3sc in the corners, mark the middle of the top side.
Info :
Put outside and inside pieces together with the cardboard piece between them and work sc around them making 3sc in the corners. When you come to the marked stitch make the loop – ch10, sl st in the marked stitch.
Portholes (in black and chocolate brown) :
make ten. Start with the black yarn.
Round 1 :
9sc in magic ring OR ch2, 9sc in 2nd chain from hk, join with the sl st (=9)
Info :
Cut the yarn. Attach the chocolate brown yarn and work 9sl st in the back loops only. Cut the yarn leaving a tail of around 8 inches.
Deck House Walls (in latte brown) :
make six (3 outside and 3 inside parts). Ch19
Round 1 :
from the 2nd ch from hk 18sc, turn (=18)
Round 2 - 16 :
ch1, 18sc, turn (=18)
Info :
Make a cardboard piece of this part. Work sc around this part making 3sc in the corners. Put outside and inside pieces together with the cardboard piece between them and work sc around them making 3sc in the corners. FO with the sl st, cut the yarn leaving a tail of around 12 inches.
Roof (in latte brown) :
make two (one outside and one inside part). Ch19
Round 1 :
from the 2nd ch from hk 18sc, turn (=18)
Round 2 - 18 :
ch1, 18sc, turn (=18)
Info :
Make a cardboard piece of this part. Work sc around this part making 3sc in the corners. Put outside and inside pieces together with the cardboard piece between them and work sc around them making 3sc in the corners. FO with the sl st, cut the yarn leaving a tail of around 12 inches.
Roof Trim (in latte brown) :
Ch73, from the 2nd ch from hk (sc, ch1, DC, ch1, 2TR, ch1, DC, ch1, sc) x12
Info :
Cut the yarn leaving a tail of around 30 inches.
— Assembling :
Windows (in white and latte brown) :
make two. Start with the white yarn.
Round 1 :
8sc in magic ring OR ch2, 8sc in 2nd chain from hk, join with the sl st (=8)
Info :
Cut the yarn. Attach the latte brown yarn and work 16sl st in the back loops only. Cut the yarn leaving a tail of around 12 inches.
Assembly Step 1 :
Sew the windows onto the deckhouse walls; stitch the frames using latte brown yarn.
Assembly Step 2 :
Sew the deckhouse walls together.
Assembly Step 3 :
Sew the roof to the deckhouse walls.
Assembly Step 4 :
Sew the deckhouse to the deck.
Assembly Step 5 :
Sew the portholes onto the ark sides.
Assembly Step 6 :
Sew the trapdoor to the ark left side (2nd row front loops); sew the button above the trapdoor.
Assembly Step 7 :
Sew both sides of the ark to the deck (sew the deck to the 18th row back loops).
Assembly Step 8 :
Sew both sides of the ark to the bottom part.
Assembly Step 9 :
Sew the sides of the ark together.
— Noah, Noah's Wife :
Supplies :
Approx. 6g Cream Yarn, Approx. 5g Green Yarn, Approx. 5g Mustard Green Yarn, Approx. 5g Lilac Yarn, Approx. 5g Bright Lilac Yarn, Approx. 3g White Yarn, Approx. 2g Black Yarn, Crochet Hook 2.0mm, Toy Stuffing, Scissors, Sewing Needle
Noah - Bottom (in green) :
1st rd: 6sc in magic ring OR ch2, 6sc in 2nd chain from hk (=6)
Round 2 :
2sc in every sc (=12)
Round 3 :
(sc, inc) x 6 (=18)
Round 4 :
(2sc, inc) x 6 (=24)
Head/Body (in cream, green and black) :
Start with the cream yarn. 1st rd: 6sc in magic ring OR ch2, 6sc in 2nd chain from hk (=6)
Round 2 :
2sc in every sc (=12)
Round 3 :
(sc, inc) x 6 (=18)
Round 4 :
(2sc, inc) x 6 (=24)
Round 10 :
(2sc, dec) x 6 (=18)
Round 11 :
(sc, dec) x 6 (=12)
Round 12 :
(2sc, dec) x 3 (=9)
Info :
Continue with the green yarn
Round 13 :
(2sc, inc) x 3 (=12)
Round 14 - 15 :
12sc (=12)
Round 16 :
(sc, inc) x 6 (=18)
Round 17 - 18 :
18sc (=18)
Round 19 :
(2sc, inc) x 6 (=24)
Info :
The next round crochet in black
Round 21 - 25 :
24sc (=24)
Info :
Stuff the body. In the next round crochet the bottom and the body together.
Round 26 :
24sc (=24). FO with the sl st, cut the yarn, fasten and hide the thread.
— Arms, Beard, Headdress (Noah) :
Arms (in cream and green) :
make two. Start with the cream yarn. 1st rd: 6sc in magic ring OR ch2, 6sc in 2nd chain from hk (=6)
Round 3 - 8 :
continue with the green yarn 6sc (=6). FO with a sl st and cut the yarn leaving a tail of around 8 inches.
Beard (in white) :
Leaving a tail of around 7 inches Ch11. Row 1: from the 2nd ch from hk 10sc, turn (=10)
Round 2 :
ch1, dec, 6sc, dec, turn (=8)
Round 3 :
ch1, dec, 4sc, dec, turn (=6)
Round 4 :
ch1, dec, 2sc, dec, turn (=4)
Round 5 :
ch1, dec x 2 (=2). Cut the yarn, fasten and hide the thread.
Headdress (in mustard green and black) :
Start with the mustard green yarn. 1st rd: 12DC in magic ring OR ch3, 12DC in 3rd chain from hk, join with a sl st (=12)
Round 2 :
ch2, (incDC) x 12, join (=24)
Round 3 :
the next round crochet in black: ch1, 24sc, join (=24)
Round 4 :
Continue in mustard green: ch2, 24DC, join (=24)
Round 5 :
ch2, 2DC, incDC, 3DC, incDC, 2DC, incDC, 3DC, incDC, 2DC, turn (=20)
Info :
Continue crocheting in rows. Row 1 - 2: ch2, 20DC, turn (=20). Row 3: ch1, sc, 18DC, sc (=20). Work sc around the headdress. FO with a sl st, cut the yarn, fasten and hide the thread.
Assembling (Noah) :
1) Stitch the eyes using black yarn (between 8th and 9th rds). 2) Sew the beard to the head; stitch the eyebrows using white yarn. 3) Sew the arms to the body. 4) Sew the headdress to the head.
— Noah's Wife :
Bottom (in lilac) :
1st rd: 6sc in magic ring OR ch2, 6sc in 2nd chain from hk (=6)
Round 2 :
2sc in every sc (=12)
Round 3 :
(sc, inc) x 6 (=18)
Round 4 :
(2sc, inc) x 6 (=24). Cut the yarn.
This Noah's Ark pattern is a lovingly designed, detailed amigurumi set that includes a structured ark, deckhouse, trapdoor and tiny Noah figures you can treasure. The cardboard-reinforced pieces keep the ark sturdy while staying soft and handmade, perfect for imaginative play and display. Happy crocheting and enjoy assembling your very own little ark adventure! 🧶🧵