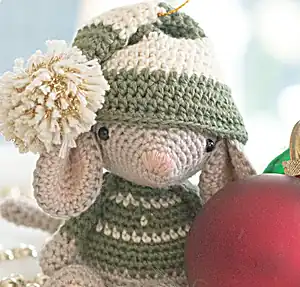
Create your own adorable Christmas companion with this charming Noel the Christmas Mouse pattern! This delightful little fellow stands at 12cm tall and features a festive green and white striped hat with a fluffy pom pom, making him the perfect addition to your holiday decorations. Whether you're looking to create a special ornament for your Christmas tree or a sweet handmade gift, Noel brings warmth and joy to any festive celebration.
Progress Tracker
0% Complete
— Head :
Info :
Starting from the tip of the nose, in Colour 18 Taupe
Round 1 :
Start 6 sc in a magic ring [6]
Round 2 :
(Sc in next st, inc in next st) x 3 [9]
Round 3 :
(Sc in each of next 2 st, inc in next st) x 3 [12]
Round 4 :
(Sc in each of next 3 st, inc in next st) x 3 [15]
Round 5 :
(Sc in each of next 4 st, inc in next st) x 3 [18]
Round 6 :
Sc in next st, inc in next st, sc in each of next 2 st, (inc in next st, sc in each of next 2 st) x 3, inc in next st, sc in each of next 2 st, inc in next st, sc in next st [24]
Info :
Mark the 8th/9th and 16th/17th stitches with spare yarn for eye and nose placement
Round 7 :
Sc in all 24 st [24]
Round 8 :
Sc in each of next 2 st, (inc in next st, sc in each of next 3 st) x 2, inc in next st, sc in each of next 2 st, inc in next st, (sc in each of next 3 st, inc in next st) x 2, sc in each of next 2 st [30]
Round 9 :
Sc in all 30 st [30]
Round 10 :
Sc in each of next 2 st, inc in next st, (sc in each of next 4 st, inc in next st) x 5, sc in each of next 2 st [36]
Round 11 :
Sc in each of next 3 st, (inc in next st, sc in each of next 5 st) x 2, inc in next st, sc in each of next 4 st, inc in next st, (sc in each of next 5 st, inc in next st) x 2, sc in each of next 3 st [42]
Round 12 :
Sc in each of next 3 st, inc in next st, (sc in each of next 6 st, inc in next st) x 5, sc in each of next 3 st [48]
Round 13-18 :
Sc in all 48 st [48]
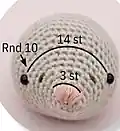
Infos :
Insert 5mm safety eyes between Round 9 and 10, 14 st apart. Use marked stitches as guide. Sew pink nose over Rounds 1-3 with embroidery thread. Start stuffing head firmly and continue as you crochet.
Round 19 :
(Sc in each of next 6 st, dec) x 6 [42]
Round 20 :
(Sc in each of next 5 st, dec) x 6 [36]
Round 21 :
(Sc in each of next 4 st, dec) x 6 [30]
Round 22 :
(Sc in each of next 3 st, dec) x 6 [24]
Round 23 :
Sc in all 24 st [24]
Round 24 :
(Sc in each of next 2 st, dec) x 6 [18]
Round 25 :
(Sc in next st, dec) x 6 [12]
Info :
Sl st in next st and fasten off, leaving long yarn tail. Close opening by weaving through front loops.
— Body :
Info :
Starting from bottom of body, in Colour 18 Taupe
Round 1 :
Start 6 sc in a magic ring [6]
Round 2 :
Inc in all 6 st [12]
Round 3 :
(Sc in next st, inc in next st) x 6 [18]
Round 4 :
(Sc in each of next 2 st, inc in next st) x 6 [24]
Round 5 :
(Sc in each of next 3 st, inc in next st) x 6 [30]
Round 6 :
(Sc in each of next 4 st, inc in next st) x 6 [36]
Round 7 :
(Sc in each of next 5 st, inc in next st) x 6 [42]
Round 8 :
(Sc in each of next 6 st, inc in next st) x 6 [48]
Round 9-11 :
Sc in all 48 st [48]
Info :
Change to Colour 42 Green yarn
Round 12 :
(Sc in each of next 6 st, dec) x 6 [42]
Round 13 :
Sc in all 42 st [42]
Round 14 :
(Sc in each of next 5 st, dec) x 6 [36]
Round 15 :
Sc in all 36 st [36]
Info :
Change to Colour 02 Off White yarn
Round 16 :
(Sc in each of next 10 st, dec) x 3 [33]
Info :
Change to Colour 42 Green yarn
Round 17 :
Sc in all 33 st [33]
Round 18 :
Sc in each of next 3 st, dec, (sc in each of next 9 st, dec) x 2, sc in each of next 6 st [30]. Optional: every 5th stitch in Off White
Round 19 :
Sc in all 30 st [30]
Info :
Change to Colour 02 Off White yarn
Round 20 :
Sc in each of next 5 st, dec, (sc in each of next 8 st, dec) x 2, sc in each of next 3 st [27]
Info :
Change to Colour 42 Green yarn
Round 21 :
Sc in each of next 5 st, dec, (sc in each of next 7 st, dec) x 2, sc in each of next 2 st [24]
Round 22 :
(Sc in each of next 2 st, dec) x 6 [18]
Info :
Sl st in next st and fasten off. Leave long tail to sew body to head. Stuff body firmly.
— Arms (Make 2) :
Info :
Starting from tip of arm, in Colour 18 Taupe
Round 1 :
Start 6 sc in a magic ring [6]
Round 2 :
(Sc in next st, inc in next st) x 3 [9]
Round 3-4 :
Sc in all 9 st [9]
Round 5 :
(Sc in next st, dec) x 2, sc in each of next 3 st [7]
Info :
Change to Colour 42 Green yarn
Round 6-11 :
Sc in all 7 st [7]
Round 12 :
Sc in each of next 3 st [3]. Leave remaining stitches unworked
Info :
Stuff hand firmly (Rounds 1-5), less further up. Flatten opening and sc through both layers to close.
— Legs (Make 2) :
Info :
Starting from base of leg, in Colour 08 Pink
Round 1 :
Start 6 sc in a magic ring [6]
Round 2 :
Inc in all 6 st [12]
Round 3 :
(Sc in next st, inc in next st) x 6 [18]
Info :
Change to Colour 18 Taupe yarn
Round 4 :
(Sc in each of next 2 st, inc in next st) x 6 [24]
Round 5-6 :
Sc in all 24 st [24]
Round 7 :
Sc in each of next 3 st, (dec, sc in next st) x 5, dec, sc in each of next 4 st [18]
Round 8 :
Sc in each of next 3 st, dec x 6, sc in each of next 3 st [12]
Round 9 :
(Sc in each of next 2 st, dec) x 3 [9]
Round 10-14 :
Sc in all 9 st [9]
Round 15 Left Leg :
Sc in each of next 2 st [2] Leave remaining unworked
Round 15 Right Leg :
Sc in each of next 7 st [7] Leave remaining unworked
Info :
Stuff leg firmly (Rounds 1-9), less further up. Flatten opening and sc through both layers to close.
— Inner Ears (Make 2) :
Info :
Starting from centre, in Colour 08 Pink
Round 1 :
Start 6 sc in a magic ring [6]
Round 2 :
Inc in all 6 st [12]
Round 3 :
(Sc in next st, inc in next st) x 6 [18]
Round 4 :
(Sc in each of next 2 st, inc in next st) x 6 [24]
Round 5 :
(Sc in each of next 3 st, inc in next st) x 6 [30]
Info :
Sl st in next st. Fasten off and weave in yarn tails.
— Outer Ears (Make 2) :
Info :
Starting from centre, in Colour 18 Taupe
Round 1 :
Start 6 sc in a magic ring [6]
Round 2 :
Inc in all 6 st [12]
Round 3 :
(Sc in next st, inc in next st) x 6 [18]
Round 4 :
(Sc in each of next 2 st, inc in next st) x 6 [24]
Round 5 :
(Sc in each of next 3 st, inc in next st) x 6 [30]
Round 6 :
Ch 1, sc in each of next 30 st through both inner and outer ear layers
Info :
Fold joined ears in half, sc in each of next 2 st through both layers, sl st. Leave long tail for sewing.
— Tail :
Info :
Starting from tip, in Colour 18 Taupe
Round 1 :
Start 6 sc in a magic ring [6]
Round 2 :
Sc in each of next 5 st, inc in next st [7]
Round 3-17 :
Sc in all 7 st [7]
Info :
Do not stuff. Flatten opening and sc through both layers to close.
— Hat :
Info :
Starting from tip, in Colour 42 Green with long starting tail
Round 1 :
Start 4 sc in a magic ring [4]
Round 2 :
(Sc in next st, inc in next st) x 2 [6]
Round 3 :
Sc in all 6 st [6]
Round 4 :
(Hdc in next st, hdc-inc in next st) x 3 [9]
Round 5 :
Hdc in all 9 st [9]
Round 6 :
(Hdc in each of next 2 st, hdc-inc in next st) x 3 [12]
Round 7 :
Hdc in all 12 st [12]
Info :
Change to Colour 02 Off White yarn
Round 8 :
(Hdc in each of next 3 st, hdc-inc in next st) x 3 [15]
Round 9 :
Hdc in all 15 st [15]
Round 10 :
(Hdc in each of next 4 st, hdc-inc in next st) x 3 [18]
Round 11 :
Hdc in all 18 st [18]
Info :
Change to Colour 42 Green yarn
Round 12 :
(Hdc in each of next 5 st, hdc-inc in next st) x 3 [21]
Round 13 :
Hdc in all 21 st [21]
Round 14 :
(Hdc in each of next 6 st, hdc-inc in next st) x 3 [24]
Round 15 :
Hdc in all 24 st [24]
Info :
Change to Colour 02 Off White yarn
Round 16 :
(Hdc in each of next 3 st, hdc-inc in next st) x 6 [30]
Round 17 :
Hdc in all 30 st [30]
Round 18 :
(Hdc in each of next 4 st, hdc-inc in next st) x 6 [36]
Round 19 :
Hdc in all 36 st [36]
Info :
Change to Colour 42 Green yarn
Round 20 :
(Hdc in each of next 5 st, hdc-inc in next st) x 6 [42]
Round 21 :
(Hdc in each of next 6 st, hdc-inc in next st) x 6 [48]
Round 22 :
Hdc in all 48 st [48]
Round 23 :
Sc in all 48 st [48]
Info :
Sl st in next st and fasten off. Make 35mm pom pom with Off White and gold yarn. Sew to tip and sew tip down to Rounds 20-21.
This delightful Noel the Christmas Mouse pattern brings festive magic to your holiday crafting! With his charming striped hat, sweet pink nose, and adorable proportions, Noel captures the warmth and joy of Christmas in every stitch. Perfect for tree ornaments, gifts, or seasonal decorations, this little mouse will become a treasured part of your holiday traditions. The clear instructions and helpful pictures make this an enjoyable project that results in a truly special handmade treasure. 🎄 Happy crocheting! 🧶✨