🧶 Beautiful ✨ Detailed 💝 Adorable

Ocean Mix Relaxed Crochet Cardigan Pattern

Ocean Mix Relaxed Crochet Cardigan Pattern
3.9★ Rating
5-7 Hours Time Needed
4.1K Made This
✂️

Beginner Friendly Level

Perfect for those just starting their crochet journey, with clear instructions and simple techniques

⏱️

Weekend Treat

Takes 5-7 hours, making it an enjoyable project to finish over a couple of days.

👕

Casual Chic

Relaxed style with a modern twist, perfect for everyday wear while maintaining that handcrafted uniqueness.

About This Ocean Mix Relaxed Crochet Cardigan Pattern

This pattern creates a relaxed, open-front crochet cardigan worked in Bernat Lattice yarn with a striped pattern using two contrast colors. The design features a V-stitch texture, puffed sleeve cuffs, and neckband extensions for a clean finish. Sizes range from XS/S through 4/5XL with color-change stripe instructions included.

Ocean Mix Relaxed Crochet Cardigan Pattern crochet pattern - detailed view of completed project

Written for size XS/S with color-coded numbers for larger sizes, the pattern includes full step-by-step rows and finishing notes. You will learn a simple Stripe Pattern and a horizontal-bar hdc (hdchb) technique for texture.

Why You'll Love This Ocean Mix Relaxed Crochet Cardigan Pattern

I absolutely love this pattern because it combines a relaxed, modern silhouette with an easy-to-follow textured stitch pattern that looks much more complicated than it is. I enjoy the gentle color striping created by alternating two yarns—it's forgiving and beautiful even for newer crocheters. The puffed cuff detail adds a thoughtful design touch that elevates the finished cardigan. Making this cardigan feels rewarding quickly because the V-stitch pattern works up efficiently and the assembly is straightforward.

Ocean Mix Relaxed Crochet Cardigan Pattern step 1 - construction progress Ocean Mix Relaxed Crochet Cardigan Pattern step 2 - assembly progress Ocean Mix Relaxed Crochet Cardigan Pattern step 3 - details and accessories Ocean Mix Relaxed Crochet Cardigan Pattern step 4 - final assembly and finishing

Switch Things Up

I love to change the color sequence to make each cardigan unique; you can swap the teal and ocean blues for contrasting brights or soft pastels to match your wardrobe.

For a chunkier, warmer cardigan try a bulkier yarn and a larger hook — this will scale the pattern up into a cozy outer layer quickly.

If you prefer a slimmer fit, use a lighter weight yarn and a smaller hook and check your gauge frequently to reach the desired measurements.

I often add decorative buttons or a simple crochet belt to the front for an alternative closure and a different look.

Try lengthening or shortening the body by adding or subtracting sets of V-st rows to make a cropped jacket or a longer coat style.

Change sleeve style by working fewer increases for a tapered sleeve or more increases for an exaggerated balloon sleeve effect.

I sometimes embroider small motifs onto the front panels or add a contrasting edged trim for a personalized finish.

To create a seamless look, carry both yarns up the side as you work color changes, or weave in ends neatly at each stripe transition.

Make a matching set by crocheting coordinating accessories like a hat or scarf using the same Stripe Pat and yarn combination.

If you want more structure at the neck, stitch the neckband a little longer before folding or add a row of slip stitches for a firmer finish.

Common Mistakes & How to Fix Them

✗ Skipping the stripe sequence will cause misaligned color bands; follow the Stripe Pat exactly (2 rows A, 2 rows B) and carry colors carefully when changing. ✗ Forgetting that ch-2 at the start of row does not count as a stitch will throw off counts; always treat ch-2 as turning chain only and count stitches per row as written. ✗ Not using hdchb correctly (working into horizontal bar below) will change the fabric texture; practice the hdchb technique on a swatch and follow the diagram for placement. ✗ Failing to measure until the specified lengths may result in incorrect armhole or neck shaping; check measurements against the pattern (eg. 15" [38 cm] before dividing) before proceeding. ✗ Skipping placing a marker at the dividing row will make it hard to measure neckband extension later; place a stitch marker at the end of the dividing row to track where to measure from.

Ocean Mix Relaxed Crochet Cardigan Pattern

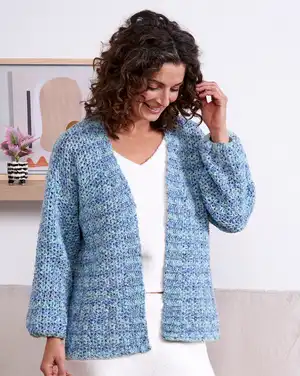
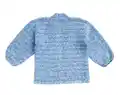
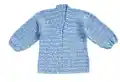
Create a relaxed, open-front cardigan worked in a soothing ocean-inspired stripe with Bernat Lattice yarn. This easy crochet pattern gives you a comfortable, slightly oversized fit with soft puffed sleeves and a simple V-stitch texture. Follow step-by-step instructions, size options from XS/S to 4/5XL, and helpful assembly notes to complete a beautiful handmade wardrobe staple. Perfect for gifting or keeping for cozy, everyday wear.

Beginner Friendly 5-7 Hours

Materials Needed for Ocean Mix Relaxed Crochet Cardigan Pattern

— Main Fabric

  • 01
    Bernat Lattice (7.8 oz/220 g; 389 yds/356 m) main yarn
  • 02
    Contrast A Teal Mix (19010) - XS/S: 2 balls (approx. 635 yds/572 m); M: 2 balls (approx. 692 yds/630 m); L: 2 balls (approx. 775 yds/705 m); XL: 3 balls (approx. 845 yds/768 m); 2/3XL: 3 balls (approx. 946 yds/865 m); 4/5XL: 3 balls (approx. 1067 yds/970 m)
  • 03
    Contrast B Ocean Blues (19011) - XS/S: 2 balls (approx. 635 yds/572 m); M: 2 balls (approx. 692 yds/630 m); L: 2 balls (approx. 775 yds/705 m); XL: 3 balls (approx. 845 yds/768 m); 2/3XL: 3 balls (approx. 946 yds/865 m); 4/5XL: 3 balls (approx. 1067 yds/970 m)

— Tools Required

  • 01
    Crochet hook size U.S. I/9 (5.5 mm) Susan Bates Silvalume or size needed to obtain gauge
  • 02
    Susan Bates stitch markers
  • 03
    Susan Bates yarn needle
  • 04
    Scissors
  • 05
    Measuring tape
  • 06
    Pins for assembly (optional)

Progress Tracker

0% Complete

— Stripe Pat :

Info :

With A, work 2 rows. With B, work 2 rows. These 4 rows form Stripe Pat.

— Body :

Info :

With A, ch 172 (187-205-223-241-262) (multiple of 3 + 16). See diagram on page 3.

1st row :

(RS). 1 hdc in 3rd ch from hook and each of next 6 ch. Skip next ch. *V-st in next ch. Skip next 2 ch. Rep from * to last 9 ch. V-st in next ch. Skip next ch. 1 hdc in each of last 7 ch. Turn. 52 (57-63-69-75-82) V-sts.

2nd row :

Ch 2. 1 hdchb in each of first 7 hdc. *V-st in next V-st. Rep from * to last 7 hdc. 1 hdchb in each of last 7 hdc. Turn.

Info :

First 2 rows of Stripe Pat are complete.

Keeping cont :

Keeping cont of Stripe Pat, rep last row for V-st Pat until work from beg measures 15" [38 cm], ending on a WS row.

Divide for Right Front and shape V-neck - 1st row :

(RS). Ch 2. 1 hdchb in each of first 7 hdc. (V-st in next V-st) 12 (14-15-17-18-20) times. Turn. Leave rem sts unworked.

2nd row :

Ch 2. V-st in each V-st to last 7 hdc. 1 hdchb in each of last 7 hdc. Turn.

3rd row :

Ch 2. 1 hdchb in each of first 7 hdc. 1 hdc in next V-st. V-st in each V-st to end of row. Turn. 11 (13-14-16-17-19) V-sts.

4th row :

Ch 2. V-st in each V-st to last 8 hdc. Skip next hdc. 1 hdchb in each of last 7 hdc. Turn.

5th row :

Ch 2. 1 hdchb in each of first 7 hdc. V-st in each V-st to end of row. Turn.

Keeping cont :

Keeping cont of Stripe Pat, rep 2nd to 5th rows 1 (3-2-4-3-4) time(s) more. 10 (10-12-12-14-15) V-sts.

Next row (WS) :

Ch 2. V-st in each V-st to last 7 hdc. 1 hdchb in each of last 7 hdc. Turn.

Next row :

Ch 2. 1 hdchb in each of first 7 hdc. V-st in each V-st to end of row. Turn.

Keeping cont :

Keeping cont of Stripe Pat, rep last 2 rows until work from dividing row measures 10 (10-11-11-12-13)" [25.5 (25.5-28-28-30.5-33) cm], ending on a WS row at end of last row.

Neckband extension - 1st row :

Ch 2. 1 hdchb in each of first 7 hdc. 1 hdc in first hdc of next V-st. Turn. Leave rem sts unworked.

2nd row :

Ch 2. 1 hdchb in each of next 8 hdc. Turn.

Keeping cont :

Keeping cont of Stripe Pat, rep last row until neckband extension from marked row measures 3 (3¼-3¾-4-4-4½)" [7.5 (8.5-8.5-10-10-11.5) cm], ending on a RS row. Fasten off.

— Back :

Info :

With RS facing, join appropriate color with sl st to first hdc of next unworked V-st. Keeping cont of Stripe Pat, proceed as follows.

1st row :

Ch 2. V-st in same sp as last sl st. V-st in each of next 27 (28-32-34-38-41) V-sts. Turn. Leave rem sts unworked. 28 (29-33-35-39-42) V-sts.

2nd row :

Ch 2. V-st in each V-st to end of row. Turn.

Keeping cont :

Keeping cont of Stripe Pat, rep last row until work from dividing row measures 10 (10-11-11-12-13)" [25.5 (25.5-28-28-30.5-33) cm], ending on a WS row. PM at end of last row.

— Left Front and shape V-neck :

Info :

With RS facing, join appropriate color with sl st to first hdc of next unworked V-st. Keeping cont of Stripe Pat, proceed as follows.

1st row :

(RS). Ch 2. V-st in same sp as last sl st. V-st in each V-st to last 7 hdc. 1 hdchb in each of last 7 hdc. Turn. 28 (29-33-35-39-42) V-sts.

2nd row :

Ch 2. 1 hdchb in each of first 7 hdc. V-st in each V-st to end of row. Turn.

3rd row :

Ch 2. V-st in each V-st to last 7 hdc. 1 hdchb in each of last 7 hdc. Turn. 11 (13-14-16-17-19) V-sts.

4th row :

Ch 2. 1 hdchb in each of first 7 hdc. V-st in each V-st to end of row. Turn.

5th row :

Ch 2. V-st in each V-st to last 8 hdc. Skip next hdc. 1 hdchb in each of last 7 hdc. Turn.

Keeping cont :

Keeping cont of Stripe Pat, rep last rows until work from dividing row measures 10 (10-11-11-12-13)" [25.5 (25.5-28-28-30.5-33) cm], ending on a WS row. Fasten off.

— Keeping cont of Stripe Pat (general) :

Info :

When instructed to keep cont of Stripe Pat, continue alternating 2 rows A and 2 rows B (the 4-row Stripe Pat) across the V-st pattern as established.

— Sleeves :

Info :

Note: Foundation ch for Sleeve is different than for Body to create "puffy cuff". With A, ch 25 (25-26-26-27-28). 1st row: (RS). 1 hdc in 3rd ch from hook. *V-st in each ch to end of chain. Turn. 23 (23-24-24-25-26) V-sts.

2nd row :

Ch 2. 1 hdc in first hdc. V-st in each V-st to last hdc. 1 hdc in last hdc. Turn.

First 2 rows :

First 2 rows of Stripe Pat are complete. Keeping cont of Stripe Pat, rep last row 4 (4-2-2-0-0) times more. 10 (10-12-12-14-15) V-sts. (Continue as pattern directs.)

Next row :

(RS). Ch 2. V-st in each V-st to last 7 hdc. 1 hdchb in each of last 7 hdc. Turn.

Next row :

Ch 2. 1 hdchb in each of first 7 hdc. V-st in each V-st to end of row. Turn. Keeping cont of Stripe Pat, rep last row 4 (4-2-2-0-0) times more.

Shape sides - 1st row :

(RS). Ch 2. 2 hdc in first hdc. V-st in each V-st to last hdc. 2 hdc in last hdc. Turn.

2nd row :

Ch 2. 1 hdc in each of first 2 hdc. V-st in each V-st to last 2 hdc. 1 hdc in each of last 2 hdc. Turn.

3rd row :

Ch 2. 2 hdc in first hdc. 1 hdc in next hdc. V-st in each V-st to last 2 hdc. 1 hdc in next hdc. 2 hdc in last hdc. Turn.

4th row :

Ch 2. 1 hdc in each of first 3 hdc. V-st in each V-st to last 3 hdc. 1 hdc in each of last 3 hdc. Turn.

5th row :

Ch 2. 2 hdc in first hdc. 1 hdc in each of next 2 hdc. V-st in each V-st to last 3 hdc. 1 hdc in each of last 3 hdc. 2 hdc in last hdc. Turn.

6th row :

Ch 2. 1 hdc in each of first 4 hdc. V-st in each V-st to last 4 hdc. 1 hdc in each of last 4 hdc. Turn.

7th row :

Ch 2. 1 hdc in first hdc. Skip next hdc. V-st in next hdc. Skip next hdc. V-st in each V-st to last 4 hdc. Skip next hdc. V-st in next hdc. Skip next hdc. 1 hdc in last hdc. Turn. 25 (25-26-26-27-28) V-sts.

8th row :

Ch 2. 1 hdc in first hdc. V-st in each V-st to last hdc. 1 hdc in last hdc. Turn. Keeping cont of Stripe Pat, rep last 8 rows 1 (1-2-2-3-3) time(s) more. 27 (27-30-30-33-34) V-sts.

Next row :

Ch 2. 1 hdchb in first hdc. V-st in each V-st to last hdc. 1 hdc in last hdc. Turn. Keeping cont of Stripe Pat, rep last row until work from beg measures 16" [40.5 cm], ending on a RS row. Fasten off.

— Finishing :

Finishing :

Sew shoulder seams. Sew sleeve seams. Sew in sleeves. Sew neckband extensions across back neck edge, meeting them at center back neck edge. Sew back seam.

Assembly Instructions

  • Sew shoulder seams together, matching stitch pattern and stripe placement, and secure with small whipstitches.
  • Sew sleeve seams by aligning underarm edges, then seam from cuff to underarm with small even stitches and fasten off securely.
  • Insert sleeves into armholes, matching center of sleeve top to shoulder seam, pin in place, then sew around the armhole to secure.
  • Sew neckband extensions across the back neck edge, meeting them at the center back neck edge and stitching edges evenly for a neat finish.
  • Sew any remaining back or side seams as needed to finish the cardigan shape, checking fit and symmetry before securing ends.

Important Notes

  • 💡Body is worked in one piece to armholes, then divided into Back and Fronts; place markers to mark dividing rows accurately.
  • 💡Ch 2 at beginning of row does not count as a stitch; treat it as the turning chain only when counting stitches.
  • 💡To change color, work to last 3 loops on hook and draw new color through last 3 loops, then proceed in the new color to maintain tidy color joins.
  • 💡Use stitch markers to mark ends of rows and dividing points to help measure neckband and sleeve placement precisely.

This relaxed, open-front cardigan brings soft, ocean-inspired stripes to your wardrobe with an easy V-stitch texture and cozy puffed cuffs. Whether you wear it layered over tees or dresses, it adds an effortless, handmade touch to your outfits. Make one for yourself or gift to a friend—crocheting this cardigan is a stylish, satisfying project! 🧶✨

You ask,

we answer.

FAQs

What size will the finished piece be?

Finished chest measurements are: XS/S 42" [106.5 cm], M 45½" [115.5 cm], L 50" [127 cm], XL 54" [137 cm], 2/3XL 58½" [148.5 cm], 4/5XL 63½" [161.5 cm].

Can I use different yarn weights for this pattern?

Yes, you can use different yarn weights, but this will affect the final size and drape; adjust hook size to achieve the gauge of 5½ V-sts and 9½ rows = 4" [10 cm].

Do I need prior crochet experience for this pattern?

This pattern is rated beginner friendly (skill level: Easy), so basic knowledge of stitches like hdc, V-st, and working hdchb is recommended.

How long does this project typically take to complete?

Most crocheters can complete this cardigan in about 5-7 hours, depending on size and experience, though time may vary.

How do I change colors cleanly for the Stripe Pat?

Work to the last 3 loops on the hook, draw the new color through the last 3 loops, then continue; alternate 2 rows of A and 2 rows of B to form the Stripe Pat.