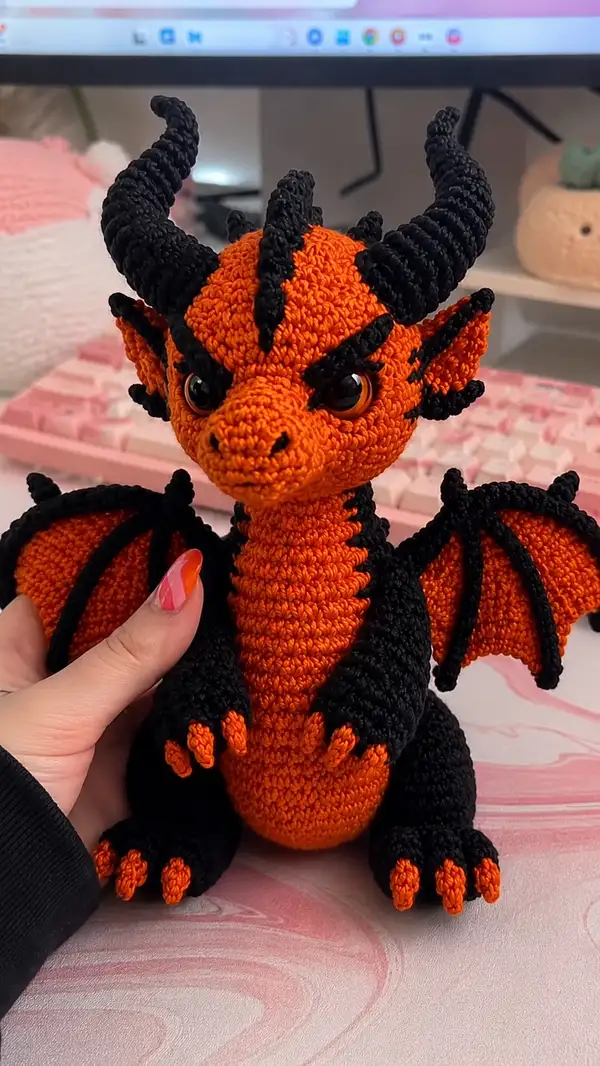
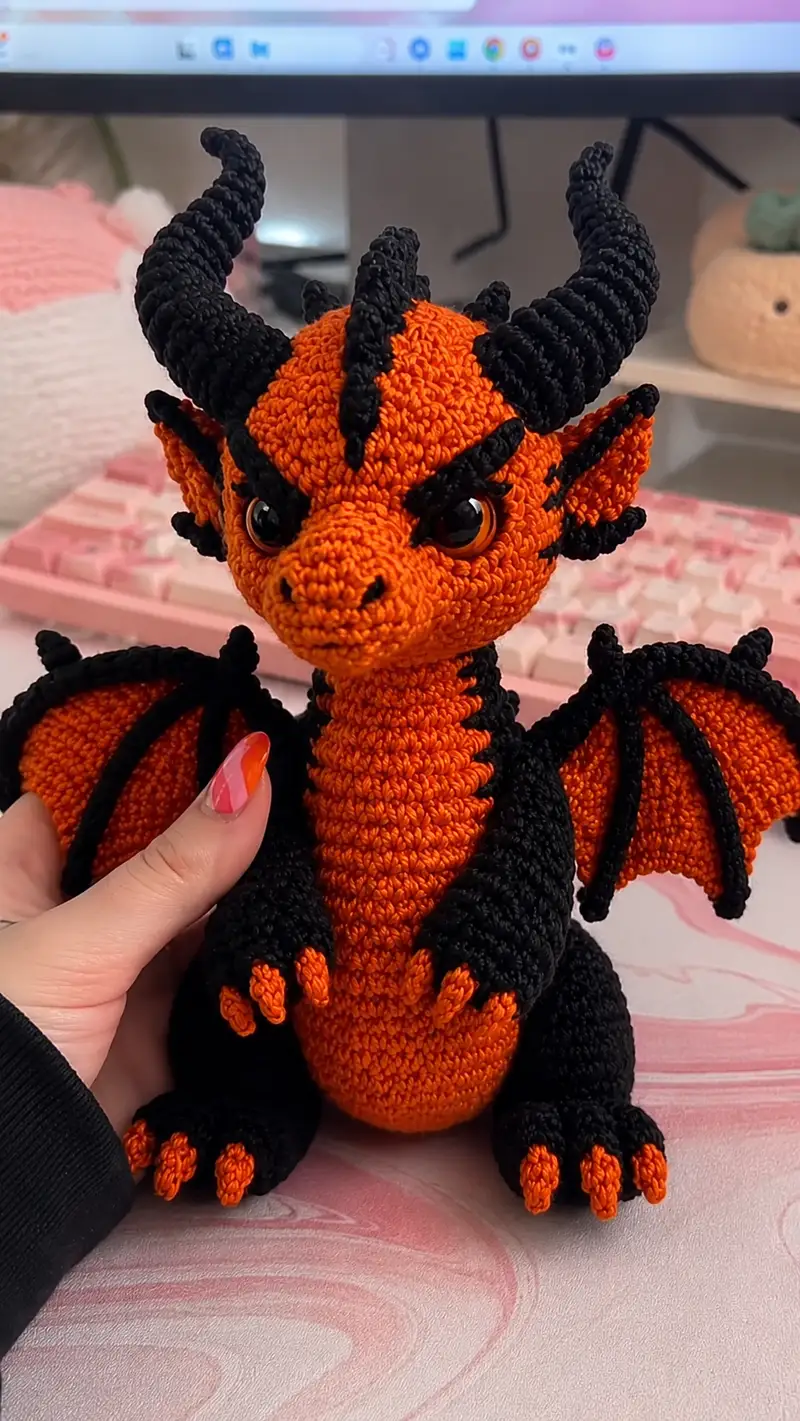
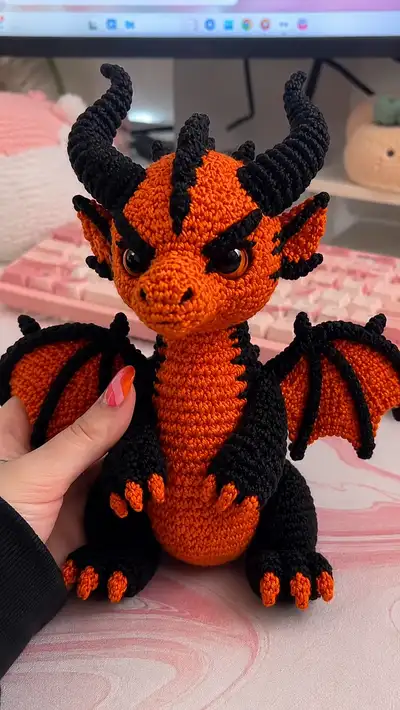
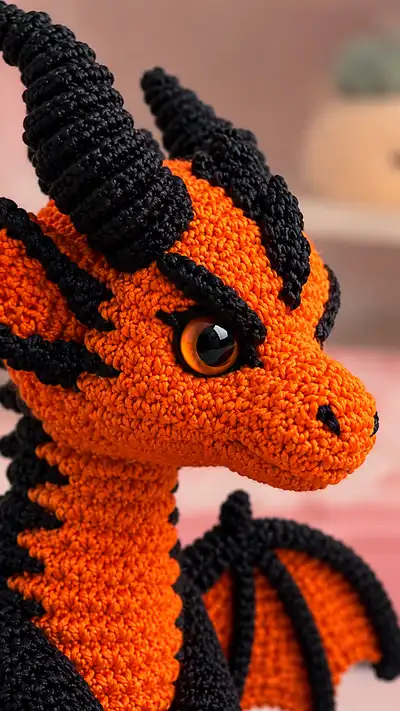
Create this fierce-yet-adorable orange and black dragon amigurumi with expressive eyes, twisted spiral horns, ribbed neck, and articulated wings. The pattern recreates the sculpted snout, layered black ridges, and contrast claws you see. Detailed round-by-round instructions guide you through head, neck, body, legs, arms, horns, wings, tail and finishing touches.
Progress Tracker
0% Complete
— Notes & Gauge :
Info :
This pattern is worked in continuous rounds unless otherwise stated. Use a stitch marker to mark the start of each round. Work tightly so stuffing does not show through. Numbers in parentheses show total stitches for the round. If you prefer a firmer texture, go down one hook size.
— Head :
Round 1 :
6 sc in magic ring (6)
Round 3 :
(1 sc, inc) x 6 (18)
Round 4 :
(2 sc, inc) x 6 (24)
Round 5 :
(3 sc, inc) x 6 (30)
Info :
Keep rounds even and tidy; the head uses a 48- to 54-st circumference at max — we will expand to 42-48 for this sculpted head.
Round 6 :
(4 sc, inc) x 6 (36)
Round 7 :
(5 sc, inc) x 6 (42)
Round 8 :
(6 sc, inc) x 6 (48)
Round 9 :
1 sc in each st (48)
Round 10 :
1 sc in each st (48)
Info :
Place safety eyes between rounds 12-13, approximately 12-14 stitches apart center-to-center for a friendly, intense expression. Use a pin to check placement — the eyes pictured sit slightly forward on the head, closer to the snout.
Round 11 :
1 sc in each st (48)
Round 12 :
1 sc in each st (48)
Round 13 :
1 sc in each st (48)
Info :
Mark the center front stitch of the head (this will be nose center). From that stitch, count 6 stitches to each side for eye placement as an approximate guide if you did not use the pin method.
Round 14 :
(6 sc, dec) x 6 (42)
Round 15 :
(5 sc, dec) x 6 (36)
Round 16 :
1 sc in each st (36)
Round 17 :
1 sc in each st (36)
Info :
Begin shaping snout by working a short muzzle section in front center — we will add the snout separately to ensure good sculpting. If your stitch tension is tight, you may need to switch to a slightly larger hook for snout rounds to avoid a too-small muzzle.
Round 18 :
(3 sc, dec) x 6 (30)
Round 19 :
(2 sc, dec) x 6 (24)
Round 20 :
1 sc in each st (24)
Round 21 :
1 sc in each st (24)
Info :
Start stuffing head firmly but not overly tight. Stuff broadly so the forehead and cheeks keep a rounded shape. Leave room in the snout area for the separate muzzle piece which will be attached and stuffed further.
Round 22 :
(2 sc, dec) x 6 (18)
Round 23 :
(1 sc, dec) x 6 (12)
Info :
Fasten off leaving a long tail for sewing the opening closed. Complete stuffing so the head holds shape and set aside gently.
Round 25 - Muzzle (worked separately) :
Make a small oval muzzle for the sculpted nose. Start: mr 6 sc (6)
Round 26 :
Inc in each st around (12)
Round 27 :
(1 sc, inc) x 6 (18)
Round 28 :
1 sc in each st (18)
Round 29 :
(2 sc, dec) x 6 (12)
Round 30 :
(1 sc, dec) x 4, sc in remaining 4 (8)
Info :
Stuff muzzle quite firmly to hold a nice nose shape. Use a small amount of fiberfill and shape with your needle. Sew muzzle to the front center of the head aligning nose tip with the center front marked earlier. Whip stitch neatly around the base then add a couple of strengthening stitches through head and muzzle to lock it in place.
Round 31 - Eyebrow Ridges (Make 2) :
Using black, ch 2, 4 sc in 2nd ch from hook, sl st to end, fasten off. Position above eye and sew in place with small invisible stitches for a raised ridge appearance. Repeat for both eyes.
Round 32 - Nose Embroidery :
Use black yarn and embroider two small nostrils on the muzzle with satin stitch. Anchor securely and weave in ends behind the muzzle.
Info :
Safety eyes: insert before sewing muzzle if you haven't already. Fit washers and ensure they are locked; apply a tiny dot of fabric glue behind washers if you want extra security. Check expression and adjust eyebrow ridges accordingly.
— Neck (ribbed design) :
Round 3 :
(1 sc, inc) x 6 (18)
Round 4 :
(2 sc, inc) x 6 (24)
Round 5-6 :
1 sc in each st (24)
Info :
The long neck on the model is ribbed using alternating rounds in BLO to create raised ridges. We'll work a tall tube and then use BLO rounds on every other round to create texture. Continue until you reach desired neck length (we will provide many rounds for height).
Round 7 :
1 sc in each st BLO (24)
Round 8 :
1 sc in each st (24)
Round 9 :
1 sc in each st BLO (24)
Round 10 :
1 sc in each st (24)
Round 11 :
1 sc in each st BLO (24)
Round 12 :
1 sc in each st (24)
Round 13 :
1 sc in each st BLO (24)
Round 14 :
1 sc in each st (24)
Round 15 :
1 sc in each st BLO (24)
Round 16 :
1 sc in each st (24)
Info :
Continue alternating BLO and full rounds until you have 18-24 total rounds for a long neck — the pictured neck has distinct ribs about 8-10 high due to the taller gauge; aim for 16 rounds total for this scale.
Round 17 :
1 sc in each st BLO (24)
Round 18 :
1 sc in each st (24)
Round 19 :
1 sc in each st BLO (24)
Round 20 :
1 sc in each st (24)
Info :
Leave a long tail to sew the neck to the body top later. Stuff the neck lightly so it is firm but still flexible. For a smoother join with the head, leave the top opening a little unstuffed and join after head is attached to body.
— Body :
Round 1 :
6 sc in magic ring (6)
Round 3 :
(1 sc, inc) x 6 (18)
Round 4 :
(2 sc, inc) x 6 (24)
Round 5 :
(3 sc, inc) x 6 (30)
Round 6 :
(4 sc, inc) x 6 (36)
Round 7 :
(5 sc, inc) x 6 (42)
Round 8 :
(6 sc, inc) x 6 (48)
Info :
The body increases form an oval base that peaks around 48 stitches. The model has a rounded belly and tapered top that will receive the neck. We'll work even rounds for height and then decrease gradually for the top where the neck attaches.
Round 9-14 :
1 sc in each st (48)
Round 15 :
(6 sc, dec) x 6 (42)
Round 16 :
(5 sc, dec) x 6 (36)
Info :
Begin stuffing the body firmly now, focusing on the lower belly to help the plush sit upright. The bottom should be very firm and round so the figure balances well.
Round 17 :
1 sc in each st (36)
Round 18 :
1 sc in each st (36)
Round 19 :
(4 sc, dec) x 6 (30)
Round 20 :
(3 sc, dec) x 6 (24)
Round 21 :
(2 sc, dec) x 6 (18)
Info :
Stop stuffing a little before the final decreases so you can shape the neck-to-body junction cleanly. Leave an opening to sew the neck and head assembly in place with a long tail.
Round 22 :
(1 sc, dec) x 6 (12)
Info :
Fasten off leaving a long tail for sewing. If you prefer, leave the bottom open and sew a felt circle inside to create a flat base for extra stability before closing completely.
— Arms (Make 2) :
Round 1 :
mr 6 sc (6) in black
Round 3 :
(1 sc, inc) x 6 (18)
Round 4 :
1 sc in each st (18)
Round 5 :
1 sc in each st (18)
Info :
The arms are black with small orange claws. Work the palm and lower arm in black, then switch to orange for the claw tips in the final rounds.
Round 6 :
1 sc in each st (18)
Round 7 :
(3 sc, dec) x 3 (15)
Round 8 :
1 sc in each st (15)
Round 9 :
Change to orange. 1 sc in each st (15)
Round 10 :
(2 sc, dec) x 3 (12)
Round 11 :
Change to black, 1 sc in each st (12)
Round 12 :
1 sc in each st (12)
Round 13 - Claws :
Using orange, make 3 small claw bumps across the end: attach yarn, ch 2, 3 sc in 2nd ch from hook, sl st back to seam, repeat spaced evenly, fasten off leaving tail to sew down. Alternatively, work single crochet bumps by 1 sc, ch1, 1 sc in same stitch to form three raised claws.
Info :
Stuff hands firmly but leave the top opening slightly open to sew the arms to the body. Sew arms to body between rounds 18-22 on sides for natural placement; see assembly section for exact placement guidance.
— Legs (Make 2) :
Round 1 :
mr 6 sc (6) in black
Round 3 :
(1 sc, inc) x 6 (18)
Round 4 :
(2 sc, inc) x 6 (24)
Round 5 :
1 sc in each st (24)
Round 6 :
1 sc in each st (24)
Info :
Legs are sturdy and black with orange toe claws. The foot is worked then the ankle and short upper leg. Reinforce the sole with a tight weave of stitches or an inserted felt piece if needing extra stability.
Round 7 :
(4 sc, inc) x 4, 2 sc (28)
Round 8 :
1 sc in each st (28)
Round 9 :
(5 sc, inc) x 4 (32)
Round 10-12 :
1 sc in each st (32)
Round 13 :
(5 sc, dec) x 4 (28)
Round 14 :
Change to orange for toes. 1 sc in each st (28)
Round 15 :
(3 sc, dec) x 6 (22)
Round 16 :
Work toes: create three small claws by making 3 small bump motifs across the front of the foot using orange as for arms. Fasten off and leave tail for sewing.
Info :
Stuff feet firmly to create a flat base and ensure the toy can sit upright. Sew legs to bottom of body, aligning the front edges with the belly seam, spacing them evenly for balance (see assembly).
— Horns (Make 2 spiral twisted horns) :
Info :
Horns are constructed as spiraled cones. Use a slightly smaller hook to keep a dense spiral. Work in continuous rounds; spiral effect is achieved by occasional increases and working in back loops to emphasize ridges. Optionally insert wire for poseable horns.
Round 1 :
Using black, mr 6 sc (6)
Round 3 :
(1 sc, inc) x 6 (18)
Round 4 :
(2 sc, inc) x 6 (24)
Round 5 :
(3 sc, inc) x 6 (30)
Round 6 :
Work 1 sc in each st BLO (30)
Round 7 :
1 sc in each st (30)
Round 8 :
(4 sc, dec) x 5, sc in remaining 10 (25)
Round 9 :
1 sc in each st BLO (25)
Round 10 :
1 sc in each st (25)
Round 11 :
(3 sc, dec) x 5 (20)
Round 12 :
1 sc in each st BLO (20)
Round 13 :
1 sc in each st (20)
Round 14 :
(2 sc, dec) x 5 (15)
Round 15 :
1 sc in each st BLO (15)
Round 16 :
(1 sc, dec) x 5 (10)
Round 17 :
1 sc in each st BLO (10)
Info :
Do not fasten off yet. Insert a short length of wire for poseability if desired. To create the spiral look, continue wrapping a small i-cord of sc around the horn base and sew spirally up the horn, or alternate between BLO and full rounds to form ridges. Make the horn taper sharper by sewing a running stitch to twist slightly after stuffing.
Round 19 :
Fasten off leaving a long tail to sew horn securely to head. Make second horn matching the first and pair them symmetrically over the crown.
— Head Spines & Brow Spikes (Make multiples) :
Round 1 :
With black, ch 3, 3 sc in 2nd ch from hook, 1 sc in next, sl st, fasten off (small teardrop spike). Make 6-8 for the top ridge and 2 small ones for brows. Sew along crown from forehead center to back in spaced increments, following the reference photo spacing.
Info :
Sew spikes to top center of head in descending size. Use pins to line them up symmetrically. The brow spikes are short and should sit just above the safety eyes to emphasize expression.
— Wings (Make 2) :
Wing Panel - Round 1 :
Using orange, ch 12, sc in 2nd ch from hook, sc across (11)
Round 2 :
Ch1, turn, sc across (11)
Round 3 :
Inc at first and last st to create slight curve: 2 sc, 7 sc, 2 sc (13)
Round 4 :
Work along edge increasing at points to create a rounded wing shape, aim for 20-26 sts around outer edge while keeping inner edge straight where it will attach to body
Round 5 :
Fasten off orange. With black, join at outer edge and work 1 sc in each st around to create a black border (this forms membrane trim).
Wing Ribs :
Make 3-4 ribs per wing from black: ch length equal to membrane curve (approx 8-12 ch), sc back along chain to make a tight rope, fasten off leaving tail. Position ribs evenly across the wing and sew one end to the top join (near shoulder) and the other near outer edge to create the webbing effect. For the raised piping on the membrane ribs, use a thin crocheted i-cord or rope and sew on top of ribs to match the image.
Info :
Optionally insert flexible wire inside each rib rope before sewing so ribs hold an arched position. The wings pictured are edged black with orange membranes and black ribs creating a skeletal look.
Wing Attachment Edge :
Work a small sc edge along the wing inner curve in black to have a neat seam for sewing to the body. Leave long tail for attachment.
— Tail :
Round 1 :
mr 6 sc in orange (6)
Round 3 :
(1 sc, inc) x 6 (18)
Round 4-8 :
1 sc in each st (18)
Round 9 :
(2 sc, dec) x 6 (12)
Round 10-16 :
1 sc in each st (12). Add small black spikes along the top of the tail by sewing small teardrop spikes (same technique as head spikes) at intervals along the top center of tail. Continue tapering if desired by decreasing gradually after round 16.
Info :
Tail length should match scale of body; the pictured model has a medium-length tail with about 12-16 rounds. Stuff lightly and leave long tail for sewing to back center of body at lower rounds (about body round 7–10).
— Belly Scales / Chest Stripe (Optional) :
Info :
Create a vertical panel of orange or darker orange using sc rows to sew onto the front of the body for a defined belly. Work a rectangular panel to fit and then sew down the sides. The pictured dragon has an orange center belly contrasted by black sides — recreate by crocheting those panels separately and sewing them in place.
— Finishing Details :
Eye Surrounds :
Use black yarn to create small raised circles around the safety eyes: work 6-8 sc in a small ring but do not close tightly; instead lay this ring around the eye and sew carefully to create the framed look seen in photo.
Nose & Mouth Embroidery :
Use black yarn to stitch small nostrils and a short smile line under the snout. A few short straight stitches create the smile impression. Be careful to keep stitches tidy and anchor well inside the head away from visible surface.
Claw Definition :
Use small orange bump motifs sewn onto the black paw ends to create toe claws as seen. Secure tightly and hide ends inside the paw interior.
Info :
Weave in all ends and trim close. Use pins to position wings, head, arms and legs, then sew firmly using the long tails left from pieces. Reinforce high-stress attachment points with extra passes of yarn for stability.
— Decorative Ridges (Black lines on head, neck and back) :
Info :
These raised decorative ridges are created using short tubes or single crochet ropes in black (approx 2-6 stitches length) sewn onto the surface. Make several ropes by chaining 6-12, then working sc back along chain to make dense cord. Sew cords in pattern on top of head, along neck ribs, and down the back. Position symmetrical cords on each side of the head for the striped look in the photos.
— Assembly :
Info :
Pin parts in position before stitching. Use a strong whip stitch or ladder stitch to attach parts. Match left and right placements by counting stitches from the center line on the body and head. For a seamless look, sew through the inner edge of both pieces and tighten gradually.
This fierce little dragon brings bold color and sculpted charm to your handmade collection! Every ridge, claw and twisted horn adds character as you stitch them into place. The detailed steps help you recreate the expression and posture seen in the photos — a satisfying project you'll be proud to display. 🐉🧶 Pop on your favorite podcast, and enjoy bringing this fiery friend to life. Share your finished dragon with others for a smile! ✨